Setting up a LAN connection with Windscribe means one of two things, and it helps to know which you need. The first is an app-level setting called Allow LAN Traffic, which lets the devices on your home network see each other while your internet traffic still routes through the VPN. The second is a network-wide setup, where the VPN runs on your router and covers every device at once. This guide walks through both, plus a middle option that shares one PC's connection to a console or smart TV.
We tested the whole flow on Windows, from a fresh install through to the router config generator. Each method serves a different goal, so we cover download, sign-in, protocol choice, and how to verify the connection actually works. We also flag the paid-plan requirement early, because it trips people up before they even start.
What "LAN connection with Windscribe" actually means (app LAN traffic vs. router/network-wide VPN)
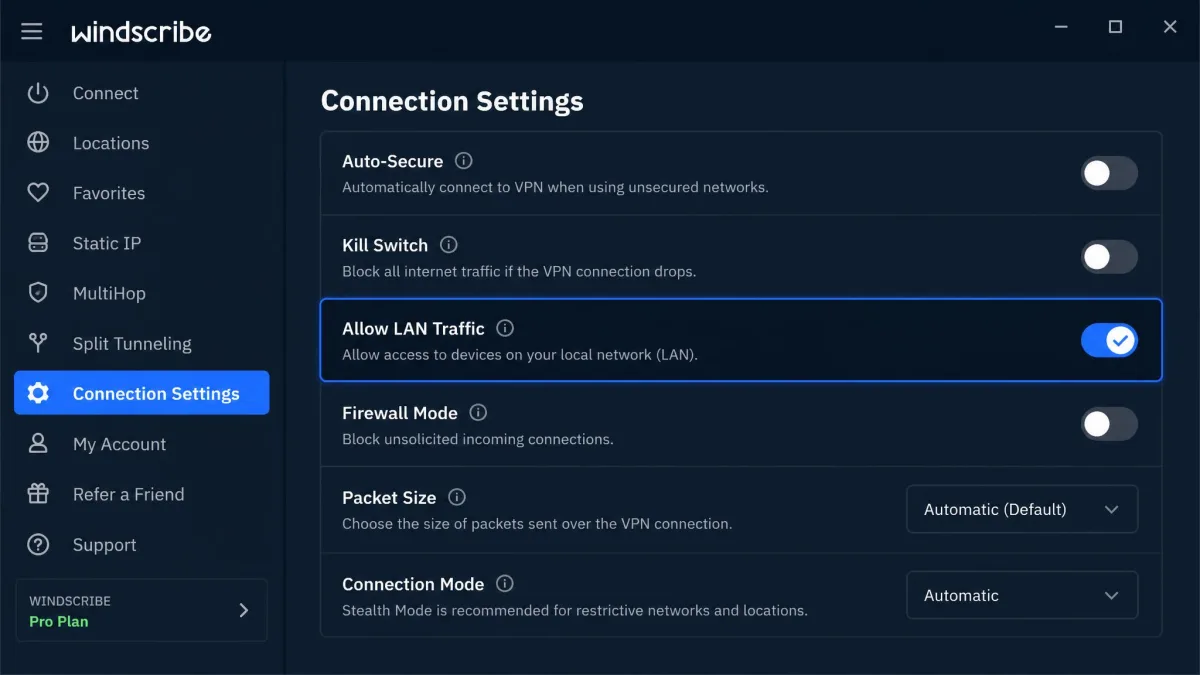
People search for this phrase with two different setups in mind. One is local device visibility. When you connect a VPN, the app can block traffic between your computer and other devices on the same network, so a printer, a NAS, or a media server stops responding. The Allow LAN Traffic setting fixes that. It lets local devices reach each other while your internet traffic still routes through the encrypted VPN tunnel and stays hidden from your ISP.
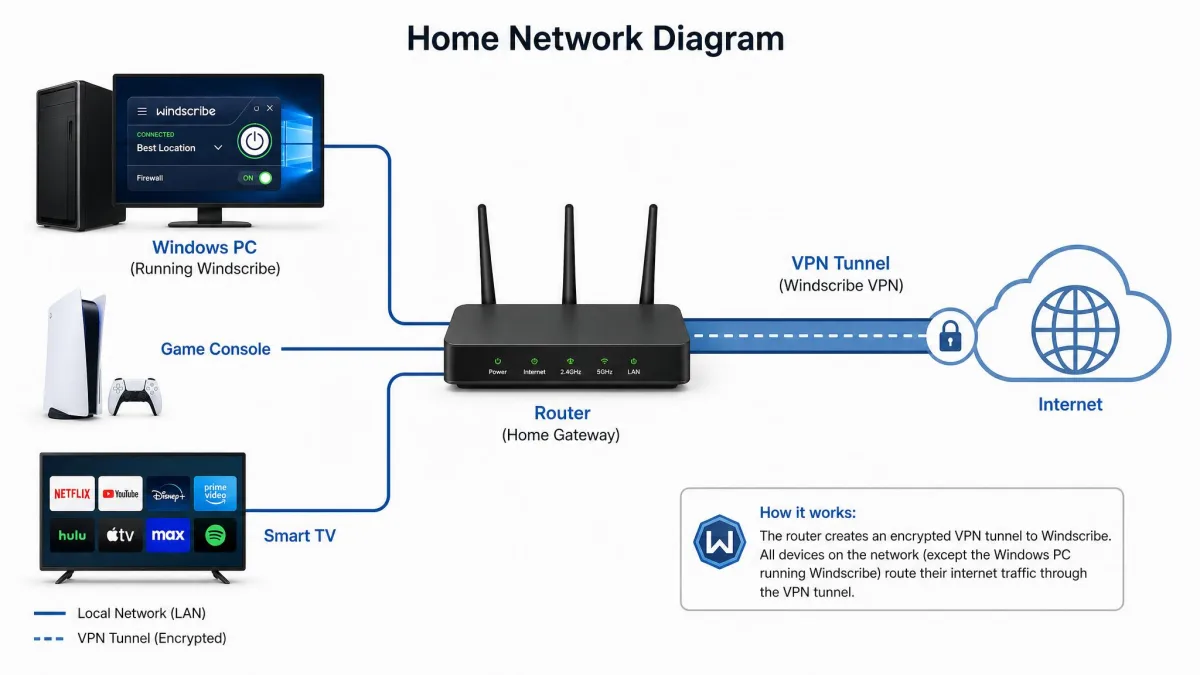
The other setup is network-wide protection. Here Windscribe runs on the router itself, so every device on the LAN uses the VPN without installing anything. This is more work and has stricter requirements. We treat both paths as separate methods below, and we add a third for sharing one machine's connection.
Before You Start: Prerequisites
A few things need to be in place before any of these methods will work. Sorting them out now saves time later.
Windscribe account and plan requirements (Config Generator needs Pro/Build-A-Plan)
The app-level Allow LAN Traffic setting works on any account, including the free tier. The free plan provides 15GB of data per month once you confirm your account email, which is enough for basic use.
Router setup is different. Downloading router config files from the Windscribe Config Generators requires a Pro or Build-A-Plan paid subscription. Free accounts cannot access the generator. The Pro plan is $9.00 per month billed monthly, or $69 per year, which works out to $5.75 per month. Build-A-Plan is a cheaper alternative at $1.00 per location per month, with a $3 minimum, and it also unlocks the config generator.
What you need on your network
For the app method, you need a Windows PC and the devices you want to reach on the same local network. For the sharing method, you need one PC running Windscribe plus an Ethernet or Wi-Fi path to the device you are sharing with. For router setup, you need a router that supports VPN client mode. Most standard ISP routers lack VPN client capability, so router-wide setup often needs third-party firmware or a router with native OpenVPN or WireGuard support.
Method 1: Enabling LAN Traffic in the Windscribe App
This is the method most people need. It takes only a few minutes and works on any plan.
Step 1: Download and install Windscribe
Go to the official Windscribe app page and download the desktop client for your operating system. Run the installer and accept the default options unless you have a reason to change them. In our testing, creating an account and installing the app took only about three minutes, and you can connect on the free tier without paying.
Step 2: Sign in / activate your account
Open the app and sign in with your username and password. If you do not have an account yet, create one and confirm your email to unlock the full free data allowance. Once you are signed in, the app is ready to connect. Note that the browser extension alone does not protect all device traffic, so install the desktop app for full coverage.
Step 3: Open Connection Settings and allow LAN traffic
Open the app's Connection Settings and look for the Allow LAN Traffic option. Turn it on. This tells Windscribe to leave local network traffic alone while it keeps routing your internet traffic through the tunnel. Your devices can now find each other again.
Allowing LAN traffic opens your machine to other devices on the same network. On your own trusted home network this is fine. On public or shared Wi-Fi, leave it off, because it exposes your device to strangers on that network.
Step 4: Reconnect and confirm devices see each other
Disconnect and reconnect Windscribe so the new setting takes effect. Then check that your local devices respond again. Try opening a shared folder, printing a test page, or reaching your NAS. If a device still does not appear, confirm every device sits on the same network, then restart the router and the devices.
Method 2: Sharing the Windscribe Connection Across Your LAN (Internet Connection Sharing)
If a device cannot run Windscribe itself, such as a game console or an older smart TV, you can share a PC's VPN connection to it. This uses the built-in Windows Internet Connection Sharing feature.
Step 1: Choose your protocol (UDP / WireGuard)
Set the app protocol to UDP or WireGuard before you share. These protocols share cleanly through Windows, and WireGuard adds speed. Connect to a nearby server first, then confirm the VPN is active.
Pick a server close to your location for the best speed, and test the shared connection over wired Ethernet before trying Wi-Fi. A short, wired hop removes one variable when something feels slow.
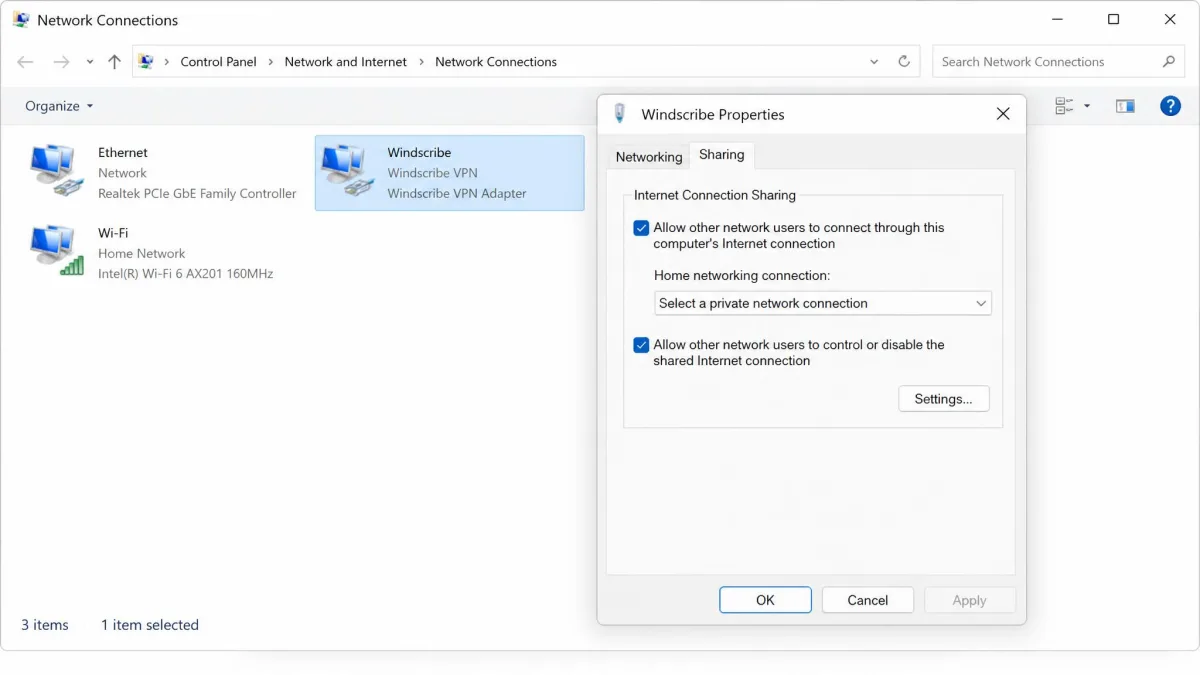
Step 2: Share the connection from Network Connections
Open the Windows Network Connections panel. Find the Windscribe virtual adapter, open its properties, and enable sharing to the network adapter that reaches your other device. Windows will route that device's traffic through the VPN tunnel on your PC.
Step 3: Connect other devices (console, smart TV, PC)
Connect the console, TV, or second PC to the shared adapter, usually over Ethernet. The device now reaches the internet through Windscribe without running the app itself. Keep the host PC on and connected, because the shared device depends on it.

Method 3: Network-Wide Setup on Your Router
Running Windscribe on the router covers every device at once. This is the most involved path, and the exact steps vary significantly by router model and firmware.
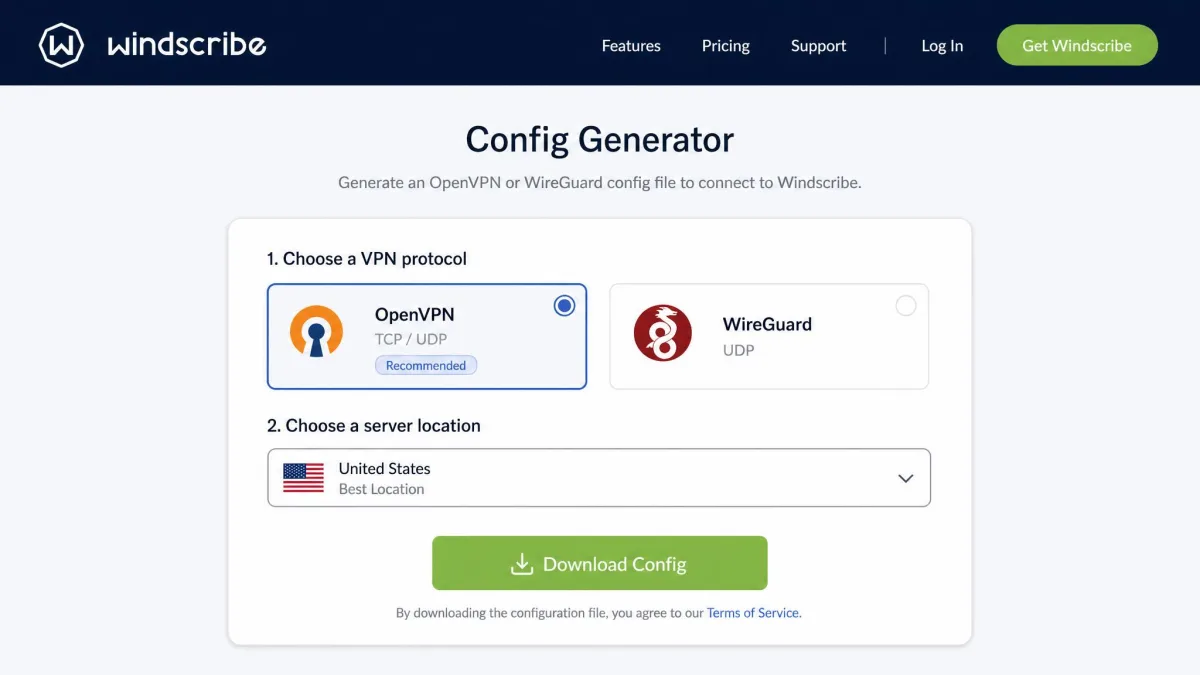
Step 1: Generate an OpenVPN or WireGuard config file
Sign in to your Windscribe account and open the config generator. Router setup supports OpenVPN over UDP or TCP, and WireGuard over UDP on select newer router models. Choose your protocol and server location, then download the config file. Remember that the generator needs a Pro or Build-A-Plan subscription.
Windscribe's official router guide covers stock firmware for ASUS, TP-Link Archer, TP-Link Deco, and GL.iNet routers. DD-WRT, OpenWrt, and Tomato firmware need their own firmware-specific steps.
Step 2: Access your router's admin panel / VPN client section
Open your router's admin panel in a browser and find the VPN client section. Many routers with stock firmware do not support outbound VPN client connections, so verify your model supports VPN client mode before going further. If it does not, third-party firmware or a VPN-ready router is your route.
Step 3: Import the config and activate the connection
Upload the config file into the VPN client section and enter your Windscribe credentials where the router asks. Save the profile and activate it. The router now connects to Windscribe on behalf of the whole network.
Step 4: Assign devices to the VPN profile
Some routers let you send only chosen devices through the VPN and leave others on the normal connection. Assign devices to the VPN profile as needed. This keeps a smart TV on the tunnel while a work laptop uses the plain line, if that suits you.
Verifying the Connection (IP check and DNS-leak test)
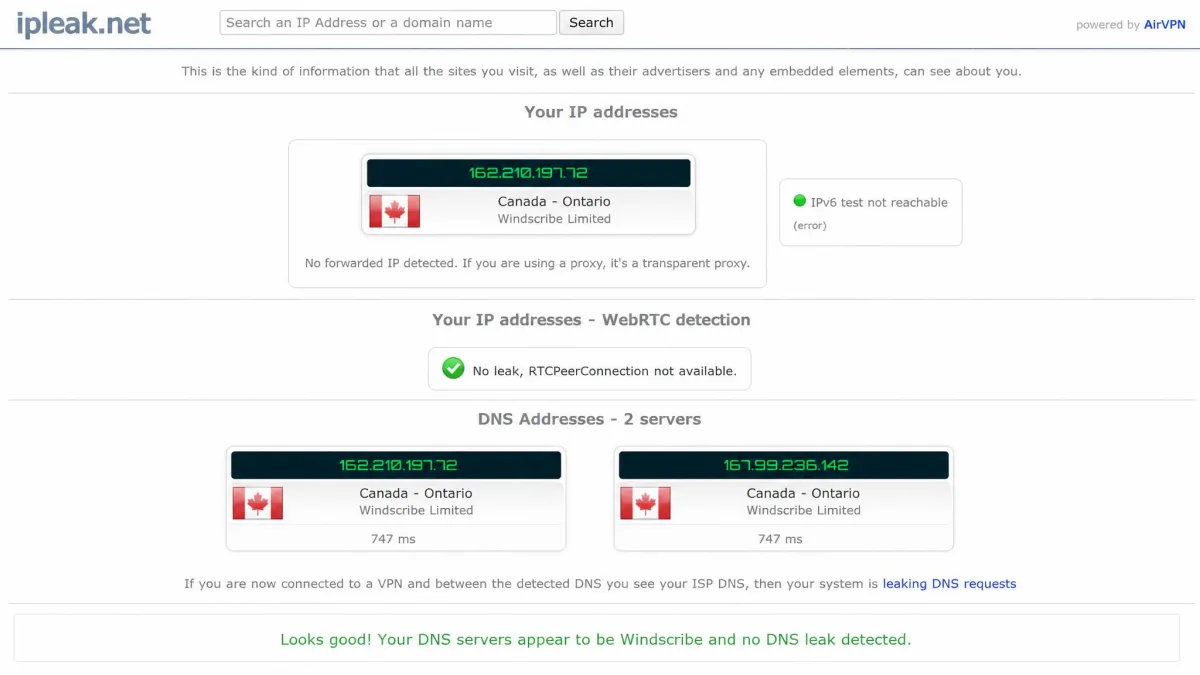
Never trust a VPN connection until you have checked it. First, confirm your public IP address changed to the server location you chose. Then run a leak test at ipleak.net to make sure your DNS requests are not slipping outside the tunnel. If your real ISP or location shows up, the tunnel is leaking.
Some setups leak IPv6 even when IPv4 looks clean. Run these checks after every method above, and repeat them whenever you change protocol or server.
Troubleshooting Common LAN + Windscribe Issues
Most problems fall into a few buckets. When a connection fails outright, switching the protocol and trying again usually clears it. WireGuard, OpenVPN, and Stealth each behave differently on different networks, and Stealth helps on networks that block standard VPN traffic.
When local devices cannot see each other on the LAN, confirm all devices are on the same network, then restart the router and the devices. For streaming that refuses to unblock, clearing your browser cookies before connecting often helps, and mobile apps sometimes check region settings separately from your chosen server. For router setups that will not connect at all, the cause is usually a router that lacks VPN client support rather than a bad config.
When we hit a stubborn connection during setup, cycling the protocol was the fix more often than any other single step. It is the first thing we try before touching anything deeper.
Security Notes: What "Allow LAN Traffic" Does to Your Privacy
Allow LAN Traffic changes what your local network can reach, not what leaves your machine for the internet. With it on, other devices on the same network can talk to your computer, while your internet traffic still travels through the encrypted VPN tunnel and stays hidden from your ISP. Your outbound privacy is unchanged.
The tradeoff is local exposure. On a home network you control, that exposure is acceptable, since you know every device on it. On untrusted networks, such as a café or a hotel, leave the setting off so strangers on that network cannot probe your device. Treat it as a home-only convenience.
Frequently Asked Questions
Do I need a paid Windscribe plan for LAN or router setup?
Does allowing LAN traffic reduce my privacy?
Will my devices still be protected when LAN traffic is allowed?
Can I share the Windscribe connection to a console or smart TV?
Why can't my devices see each other on the LAN?
Which protocol should I choose for the fastest connection?
Conclusion
Setting up a LAN connection with Windscribe comes down to picking the right method for your goal. For local device visibility, the app's Allow LAN Traffic setting is all you need, and it works on any plan. For sharing one connection to a console or TV, Internet Connection Sharing bridges the gap. For whole-network coverage, the router method delivers it, provided your hardware supports VPN client mode and your account can reach the config generator.
Whichever path you take, choose your protocol with speed versus compatibility in mind, then verify the result with an IP check and a DNS-leak test. A working setup you have confirmed beats a setup you only assume is working.