
OpenVPN is an open-source SSL/TLS virtual private network that builds an encrypted tunnel between a server and its clients. If you want the background first, our guide to what OpenVPN is and how it works covers the fundamentals. It runs on Windows, Linux, and macOS, uses certificate-based authentication through its own EasyRSA tooling, and works in either routed or bridged mode. Because it is free and self-hosted, you control every part of the setup, from the certificate authority to the firewall rules. This guide walks through the full process: installing the software, building the public key infrastructure, writing the server configuration, opening the network path, and connecting your first client. We use the OpenVPN Community Edition throughout, and each step lists the exact commands you run. By the end, you will have a working tunnel and a checklist for hardening it.
What You Need Before You Start
Before you install anything, confirm a few prerequisites. You need a machine that will act as the server, either a Linux host such as Ubuntu or Debian, or a Windows machine. You need administrator or root access, because installing drivers and binding network ports both require elevated rights. You also need a second device to act as the client for testing the connection.
Plan your addressing before you begin. The server needs a static IP on your local network or a reserved lease from your router. If clients will connect from the internet, you need either a public IP or a dynamic DNS hostname, plus the ability to forward a port on your router. OpenVPN defaults to UDP 1194, so keep that port in mind for the firewall step later.
Paths differ between platforms. On Linux the configuration lives under /etc/openvpn, while on Windows the default install directory is C:\Program Files\OpenVPN, with its own config and log subfolders. We note both paths as each step comes up so you can follow along on either system.
Step 1: Download and Install OpenVPN
The install differs by operating system, but the goal is the same: get the OpenVPN binary and the EasyRSA scripts onto the server. We recommend downloading the current installer straight from the project rather than a third-party mirror, so you always get a signed, up-to-date build.
Installing on Windows
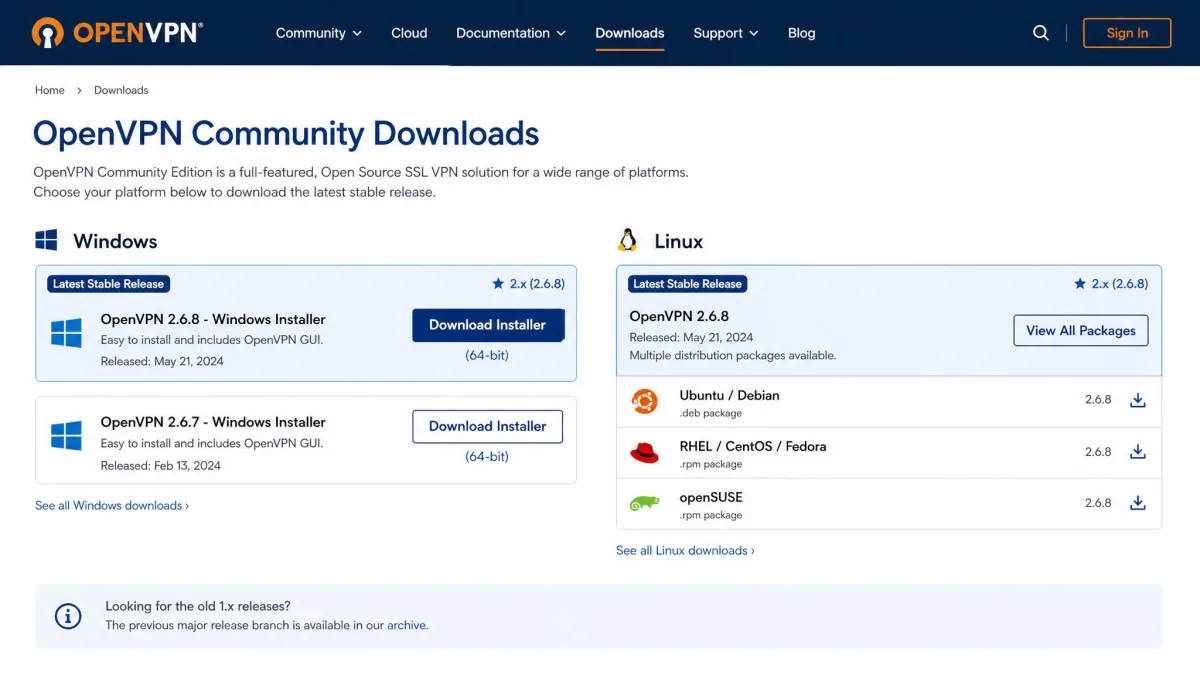
Download the latest Windows installer from the OpenVPN community downloads page and run it. The installer offers a choice of virtual network driver. Newer 2.7 installers default to the Data Channel Offload (DCO) driver, while older builds ship the TAP-Windows6 driver for legacy setups. Accept the driver the current installer recommends unless you have a specific reason to change it.
When the installer asks which network driver to install, take the one it selects by default. The DCO driver on current builds gives the best throughput, and only older configurations need the legacy TAP adapter. Changing this without a reason is a common source of connection trouble later.
After the install finishes, the software sits in C:\Program Files\OpenVPN. The GUI client and the OpenVPN service are both installed. Note that the Windows GUI needs to run as administrator, because it cannot bring up the virtual adapter without elevated rights. We set the shortcut to always run as administrator so a connection never silently fails on that point.
Installing on Linux (Ubuntu/Debian)
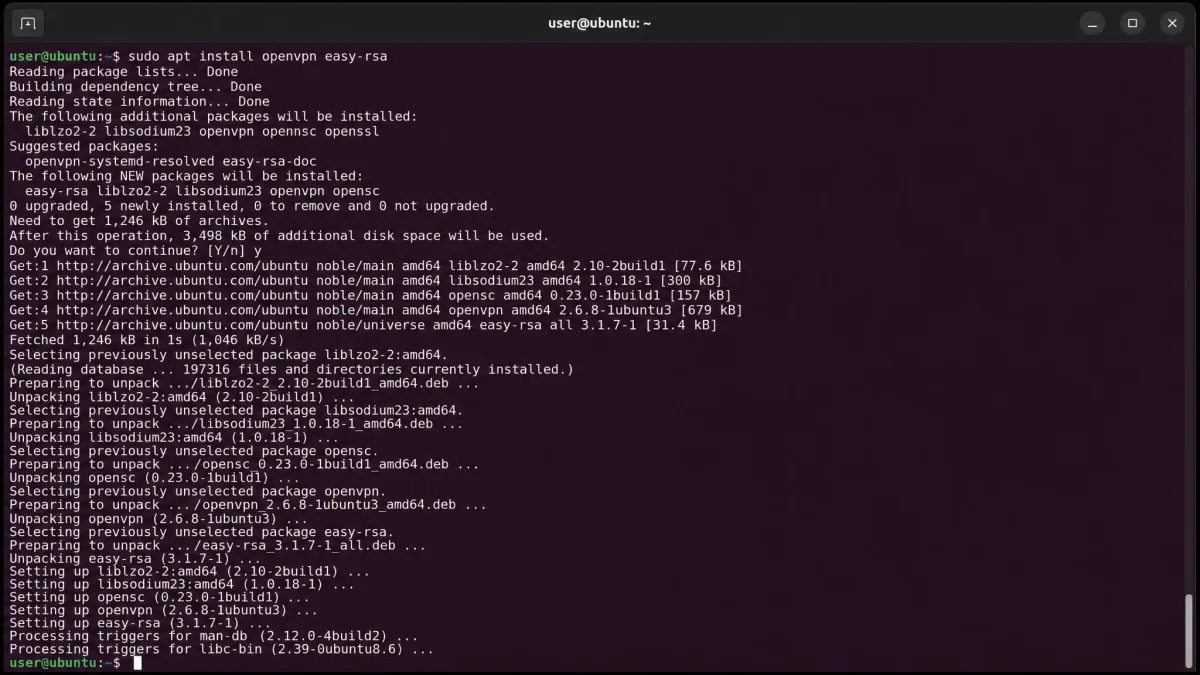
On Ubuntu or Debian, the software and its PKI tooling install from the standard repositories with one command:
sudo apt install openvpn easy-rsaThis pulls in the OpenVPN daemon plus the EasyRSA scripts you use in the next step. Once it completes, the daemon is available as a systemd service, and configuration files belong in /etc/openvpn. You do not start the service yet, because there is no configuration or certificate for it to load.
Step 2: Set Up the Public Key Infrastructure (PKI) with EasyRSA
OpenVPN authenticates with certificates rather than shared passwords. To issue those certificates you build a small public key infrastructure using EasyRSA. This is the most error-prone part of the whole setup, because a single mismatched or unsigned certificate stops the tunnel from establishing. Work through it carefully and keep the certificate authority key private.
The overall flow is straightforward. You create a working directory, initialize the PKI, build the certificate authority, then generate and sign a certificate for the server and one for each client. EasyRSA handles the cryptography; your job is to run the steps in order and answer the prompts.
The certificate authority key is the master key for your whole VPN. Anyone who holds it can issue certificates that your server will trust. Build the CA on the server or an offline machine, never share the ca.key file, and back it up somewhere secure. If it leaks, you must rebuild the entire PKI.
Create the Certificate Authority (CA)
Start by making a copy of the EasyRSA directory so upgrades do not overwrite your keys, then initialize the PKI and build the CA:
make-cadir ~/openvpn-ca
cd ~/openvpn-ca
./easyrsa init-pki
./easyrsa build-ca
The build-ca step asks for a passphrase and a common name. This produces ca.crt, the public certificate every client and the server will trust, and ca.key, the private key you guard closely. For a helpful reference on these commands, the EasyRSA quickstart guide walks through the same sequence.
Generate Server Keys and Certificates
Next, create the server's request, sign it with your CA, and generate the Diffie-Hellman parameters the server needs for the key exchange:
./easyrsa gen-req myserver nopass
./easyrsa sign-req server myserver
./easyrsa gen-dh
This gives you myserver.crt, myserver.key, and dh.pem. We also generate a tls-crypt key with openvpn --genkey secret ta.key, which wraps the control channel in an extra layer of encryption and blocks unauthenticated probes before they reach the TLS layer.
Generate Client Certificates and Keys
Each client gets its own certificate and key, which lets you revoke one device without disturbing the others. Generate and sign a client certificate the same way:
./easyrsa gen-req client1 nopass
./easyrsa sign-req client client1
Copy ca.crt, client1.crt, client1.key, and ta.key to the client device over a secure channel. Repeat these two commands with a new name for every device you want to connect. Because the certificate chain is where most setup failures begin, double-check that each client certificate was signed by the same CA before you move on.

Step 3: Create the OpenVPN Server Configuration File
With certificates in hand, you write the server configuration. On Linux this file lives at /etc/openvpn/myserver.conf; on Windows it goes in the config folder under C:\Program Files\OpenVPN. The fastest way to start is from the project's sample server config file, which you copy and edit to point at your own certificates.
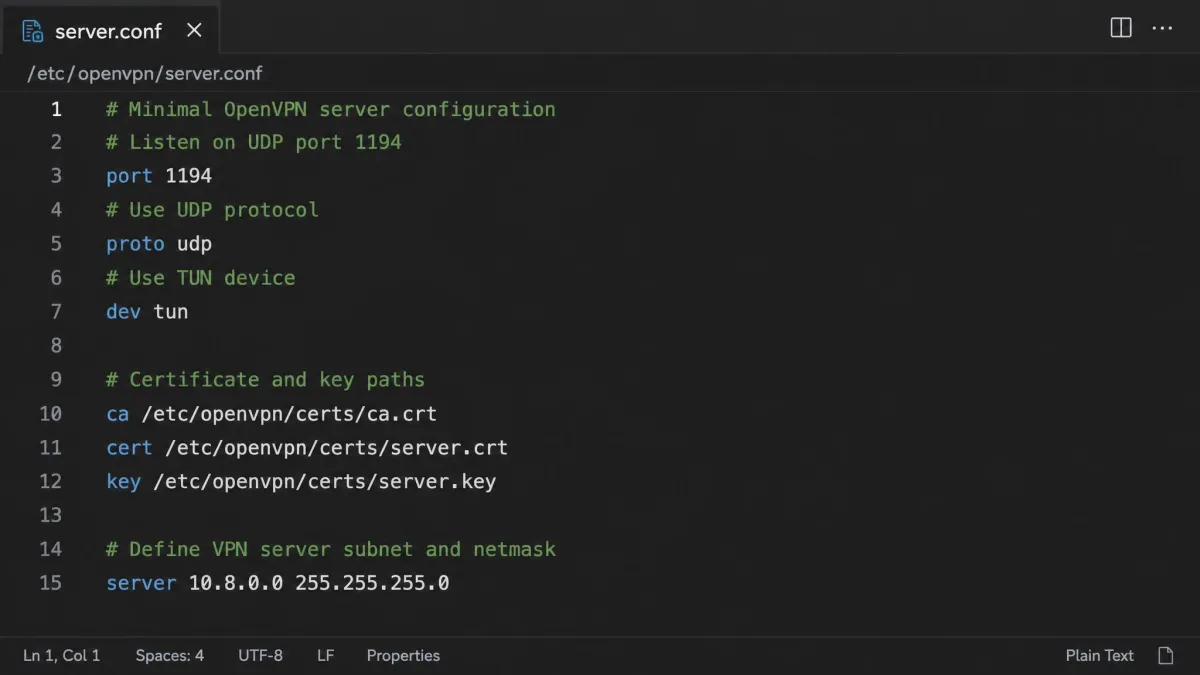
A minimal working configuration sets the protocol, the port, the tunnel device, and the paths to your certificates and keys:
port 1194
proto udp
dev tun
ca ca.crt
cert myserver.crt
key myserver.key
dh dh.pem
tls-crypt ta.key
server 10.8.0.0 255.255.255.0
data-ciphers AES-256-GCM
push "redirect-gateway def1"
push "dhcp-option DNS 1.1.1.1"
keepalive 10 120
persist-key
persist-tun
We use UDP as the protocol, because it is OpenVPN's default and gives lower overhead and better performance for most connections. If you are weighing the trade-offs, our comparison of OpenVPN TCP vs UDP explains when each one makes sense. The data-ciphers AES-256-GCM line sets a modern, fast cipher; OpenVPN 2.5 and later expect an explicit cipher negotiation rather than a single hardcoded value. The redirect-gateway push tells clients to send all their traffic through the tunnel, and the DNS push stops queries from leaking to the local network. Adjust the server subnet if 10.8.0.0/24 clashes with your existing network.
Choose UDP unless you have a reason not to. UDP is OpenVPN's default and handles the tunnel's own retransmission more efficiently than TCP. Reserve TCP for networks that block or throttle UDP, since running a reliable protocol inside a reliable protocol adds latency.
Step 4: Configure Networking, Routing, and the Firewall
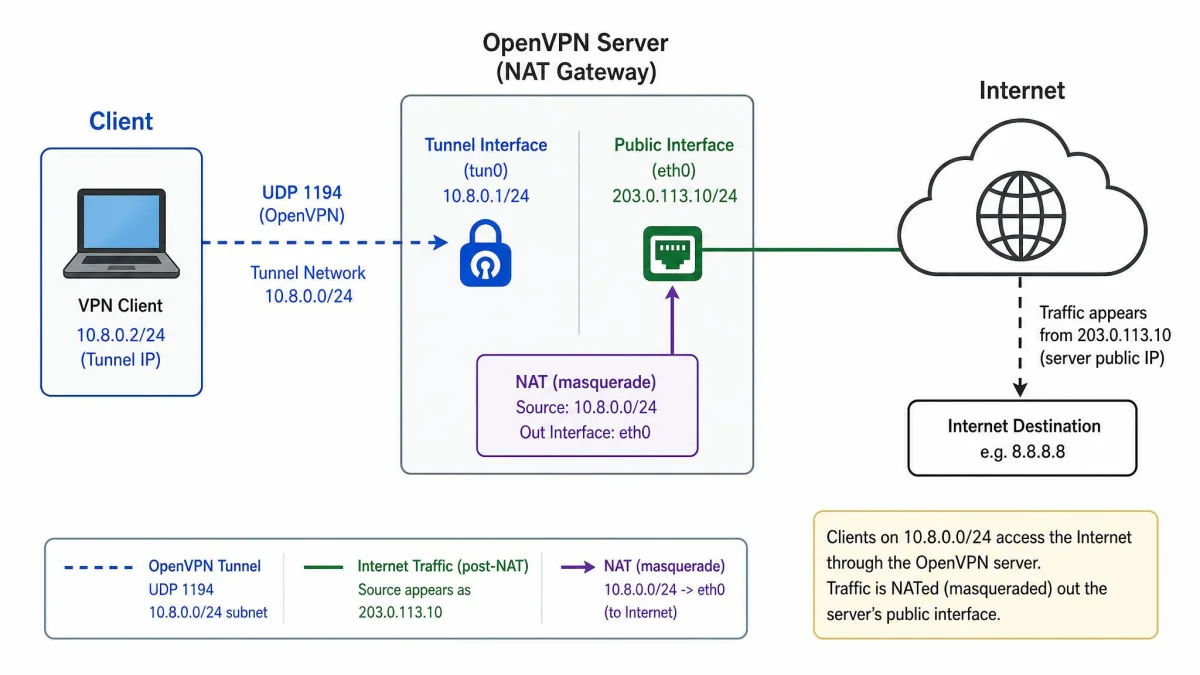
A running OpenVPN server is useless if packets cannot reach it or cannot leave the tunnel for the wider internet. This step opens the port, then turns the server into a router for its clients. Skipping either half is the classic reason clients connect successfully but then reach nothing online.
Open the OpenVPN Port (default UDP 1194)
OpenVPN listens on UDP 1194 by default, so that port must be reachable. On the server firewall, allow inbound UDP 1194. On Ubuntu with UFW, that is sudo ufw allow 1194/udp. On Windows, add an inbound rule for UDP 1194 in Windows Defender Firewall. If clients connect across the internet, also forward UDP 1194 on your router to the server's local IP.
Only open the single port OpenVPN needs, and only to the protocol it uses. Exposing a management interface or leaving extra ports forwarded gives attackers more surface to probe. A VPN server that faces the public internet should run nothing else that listens externally, and you should watch its logs for repeated failed handshakes.
Enable IP Forwarding / NAT
By default the server will not pass traffic between its interfaces. Enable IP forwarding so packets can move from the tunnel to your internet-facing adapter:
sudo sysctl -w net.ipv4.ip_forward=1Make it permanent by setting net.ipv4.ip_forward = 1 in /etc/sysctl.conf. Then add a NAT rule so the tunnel subnet is masqueraded behind the server's public address. With iptables that is a POSTROUTING MASQUERADE rule on your outbound interface for the 10.8.0.0/24 range. Without both forwarding and NAT in place, clients get an IP but no route to the internet.
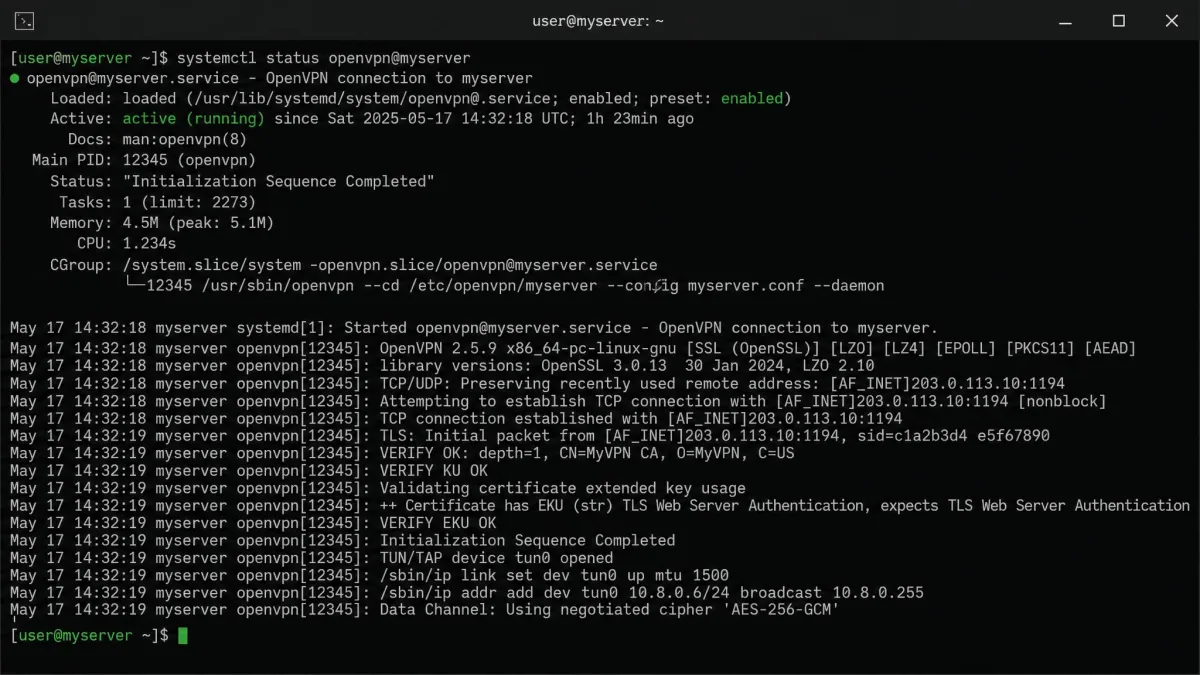
Step 5: Start and Enable the OpenVPN Server
Now you launch the server and confirm it loads cleanly. On Linux, the systemd unit is templated on your configuration file name. Start it and check that it stays running:
sudo systemctl start openvpn@myserver
sudo systemctl enable openvpn@myserver
sudo systemctl status openvpn@myserver
The enable command sets the service to launch at boot, so the tunnel comes back after a reboot. On Windows, start the OpenVPN service from the Services panel, or right-click the configuration in the GUI and connect. If the service fails to stay up, the log is the first place to look. On Windows that is C:\Program Files\OpenVPN\log\server.log, and restarting the service often clears a stuck virtual adapter. On Linux, journalctl -u openvpn@myserver shows the same startup detail.
Step 6: Configure the OpenVPN Client and Connect
The client needs its own small configuration file, saved with the .ovpn extension, that points at the server and references the client's certificate set. A minimal client config mirrors the server's cipher and protocol choices:
client
dev tun
proto udp
remote your-server-address 1194
ca ca.crt
cert client1.crt
key client1.key
tls-crypt ta.key
data-ciphers AES-256-GCM
remote-cert-tls server
persist-key
persist-tun
Replace your-server-address with your server's public IP or dynamic DNS hostname. Place this file alongside ca.crt, client1.crt, client1.key, and ta.key. On Windows, drop everything in the config folder and connect from the GUI running as administrator. On Linux, run sudo openvpn --config client1.ovpn or import the file into your network manager.
If a Windows client throws a line-length or parsing error on a config file you edited on Linux, the culprit is usually line endings. A .ovpn file saved with Unix (LF) endings can fail on Windows; converting it to Windows (CRLF) endings resolves it. A text editor that lets you set the line ending, or a quick unix2dos pass, fixes it in seconds.
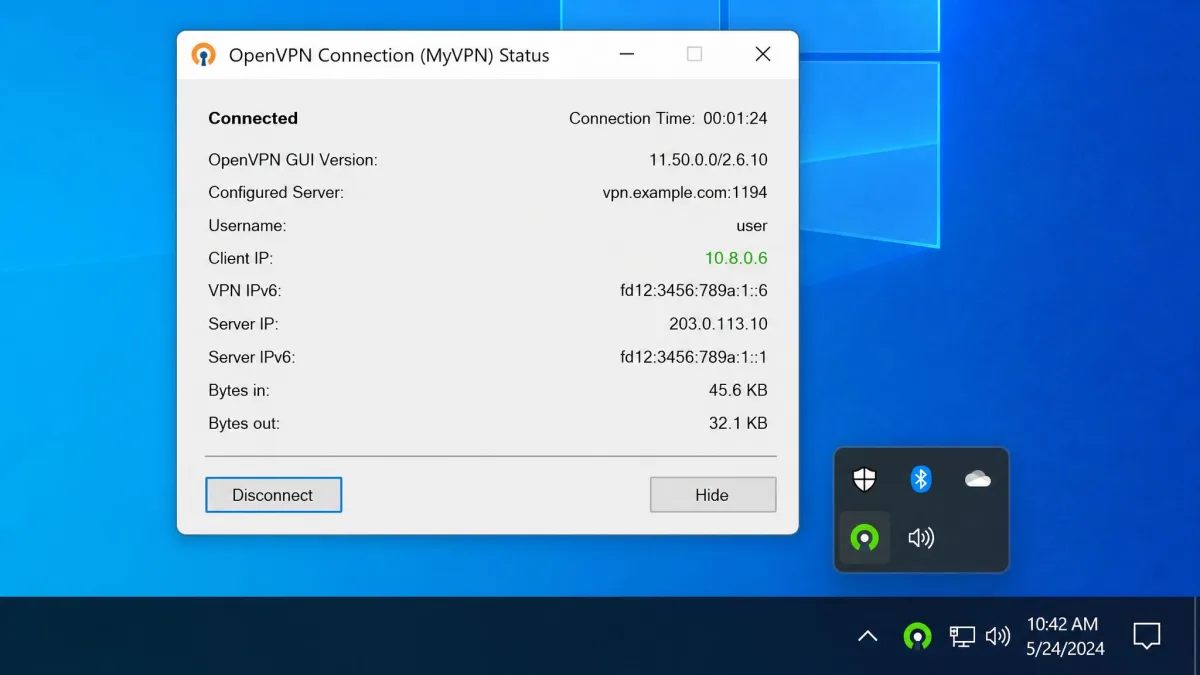
Step 7: Test the VPN Connection
Once the client reports a connection, verify the tunnel actually carries your traffic. First, confirm the client received a tunnel address in the 10.8.0.0/24 range. Then ping the server's tunnel IP, usually 10.8.0.1, to prove the tunnel is up end to end.
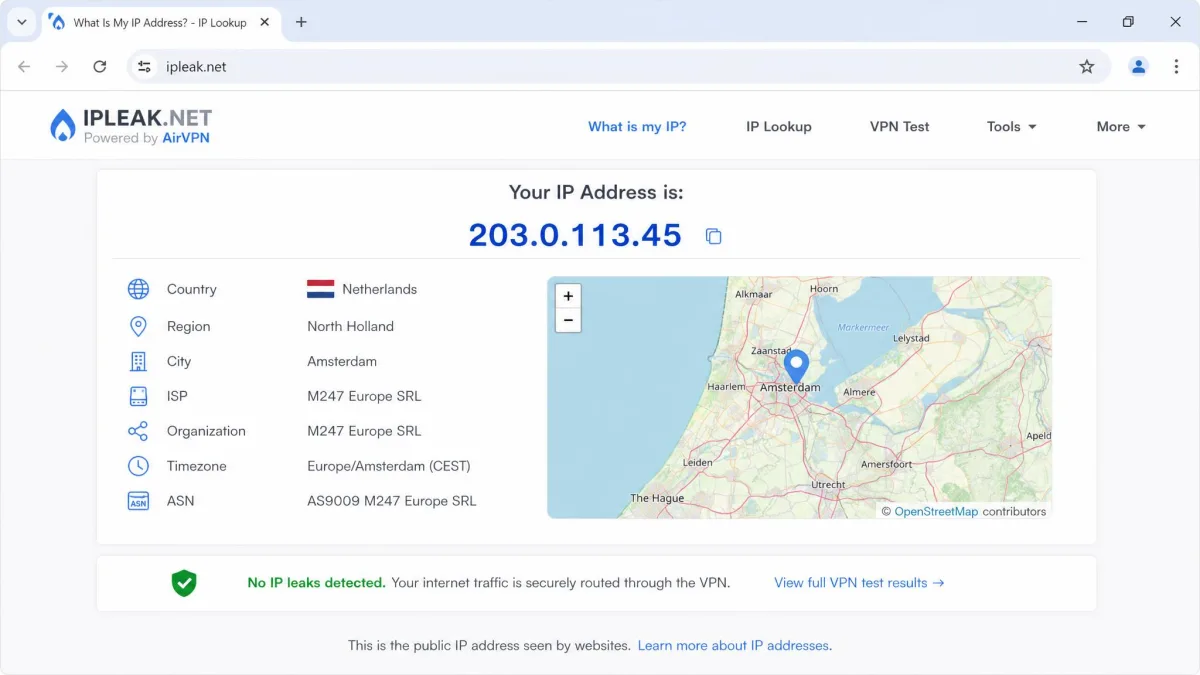
Next, check that your public traffic routes through the server. Load an IP-address lookup site and confirm it shows the server's location, not your own. Run a DNS-leak test as well, to make sure queries follow the DNS server you pushed in Step 3 rather than your local resolver. If the address changes and DNS points where you expect, the setup is working. If the client connects but pages will not load, return to Step 4, since missing IP forwarding or NAT is the usual cause.
Troubleshooting Common OpenVPN Setup Problems
Most setup problems fall into a handful of categories, and the logs tell you which one you are facing. A TLS handshake failure almost always traces back to one of three things: a firewall blocking UDP 1194, a wrong client certificate or key, or mismatched cipher and auth directives between the server config and the client .ovpn. Check the port first, then confirm both ends declare the same data-ciphers. For a wider list of causes, our guide to what to do when OpenVPN won't connect walks through each one in order.
When clients connect but cannot reach the internet, the fix is nearly always routing. Confirm IP forwarding is enabled and the NAT rule is in place. On PPPoE and some ISP links, the redirect-gateway push can also fail to resolve the real default gateway, which strands client traffic even though the tunnel is up. On Windows, a virtual adapter that stays disabled points at a permissions or driver issue; check server.log, run the GUI as administrator, and restart the OpenVPN service to clear it.
Certificate errors are the single most common reason a first setup will not connect. If the log mentions verification or a CA mismatch, confirm that every client certificate was signed by the same certificate authority as the server, and that you copied ca.crt, the client .crt, the client .key, and ta.key to the device. One missing or wrong file breaks the chain.
Hardening and Securing Your OpenVPN Server
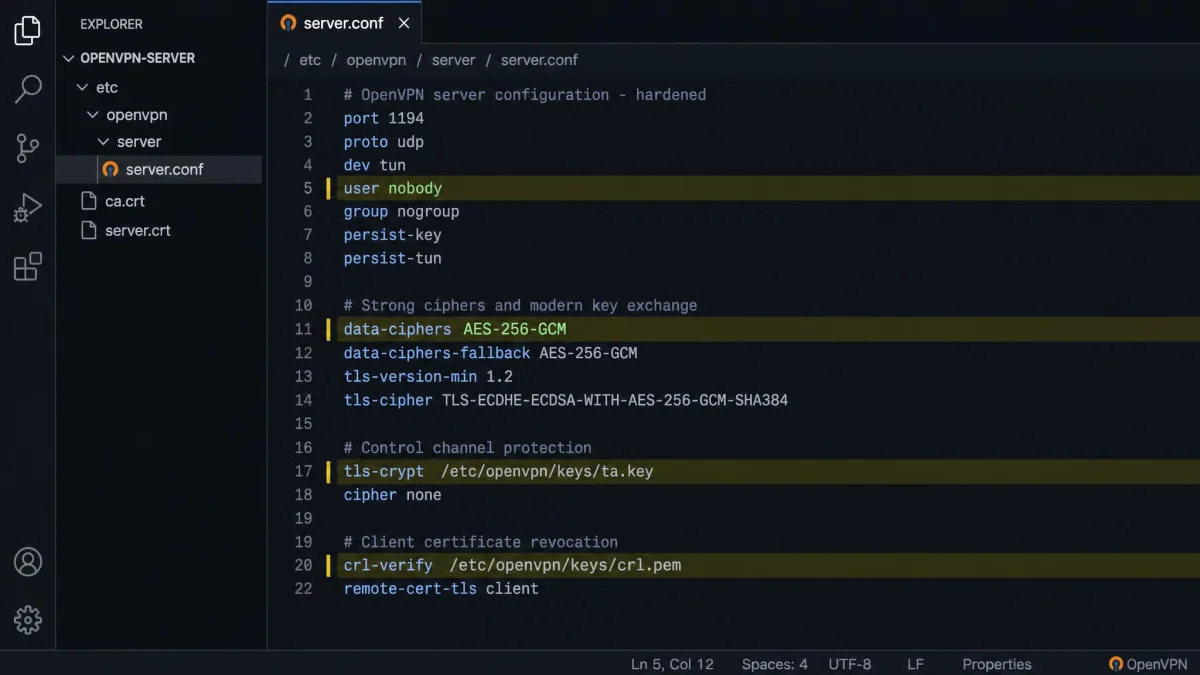
A working tunnel is not the same as a secure one. Start with the cipher: AES-256-GCM is the modern default, and pairing it with a tls-crypt key hides and authenticates the control channel so unsolicited probes never reach your TLS stack. Keep OpenVPN itself current, because version numbers advance often across the 2.6 and 2.7 branches and updates carry security fixes; check the download page for the current build rather than pinning an old one.
Beyond the crypto, limit exposure. Run the server as an unprivileged user after startup with user nobody and group nogroup, keep only UDP 1194 open, and issue one certificate per device so you can revoke a lost laptop without reissuing everything. Maintain a certificate revocation list and reference it in the server config, so a revoked client is refused immediately. For a broader reference on secure defaults, the OpenVPN community HOWTO and the Ubuntu guide to installing OpenVPN both document hardening options in depth.
Frequently Asked Questions
Which port does OpenVPN use?
.ovpn, which some people do to slip past networks that block the well-known port. Whatever port you pick, it must be allowed through the server firewall and forwarded on the router if clients connect from outside your network.Why can't clients reach the internet after connecting?
net.ipv4.ip_forward = 1 and add a NAT rule that masquerades the tunnel subnet behind the server's public interface. On some PPPoE connections the redirect-gateway push cannot resolve the real default gateway, which also strands client traffic even though the connection looks healthy.Should I use TCP or UDP for OpenVPN?
How do I add another client?
./easyrsa gen-req name nopass and ./easyrsa sign-req client name, then copy that certificate set plus ca.crt and ta.key to the device with its own .ovpn file. One certificate per device lets you revoke a single lost machine without disrupting anyone else.Conclusion
Setting up OpenVPN comes down to five moving parts working together: the installed software, a clean certificate chain from EasyRSA, a server configuration that names those certificates, the networking that opens the port and routes the tunnel, and a matching client profile. Get the certificate chain right and keep the server and client ciphers in agreement, and most connection problems disappear before they start. Once the tunnel is up, spend a few minutes on the hardening steps, because a self-hosted VPN is only as private as its weakest setting. With the configuration files saved and the service enabled at boot, you have a private tunnel you fully control.