

If Microsoft Edge is loading pages slowly or showing an old version of a site, clearing the cache usually sorts it out. The cache is a store of temporary files that Edge saves on your device so pages you have already visited load faster next time. When those files go stale, they cause the glitches, and clearing them is the quick refresh to reach for.
How to Clear the Cache in Microsoft Edge on Windows and Mac
The steps below are the same on Windows and Mac, and the whole thing takes about a minute.
Step 1: Open the Settings and more menu (three dots)
Open Edge, then click the three-dot Settings and more menu in the top-right corner and choose Settings.
Step 2: Go to Privacy, search, and services
In the Settings menu, select Privacy, search, and services from the list on the left.
Step 3: Select Choose what to clear
Scroll to the Clear browsing data section and click Choose what to clear.
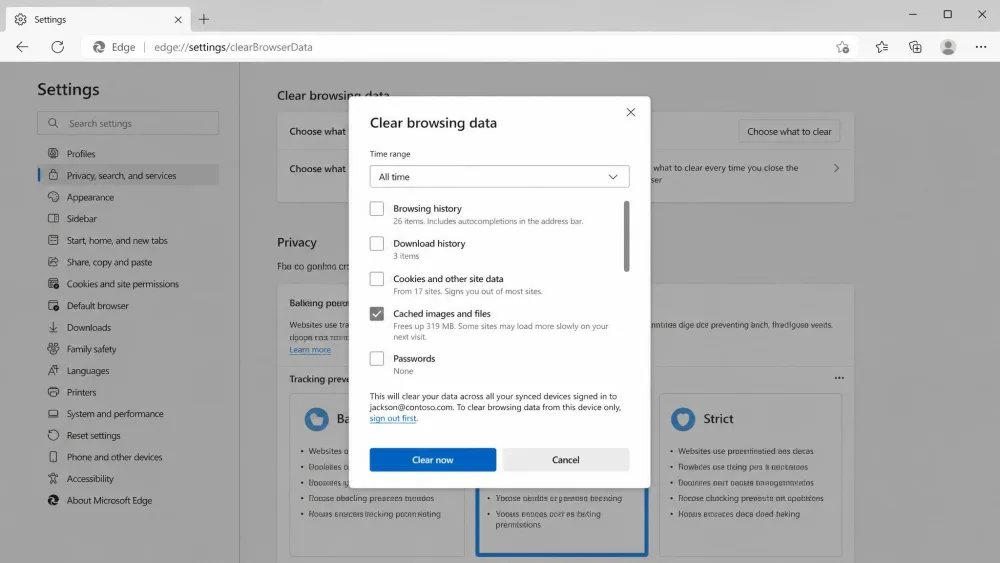
Step 4: Set the time range and check Cached images and files
Open the Time range dropdown and pick how far back to go, then tick Cached images and files. Leave the other boxes unchecked if you only want to clear the cache. The Time range options are:
- Last hour
- Last 24 hours
- Last 7 days
- Last 4 weeks
- All time
Choose All time to remove everything Edge has cached.
Step 5: Click Clear now
Click Clear now. Edge empties the cache in a second or two and closes the dialog. Closing your other tabs first gives a cleaner result.
To skip the menus, press Ctrl+Shift+Delete on Windows to open the Clear browsing data dialog directly. On a Mac, press Command+Shift+Delete instead.
How to Clear the Cache and Cookies Together in Edge
The cache and your cookies live in the same dialog. To remove both, follow the five steps above and also tick Cookies and other site data before you click Clear now. This is worth doing when a site misbehaves even after a plain cache clear.
Ticking Cookies and other site data signs you out of most websites, so you will need to log back in afterward. Leave that box unchecked if you only want to refresh the cache.
How to Automatically Clear the Cache When You Close Edge
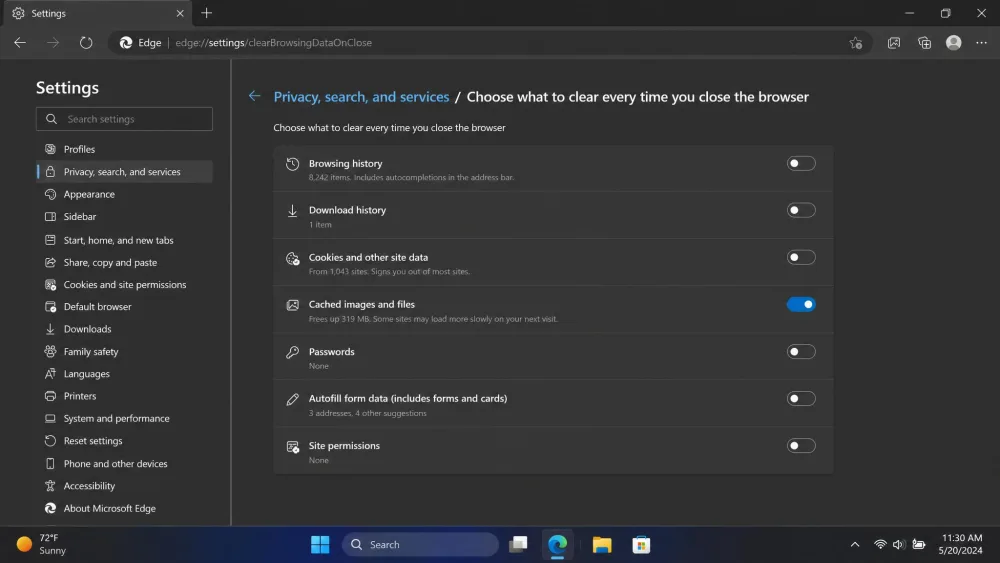
Edge can clear the cache automatically every time you close the browser.
- Open Settings > Privacy, search, and services.
- Under Clear browsing data, click Choose what to clear every time you close the browser.
- Toggle on Cached images and files, plus any other items you want removed on exit.
From then on, Edge wipes those files each time you quit.
How to Clear the Cache in Edge on Android and iPhone
The mobile app follows the same idea, with the menu tucked into the bottom bar instead of the top corner.
Clear the Cache in Edge on Android
- Tap the three-dot menu in the bottom bar, then tap Settings.
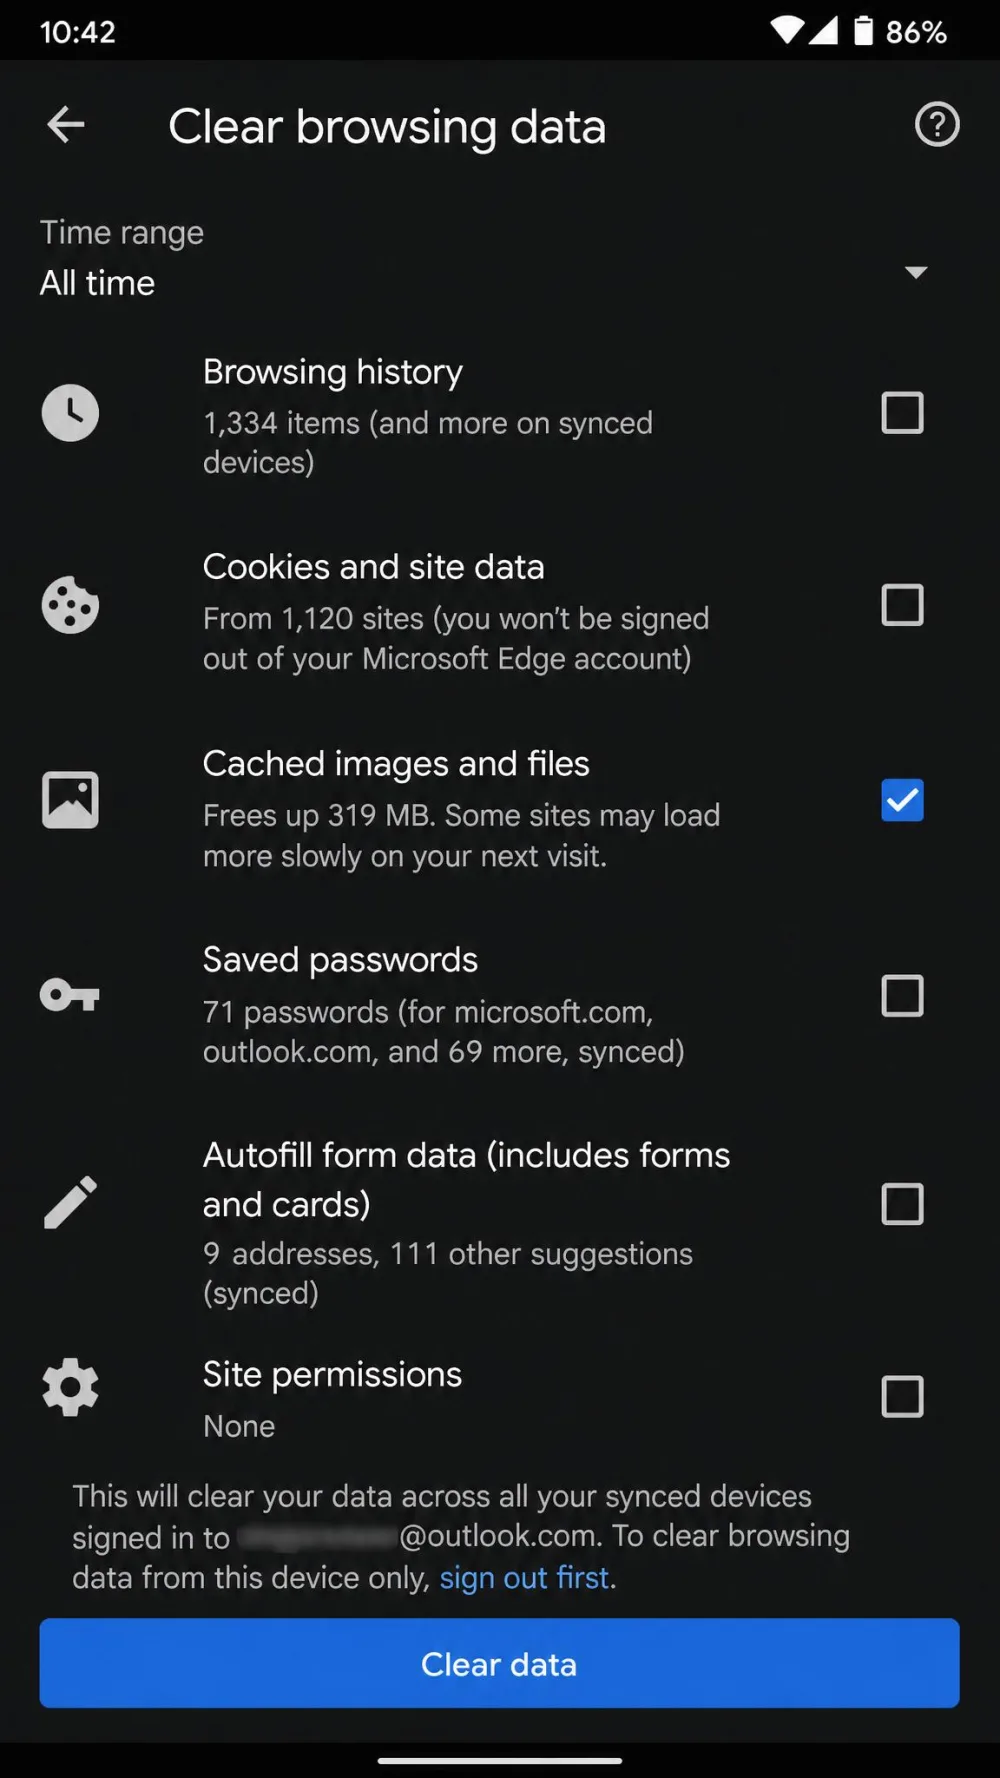
- Tap Privacy and security > Clear browsing data.
- Tick Cached images and files, then tap Clear data.
Android also has a Clear browsing data upon exit toggle if you want the phone to handle it for you.
Clear the Cache in Edge on iPhone and iPad
- Tap the three-dot menu in the bottom bar, then tap Settings.
- Tap Privacy and security > Clear browsing data.
- Tick Cached images and files, then tap Clear data.
The auto-clear-on-exit option is missing on iPhone and iPad, so you will need to clear the cache manually whenever a page starts misbehaving.
How to Clear the Cache for a Single Website in Edge
Sometimes only one site is playing up, and clearing everything is overkill. Edge lets you clear the cache and cookies for a single website instead.
- Open Settings > Cookies and site permissions > Manage and delete cookies and site data.
- Click See all cookies and site data, then search for the site.
- Select the down arrow next to it and click Delete.
You can jump straight there by typing edge://settings/siteData into the address bar.
What Is the Browser Cache, and Why Clear It in Edge?
The browser cache is a store of temporary files, such as images and scripts, that Edge saves on your device so pages you have visited load faster next time. When those files fall out of date, they are what causes the trouble you see:
- Pages that look broken or show an old version of a site
- Slow loading on sites that used to be quick
- Formatting and images that render in the wrong place
Clearing the cache forces Edge to fetch fresh copies. The first visit afterward loads a little slower while Edge re-downloads those files, and every visit after that speeds back up. For more background, see Microsoft's Edge Learning Center guide to cache and cookies.
Cache vs. Cookies vs. Browsing History: What Gets Deleted
The Clear browsing data dialog lists several data types, and it helps to know what each one removes. Cached images and files is the only box you need for a plain cache clear. Microsoft's official Edge support documentation lists every checkbox in this dialog.
If Edge sync is turned on, clearing browsing data removes it from every device signed in to your account. Turn off sync first if you want to clear only this device.
| Data type | What it is / what gets deleted | Where it's stored |
|---|---|---|
| Browsing history | The list of sites you have visited | On your device, synced when sync is on |
| Download history | The list of downloaded files, not the files themselves | On your device |
| Cookies and site data | Sign-in tokens and site preferences; removing them logs you out | On your device, per website |
| Cached images and files | Temporary files that speed up repeat page loads | On your device |
| Passwords | Saved sign-in credentials | On your device, synced when sync is on |
| Autofill form data | Saved form entries, addresses, and card details | On your device, synced when sync is on |
| Site permissions | Granted permissions such as camera, microphone, and location | On your device, per website |
Frequently Asked Questions
Will clearing the cache delete my passwords or bookmarks?
How often should I clear my cache in Edge?
Will clearing the cache make Edge faster?
Does clearing the cache log me out of websites?
Is it safe to clear the cache?
Conclusion
Clearing the cache is one of the quickest fixes for a browser that feels slow or shows outdated pages. On the desktop, the five-step path takes under a minute, and the same routine works on Android, iPhone, and iPad. We recommend a monthly cleanup, plus a quick clear whenever a site simply refuses to update.