The lid comes up and nothing happens for five seconds. You click a browser tab and the window hangs before it redraws. The fan spins up while you are reading email. That is the shape of a laptop that has slowed down over time, and almost none of it means the machine is broken.
Most of it is software. Programs you installed once and forgot, a drive that has filled up, a power setting that never left its battery-friendly default. Those are free to fix, and they are where this guide starts. Only the last two fixes cost money.
Work through the list in order. Each fix stands alone, so you can stop the moment your laptop feels right again.
Start Here: The 5-Minute Checklist
If you only have five minutes, do these four things.
- Restart the laptop properly, using Restart rather than closing the lid.
- Open Task Manager with Ctrl+Shift+Escape and close whatever is eating the most memory.
- Open Settings, go to System, then Power, and set the power mode to Best performance.
- Check your free disk space and delete the largest files you no longer need.
Those four steps cover most everyday slowdowns. What follows is the fuller version, with the reasoning attached.
Why Your Laptop Slowed Down
A laptop gets slower the way a desk gets cluttered, one small addition at a time. Every app you install may add a startup entry or a background service. Every feature update leaves files behind. The drive fills, the free space the system relies on for temporary work shrinks, and the whole machine feels sticky.
Laptops have a second problem that desktops mostly avoid. They are small, and the cooling is small with them. Dust builds in the vents, the processor runs hotter, and Windows quietly reduces speed to keep the temperature safe. Microsoft's own performance tips for Windows list 12 fixes that overlap heavily with what follows, which is reassuring: a slow laptop is normally a badly maintained laptop, not a dying one.
1. Restart Your Laptop and Close What's Running in the Background
Closing the lid is not a restart. It suspends the system, so memory leaks, stuck processes and half-finished updates survive into the next session. Open the Start menu, select Power, then select Restart.
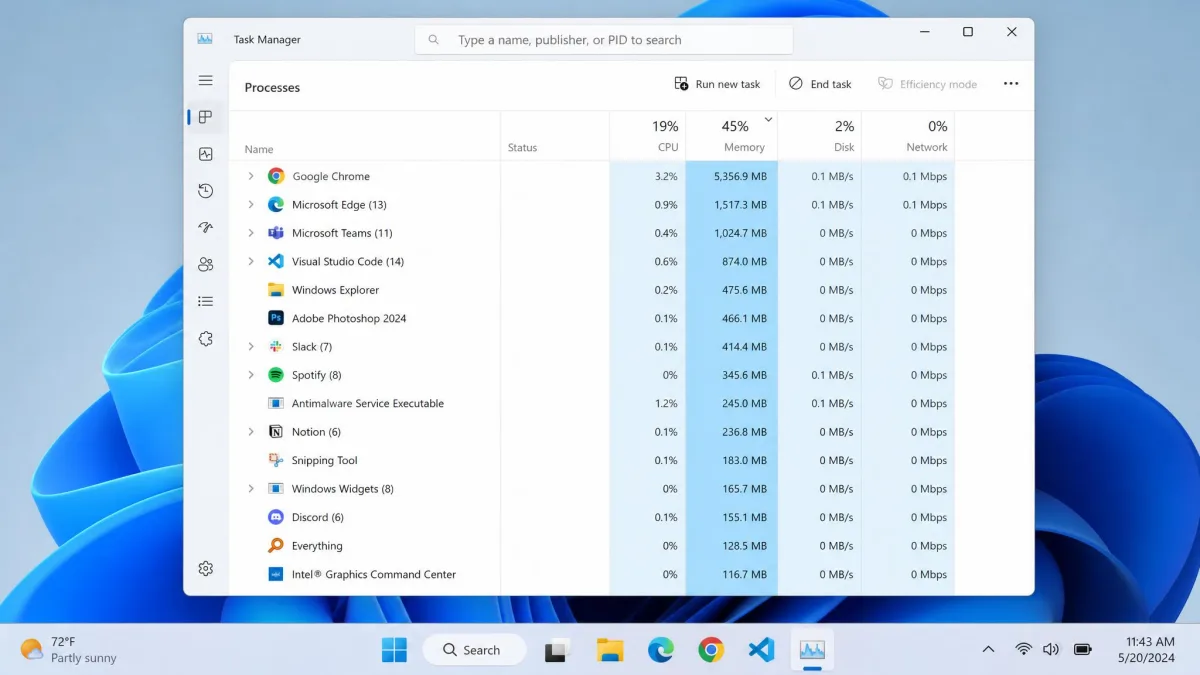
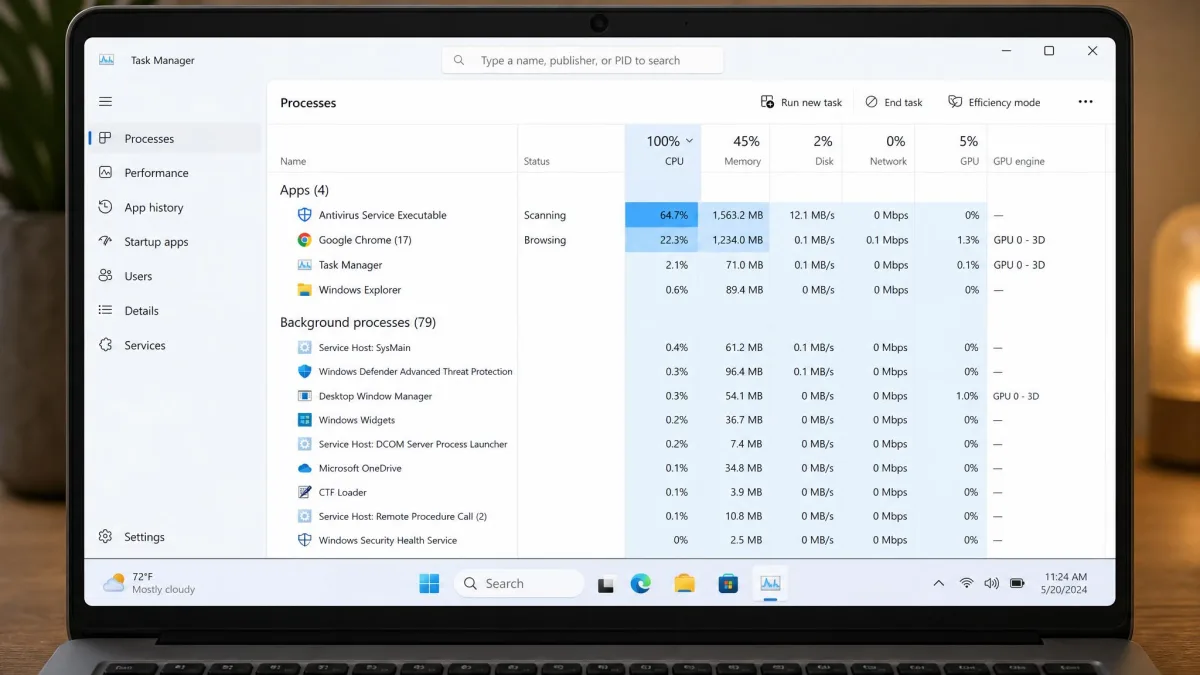
Then look at what is running in the background. Press Ctrl+Shift+Escape to open Task Manager, select the Processes tab, and click the Memory column to sort. The browser is almost always at the top, well ahead of anything you think of as a big application.
Restart once a week even if nothing feels wrong. It is the cheapest maintenance there is, and it prevents most of the slowdowns that build up over a long uptime.
2. Disable Startup Programs
This fix has the largest payoff for the smallest effort. Every program that launches at boot competes for the processor and the drive during the exact minute you are waiting to start work. Chat apps, updater services and cloud clients all put themselves there by default.
Disabling an entry does not uninstall the program. It only stops it launching automatically, so you can still open it yourself and switch the entry back on in seconds if something misbehaves.
Windows: Task Manager > Startup apps
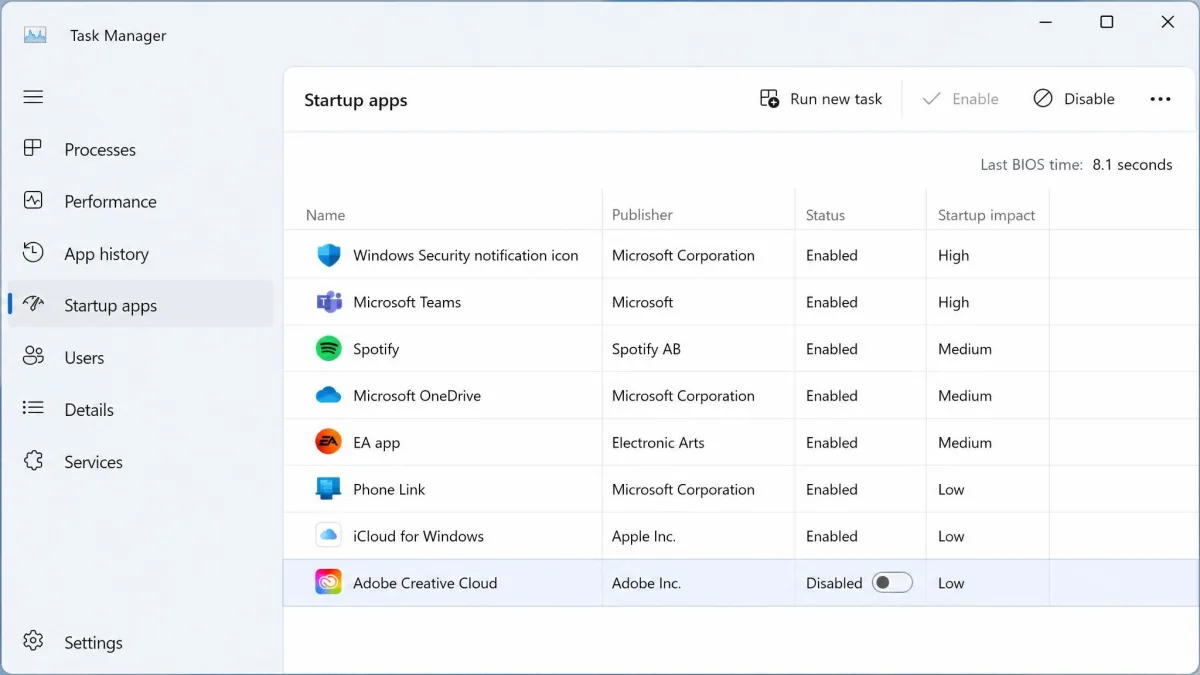
Press Ctrl+Shift+Escape, then select Startup apps. Windows rates each entry with a startup impact of High, Medium or Low, which tells you where to aim. Right-click anything rated High that you do not need at boot, then select Disable. Microsoft documents the same route if you would rather configure startup apps in Windows from Settings. Leave your security software and your touchpad or audio drivers alone.
macOS: Login Items
Open the Apple menu, select System Settings, then General, then Login Items. The top list holds apps that open at login, and the lower list holds background helpers. Select an app and click the minus button to remove it.
Startup programs and the power plan are the two changes we reach for first on an older laptop, because you feel them immediately in mouse movement and window switching rather than in a benchmark.
A typical Windows laptop shows around 16 apps in the Startup tab, and that list is only part of the story. Windows has over 200 places a program can hook itself into startup, while Task Manager covers just the Run registry keys and the Startup folder. On one older laptop the tab listed 11 entries while Sysinternals Autoruns found 172 autostart entries in total, which is why a machine can still boot slowly after the visible list has been cleared.
The payoff depends on what drive you are on. On a lower-end laptop with a mechanical hard drive, boot time falls from about 1 minute 10 seconds with everything enabled to 59 seconds after disabling entries selectively, and 51 seconds with every startup app switched off. On a current machine with an SSD, the same exercise moves boot from 27 seconds to 23, and 20 with the lot disabled. Clearing startup apps is worth far more on the old hard-drive laptop than on the new one, and disabling everything rather than a sensible few buys only a handful of extra seconds while costing you the apps that were meant to be running.
To check whether your own change helped, time the boot with a stopwatch from the power button to a usable system tray and average three to five runs. Watch Last BIOS time on the same screen as well: under 10 seconds is normal, and a long one is firmware work that no amount of Windows-side cleanup will touch.
3. Find the Resource Hogs in Task Manager
Guessing wastes time. Open Task Manager, select the Processes tab, then click the CPU heading to sort by processor use and the Memory heading to sort again. Watch for a few minutes rather than taking one snapshot, because a process that spikes and settles is normal while one that sits high is the problem.
Browsers dominate the memory column on most laptops, since every tab and extension is its own process. Antivirus scans, indexing services and cloud sync clients are the other usual suspects. Once you can name the process, you have a decision: close it now, stop it starting at boot, or remove the program entirely.
Windows also uses part of your drive as a page file when memory runs short. If you want to understand why a laptop with little free space feels slow even when memory looks fine, read up on how the Windows page file works.
4. Uninstall Programs and Bloatware You Never Use
Laptops arrive with software nobody asked for. Trial antivirus, manufacturer utilities, games you will never open. Each takes disk space, and many add background processes and startup entries.
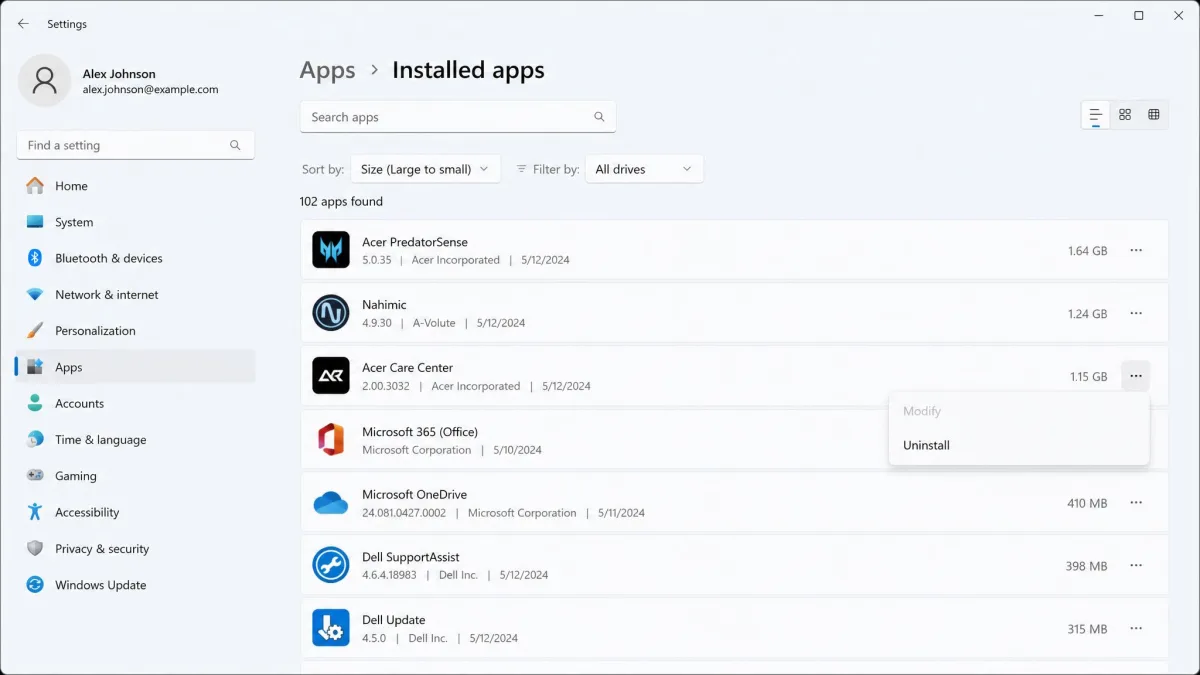
Open Settings, go to Apps, then Installed apps. Sort by size to find the big offenders, then sort by install date to find what arrived alongside something else. Select the three dots next to an app and choose Uninstall. If you do not recognise a name, search it first, because some entries are drivers or support packages your hardware genuinely needs.
5. Free Up Disk Space and Run Disk Cleanup
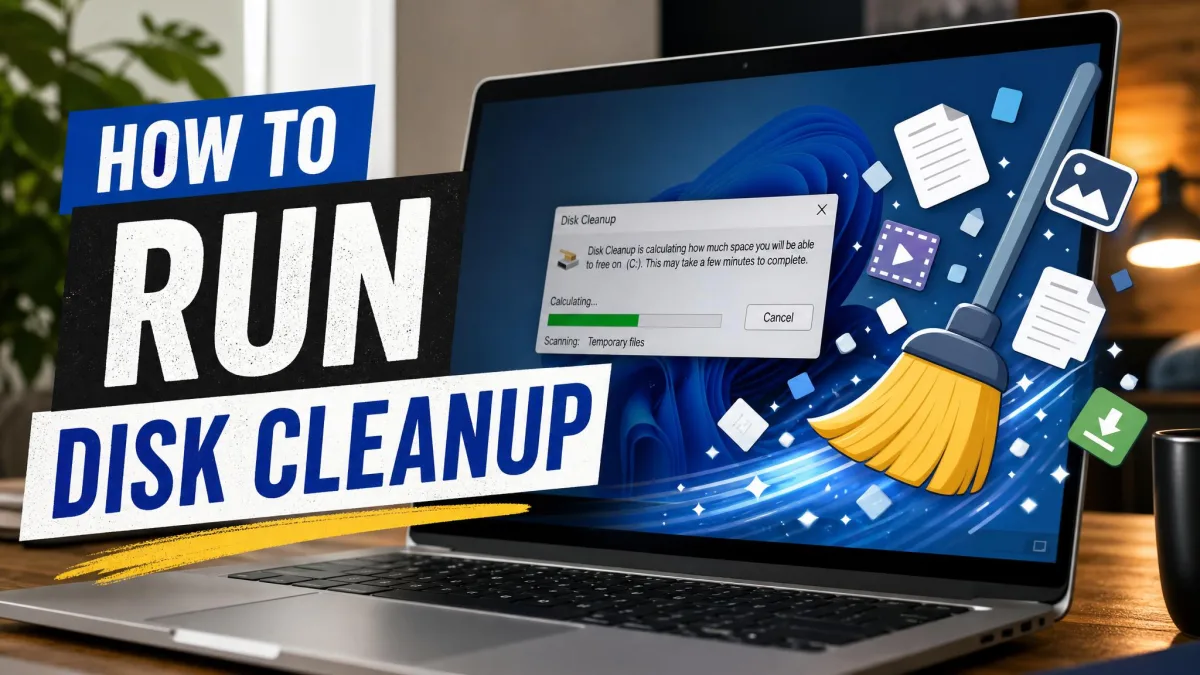
A full drive slows a system down. Microsoft says so directly, without publishing a specific threshold, and the effect is easy to feel on a laptop with a small drive. Open Settings, go to System, then Storage. If the usage bar is red, clear space now rather than later.
Windows 11 includes Storage Sense, which deletes temporary files for you. On that same screen, turn Storage Sense on, then select Run Storage Sense now. For a deeper pass, Disk Cleanup removes the update leftovers that Storage Sense leaves behind.
On an SSD, keep roughly 10 to 20 percent of the drive free. The right margin varies with drive capacity and how much over-provisioning the SSD reserves, so treat that as a working range rather than a fixed line. Windows 11 needs a 64 GB or larger storage device just to install, so a 128 GB laptop is fighting for room from day one.
What's safe to delete (and what isn't)
Safe to remove: temporary files, the Recycle Bin, downloads you have already used, delivery optimisation files, and previous Windows installation files once the current version is stable.
Leave alone: Microsoft Visual C++ redistributables, the AMD, Nvidia or Intel driver folders, and the System and Reserved storage categories. Disk cleanup goes wrong when driver folders or System and Reserved entries get deleted along with the temp files, and that can break graphics output or stop installed software launching.
Never delete a folder from inside Program Files or Windows to reclaim space. Use the uninstaller or Disk Cleanup instead. Manual deletion leaves the system registry pointing at files that no longer exist, which causes errors far harder to fix than a full drive.
6. Install Windows, Driver, and App Updates
Keeping a laptop up to date is maintenance, not optional polish. Updates carry fixes for the exact power and scheduling bugs that make a machine feel sluggish.
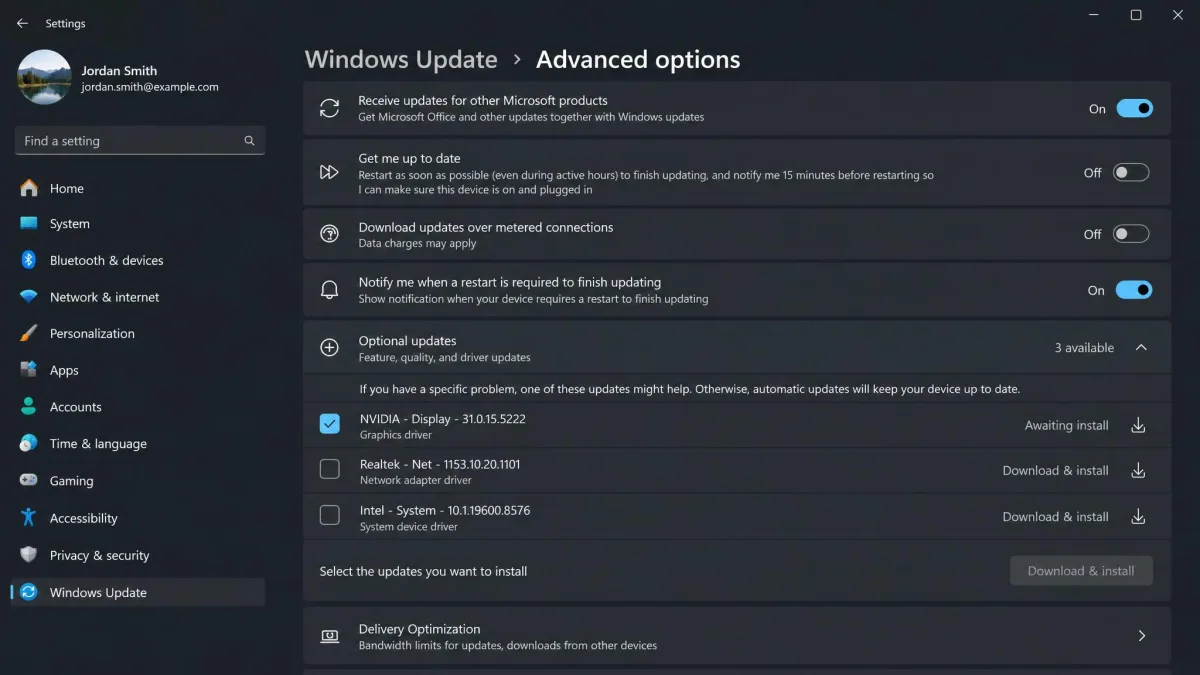
Open Settings, select Windows Update, then Check for updates. Install what is offered, including the optional driver updates behind the Advanced options link, then restart. A pending update that has not finished installing is itself a source of background disk activity.
Graphics drivers are worth doing by hand, since Windows Update often ships an older version. Get them from the vendor: Nvidia drivers, Intel drivers and AMD drivers all offer a detection tool that identifies your hardware for you. Check your laptop maker's support page for a BIOS or UEFI update too. Stale firmware causes fan-curve and power-limit behaviour that no software setting fixes, which is why we do firmware before any other tuning.
If updates keep downloading in the middle of your work, open Settings, go to Network and internet, select your Wi-Fi network, and turn on Metered connection. Windows then holds off large downloads until you are ready.
7. Set Your Power Plan to Best Performance
Laptops ship set up to conserve battery, which means the processor is being deliberately held back. Changing that takes ten seconds and is the fastest single improvement most people will feel.
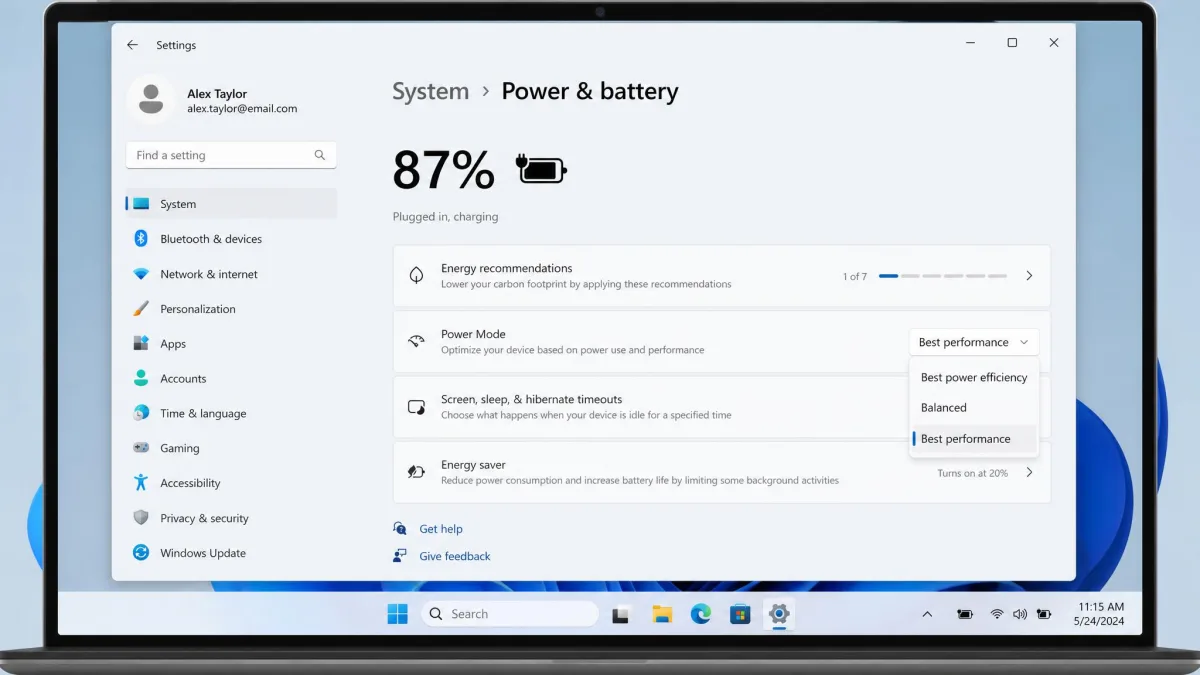
Open Settings, go to System, then Power and battery, and set Power mode to Best performance. On older builds, open Control Panel, select Power Options, and choose the High performance plan. Responsiveness improves straight away, most visibly in how quickly windows and menus react.
Battery life vs. speed: the trade-off
You are trading runtime for speed. Run Best performance while plugged in and let Windows drop back to a balanced mode on battery, which it will do once you set the plugged-in and on-battery options separately.
Battery wear matters here too. It shows up as a falling percentage of original capacity long before the laptop reports a problem, and a worn battery pushes the machine toward power-saving behaviour even when you have asked for performance. If your laptop is several years old and will not hold its speed unplugged, check the battery health report before blaming the software.
8. Scan for Malware and Unwanted Software
Sudden slowdowns with no obvious cause deserve a malware check. Crypto-mining scripts, adware and browser hijackers all consume processor time in the background, and they are designed not to announce themselves.
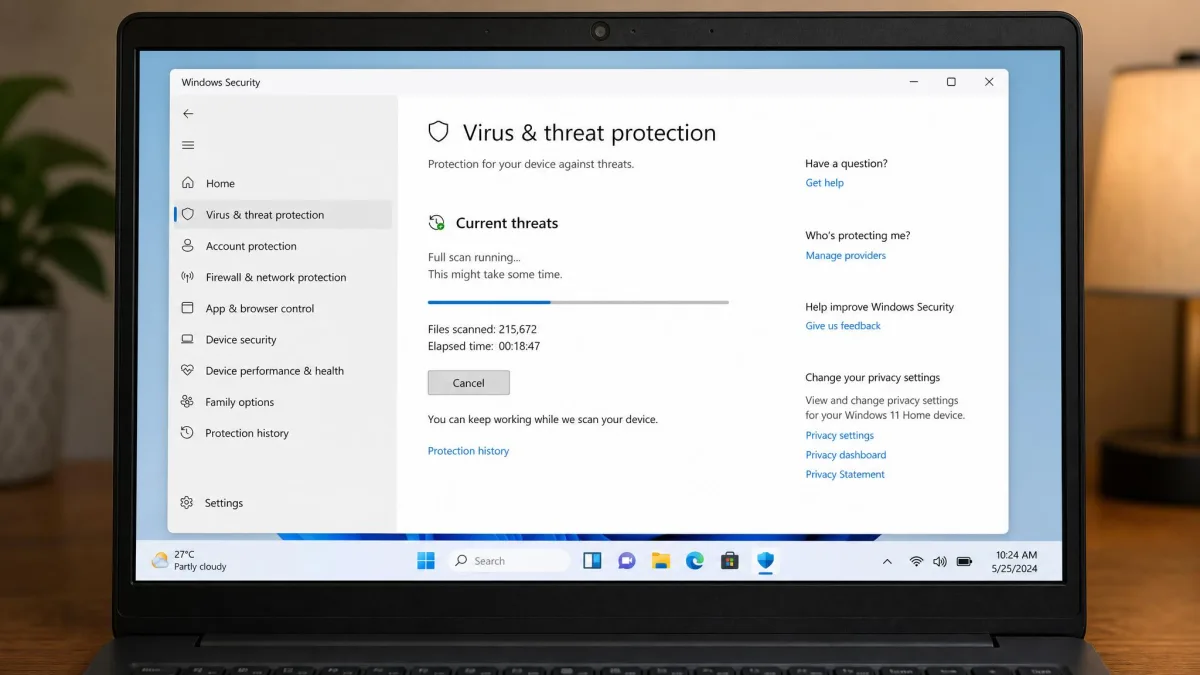
Windows includes protection already. Open Windows Security, select Virus and threat protection, choose Scan options, then select Full scan. Microsoft's instructions for running a Microsoft Defender scan cover the offline scan as well, which catches things that hide while Windows is running. Then check your browser and remove any extension you did not deliberately install.
9. Turn Off Visual Effects and Animations
Windows spends processor and graphics effort on animations, shadows and transparency. On a budget machine with limited RAM or a weak processor, turning the effects off is one of the clearest wins available, and it barely registers on a well-specced machine.
Open Settings, go to Accessibility, then Visual effects, and turn off both Transparency effects and Animation effects. For the full set, search for "Adjust the appearance and performance of Windows", then select Adjust for best performance. If the result looks too plain, re-enable "Smooth edges of screen fonts" on its own.
If you drive a 4K panel, dropping to a lower resolution eases the graphics load noticeably, because 4K is roughly four times the pixel work of 1080p.
10. Tame Your Browser: Tabs, Extensions, and Cache
The browser is the heaviest program on most laptops. Every open tab holds memory, and every extension runs on every page you load.
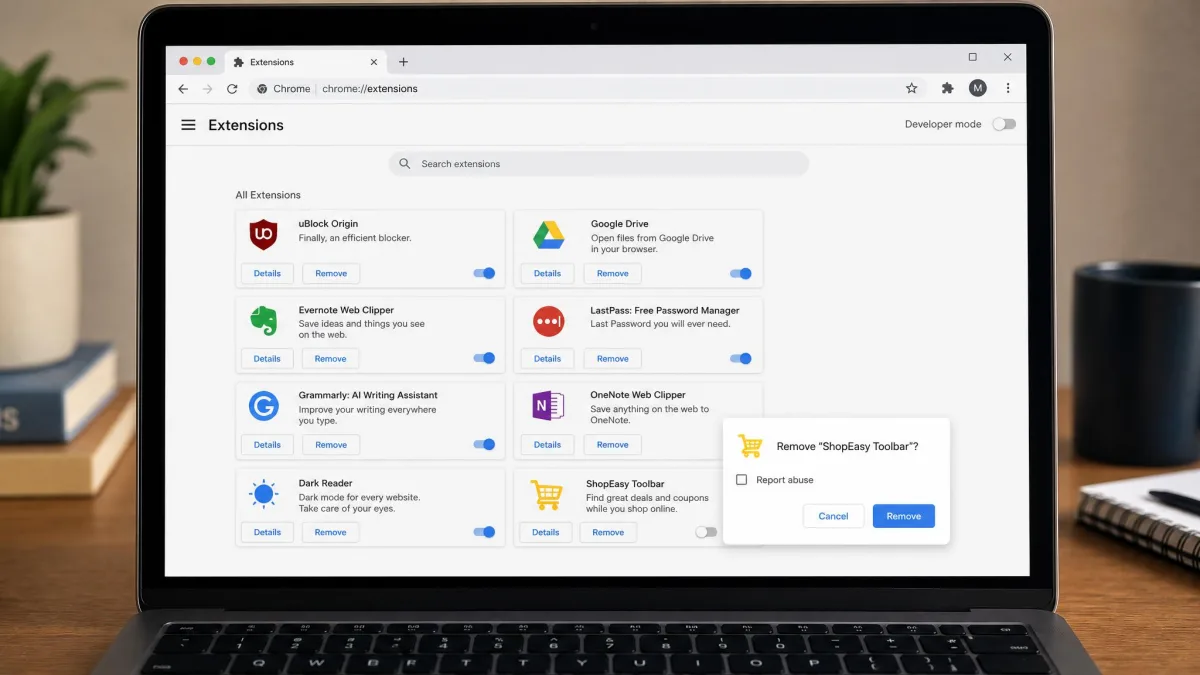
Close the tabs you are keeping "just in case" and bookmark them instead. Open your browser's extension manager and remove anything you have not used this month. Then clear the cache, which grows into gigabytes over a year of browsing. Our guide to clear your browser cache walks through the steps for each browser.
If you routinely keep twenty tabs open, look for your browser's tab sleeping or memory saver feature. It suspends inactive tabs and gives their memory back to the system.
11. Optimize or Defragment Your Drive
This step depends on what kind of drive you have, and getting it wrong wastes time.
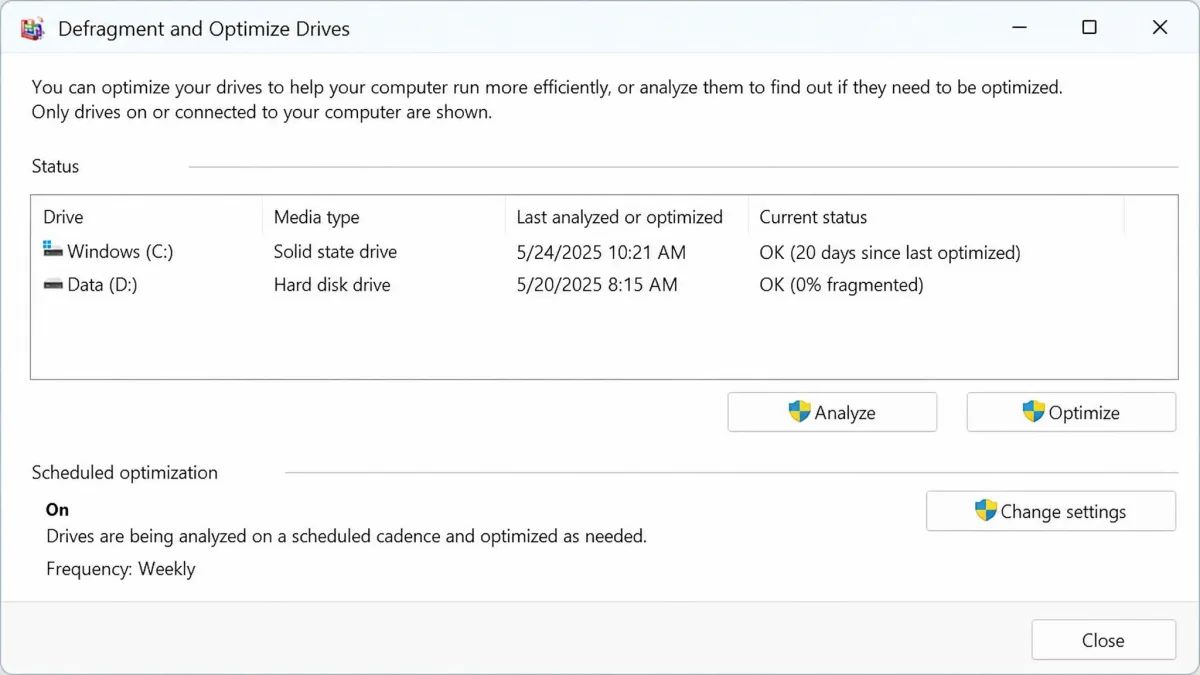
Search for "Defragment and Optimize Drives" and open it. The Media type column tells you what you are looking at. A drive listed as Hard disk drive benefits from a real defragmentation pass, which reorders files so the read head travels less. A drive listed as Solid state drive should never be defragmented, because running the tool there only issues TRIM commands and manual defragmentation just adds writes for no gain.
Select the drive, then select Optimize, and let Windows decide which operation applies. Microsoft's instructions for optimizing your drives cover scheduling. Weekly is fine for a hard drive, monthly is plenty for an SSD.
12. Pause OneDrive and Cloud Sync
Cloud sync clients are quiet, constant work. OneDrive left running in the background is a recurring drag on an otherwise idle laptop.
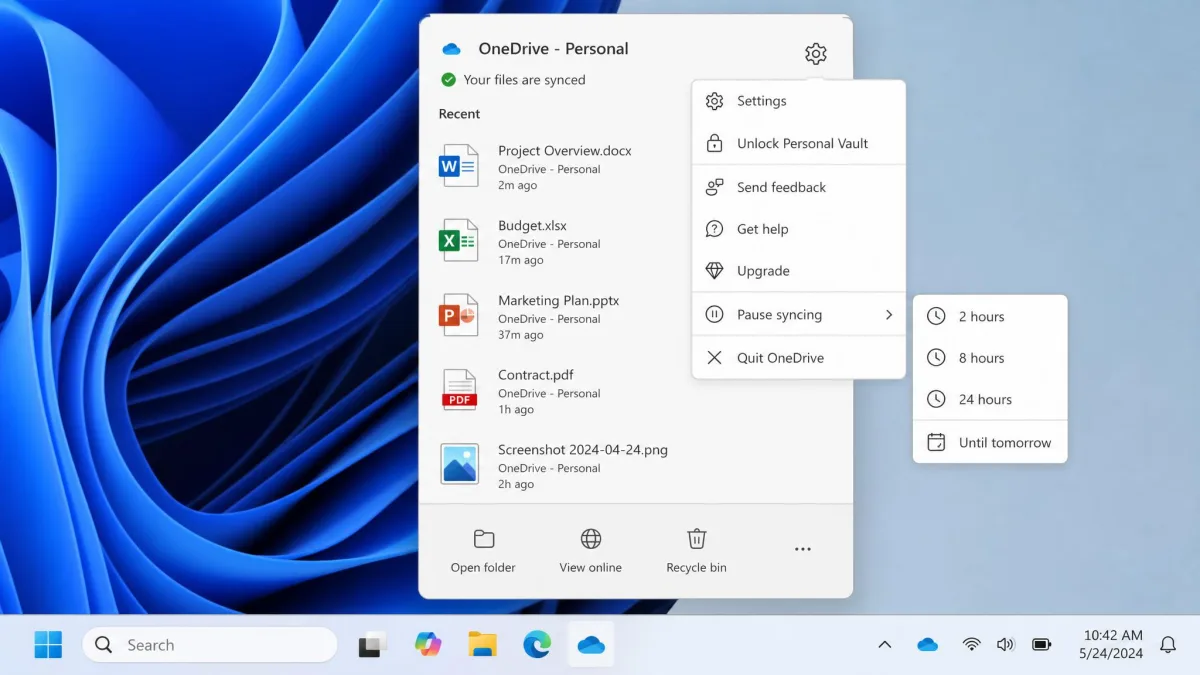
You do not need to remove them. Select the OneDrive icon in the notification area, select the gear, choose Pause syncing, and pick 2, 8 or 24 hours. Sync resumes on its own afterwards. For a permanent change, turn off Files On-Demand for folders you never touch, or stop backing up your Desktop and Pictures folders.
Pause cloud sync before any large task: video editing, a big import, a game install. You get the drive and the network to yourself, and the sync catches up later without you doing anything.
13. Clean the Vents and Stop Thermal Throttling
This is the fix that separates a laptop from a desktop, and the one most people skip. Dust collects in the intake vents and on the fan blades, airflow drops, and the processor gets hotter than it should for the work it is doing.
When the processor reaches its temperature ceiling it cuts frequency and power to protect itself, and you lose speed. Intel's maximum junction temperature is typically between 100C and 110C, with 100C common on laptop parts, as Intel's processor temperature guidance sets out. Most laptops also set a PROCHOT offset so the processor starts throttling below that ceiling, which means your machine may be slowing at temperatures that still look safe.
The symptom is distinctive. A throttling laptop feels fast for the first minute of a task and then steadily slows as the temperature climbs. Software slowdowns do not behave that way, so if speed drops with time under load, look at heat first.
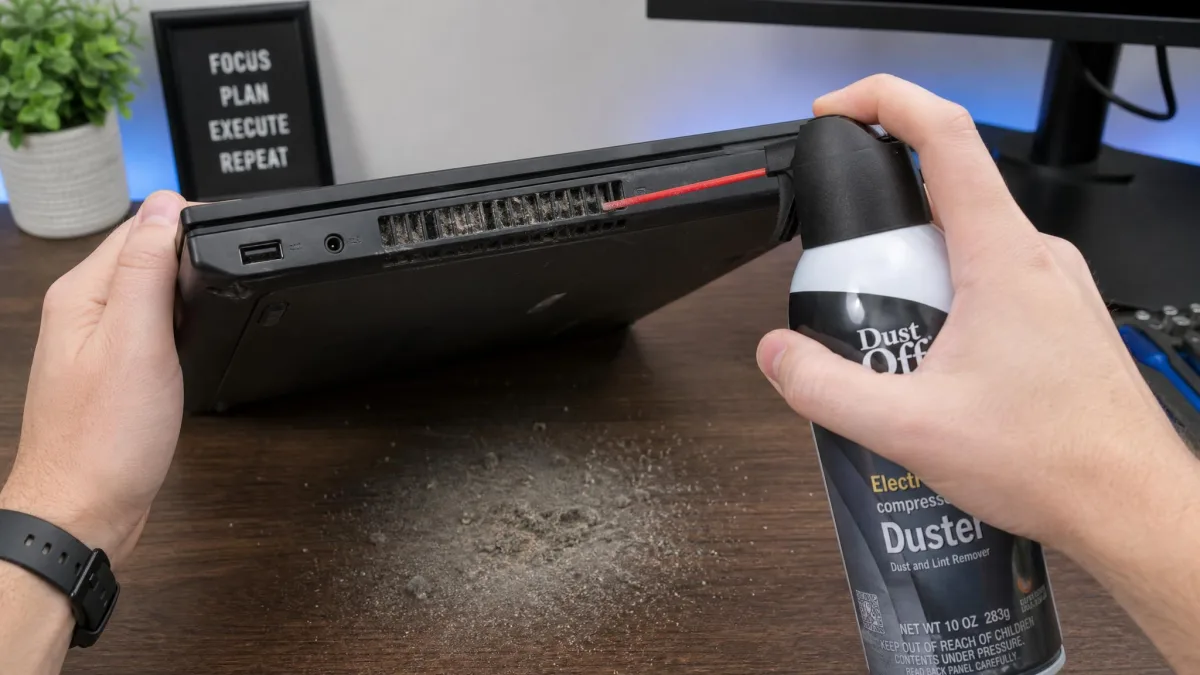
To clean it, shut the laptop down and unplug it, then use short bursts of compressed air held upright, aimed into the intake vents from the outside. Raise the back of the laptop on a stand so the intakes are not sitting flat against a desk or a duvet, which is the most common cause of a laptop cooking itself.
Do not spin the fan with compressed air. A fan driven backwards at high speed can generate enough voltage to damage the board it is attached to. Keep the air in short bursts, hold the blades still with a cocktail stick, and never use a vacuum cleaner on the vents, because the static charge is a genuine risk to the internals.
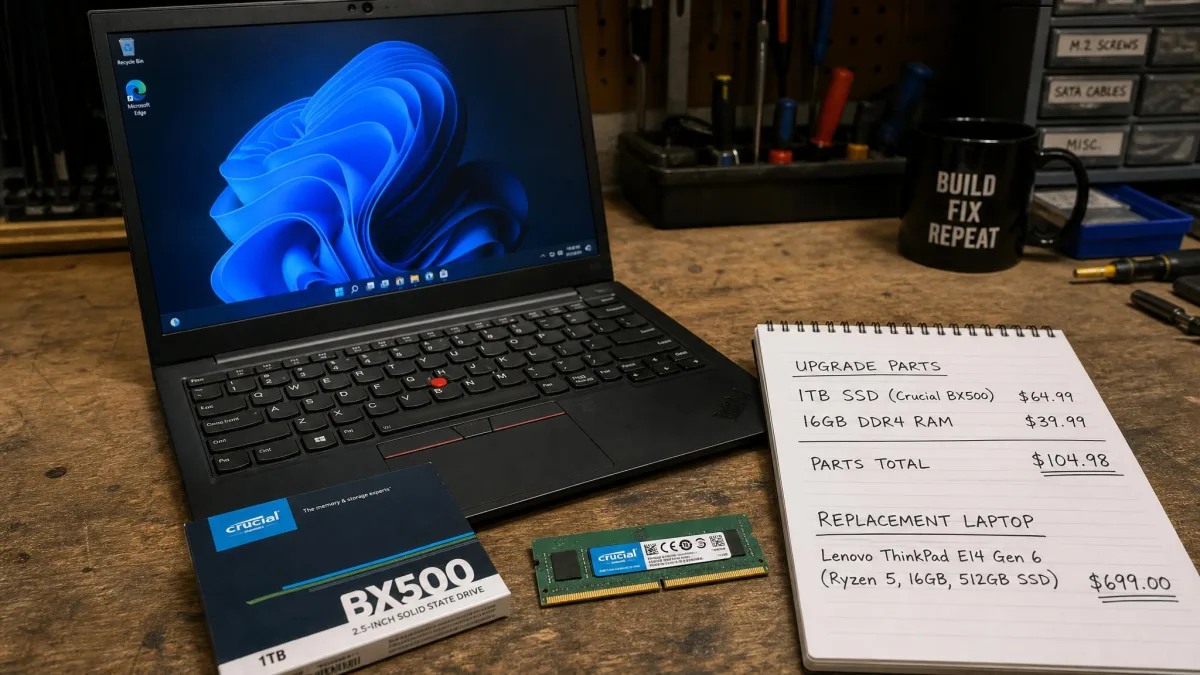
14. Upgrade to an SSD
Everything so far has been free. If your laptop still runs a mechanical hard drive, this is where spending money changes the machine completely.
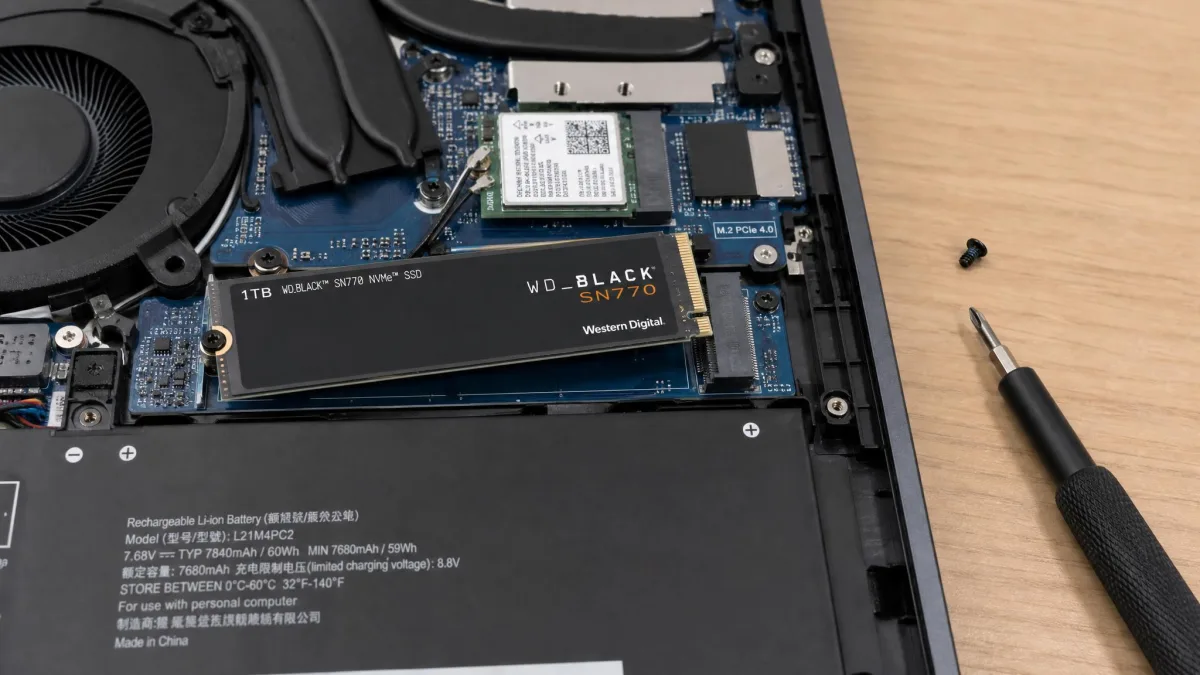
Fitting an SSD or an M.2 drive delivers the single most noticeable improvement of any upgrade on a slow laptop. Boot times show why: SSD-equipped laptops typically start in about 10 to 20 seconds against 30 to 40 seconds for a hard drive. Those figures swing widely with the laptop's processor, startup app load and drive interface, so treat them as a range rather than a promise.
Check what your laptop takes before you buy. Crucial's upgrade compatibility tool scans your system and lists the drives that physically fit, which saves you working out whether you need a 2.5 inch SATA drive or an M.2 stick. Budget 30 to 60 minutes for the swap, plus a clean Windows install or a clone of your existing drive.
Samsung's own test of a 1TB 870 EVO replacing a hard drive cut boot time from 29 seconds to 10 seconds, with sequential read and write rising roughly seven to nine times and random read and write rising by two to three orders of magnitude. Random access is the number that matters day to day, because it governs how quickly Windows and your applications load their thousands of small files. Larger claims circulate for very old machines, but a badly worn hard drive flatters the comparison, so treat the biggest figures as the top of the range rather than the norm.

15. Add More RAM
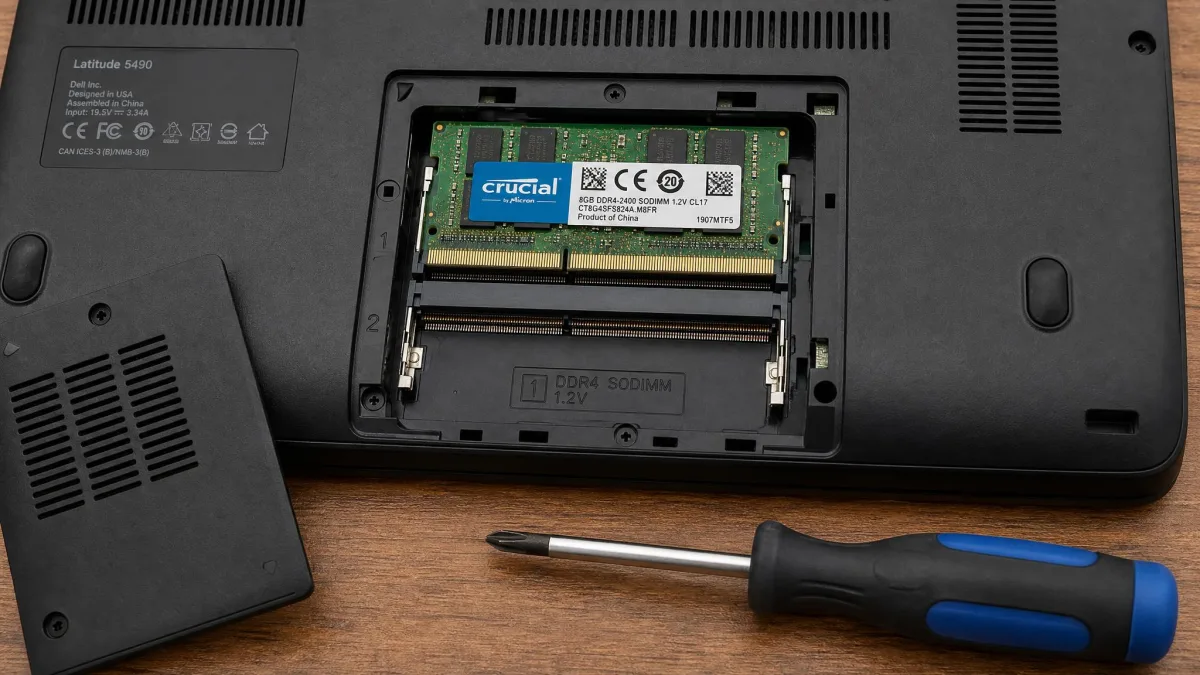
Memory is the other hardware fix, and it is more conditional than the SSD. Adding RAM pays off mainly on laptops sitting at 8GB or less. Above that, more memory rarely fixes a slow laptop, because the bottleneck is somewhere else.
Check first. Open Task Manager, select the Performance tab, then select Memory. If the in-use figure sits near the total during ordinary work, you are short. If it hovers at half, adding more will not help. Access varies too: some laptops have a panel on the underside that exposes the memory slots, while many thin machines have the memory soldered to the board.
How much RAM do you actually need?
Crucial's guidance is a sensible baseline. 8 GB covers casual browsing, email and office work. 16 GB suits heavier multitasking, casual gaming and business use. 32 GB is aimed at serious gaming, engineering and multimedia work. Windows 11 sets a minimum RAM of 4 GB, alongside a 1 GHz processor with two or more cores and TPM 2.0, but a 4 GB laptop runs at the edge of what the system asks for. For most people reading this, 16 GB removes the problem for the remaining life of the laptop.
When It's Time to Replace the Laptop Instead
There is a point where more effort stops paying. If your laptop already has an SSD and 16 GB of memory, if the vents are clear, if the startup list is short and the drive has room, and it is still slow, the hardware has been outrun by what you are asking of it.
The other honest signals: memory soldered to the board at 8 GB, a battery that no longer holds a charge on a model where the battery is glued in, a processor without TPM 2.0 so Windows 11 will not install, or a repair quote approaching half the cost of a replacement.
If none of that applies, the fixes above are worth another pass. Most laptops that feel finished are simply cluttered. Our guides to how to make my laptop faster and fix a slow computer go deeper on the diagnostics.