The low disk space warning usually arrives at the worst possible moment, right before a Windows update or a large download. A "C drive" that is nearly full also slows saves, stalls installers, and blocks feature updates that need gigabytes of space just to stage themselves.
The good news is that Windows already ships with almost everything needed to make freeing up storage space easy. Storage Sense, Cleanup recommendations, and Disk Cleanup between them can clear temporary files, old update leftovers, and forgotten downloads without a single third-party download.
This guide walks through twelve methods in order of effort, from a two-click cleanup to the deeper options that trade a little convenience for gigabytes of space.
Every figure below is either documented by Microsoft or measured on our own cleanup runs. Our reference machine is a 512 GB SSD laptop with 16 GB of RAM running Windows 11, upgraded rather than clean installed, which is the situation most low-space complaints come from.
First: Find Out What Is Using Your Disk Space
Cleaning blindly wastes an afternoon and usually recovers less than one targeted deletion would. Windows can show where the gigabytes went before you delete anything, so start there and pick the methods that match what you find.
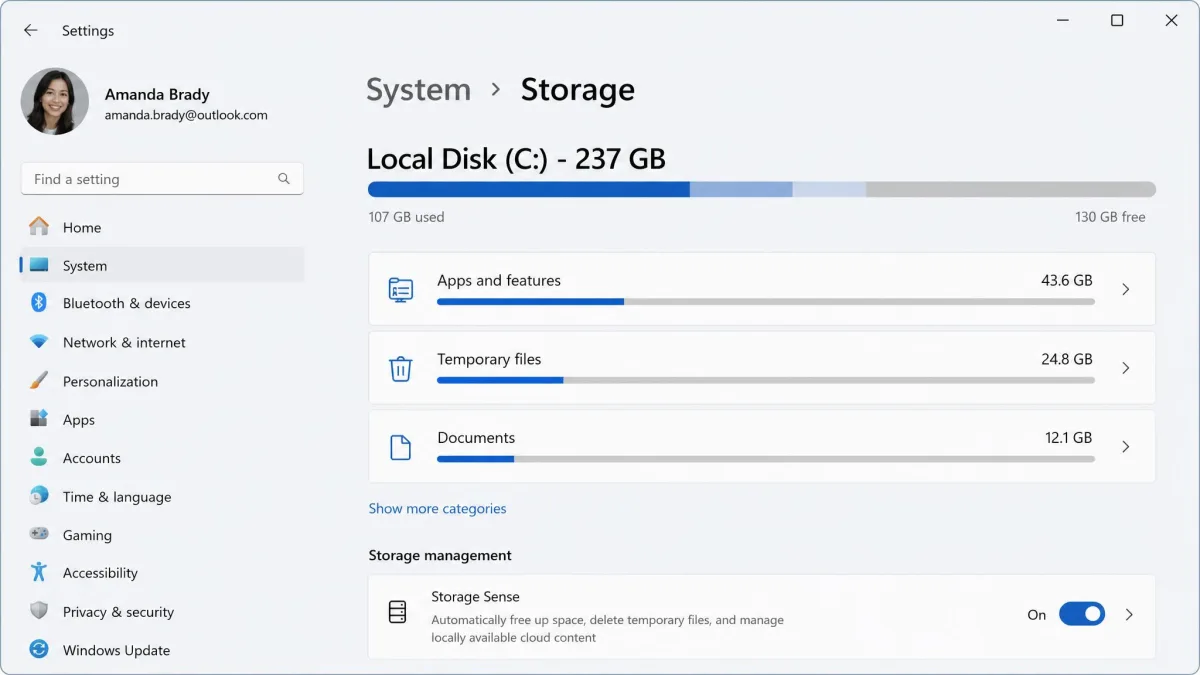
Check the storage breakdown in Settings
- Press Windows + I to open Settings.
- Select System, then choose Storage.
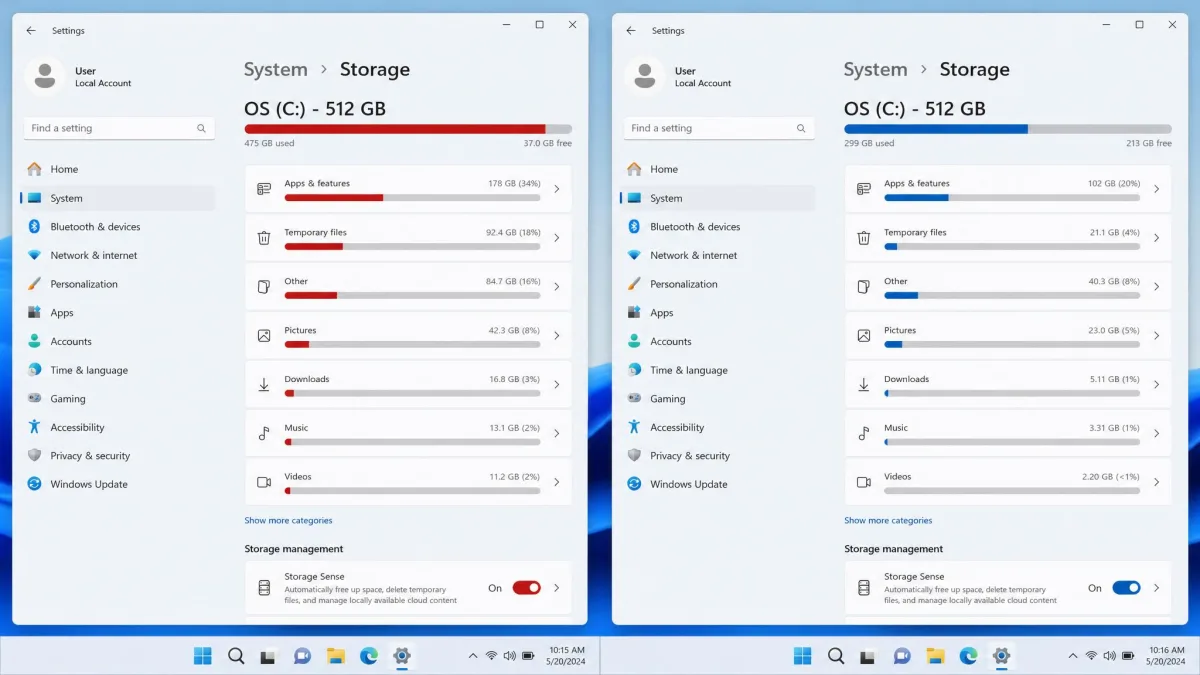
- Wait for the bars to finish calculating, then select Show more categories.
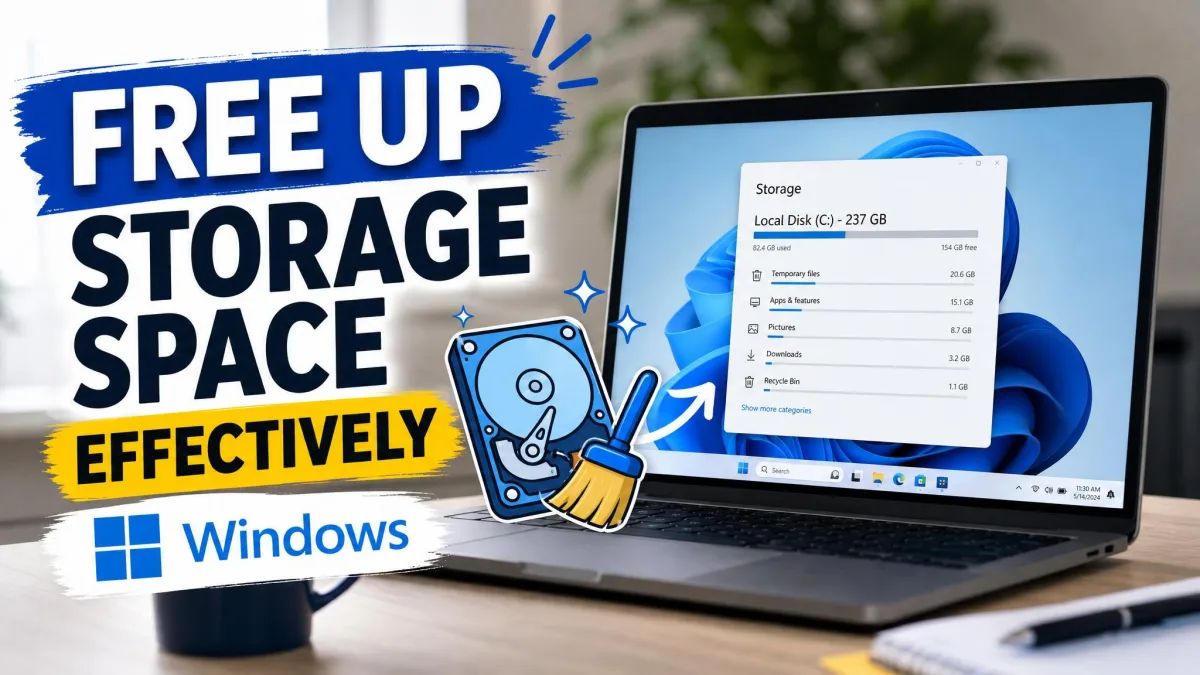
The breakdown lists apps and features, temporary files, documents, and system reserved space. In our cleanup runs the biggest surprises are almost always Temporary files and Apps and features, not personal documents.
Spot oversized folders in File Explorer or a disk analyzer
Settings stops at categories. To find the folder actually responsible, open File Explorer, right-click a suspect folder such as your user profile, and select Properties to read its true size on disk. For a full picture, a visual mapping tool is faster. WinDirStat draws every folder and file as a sized block, so an oversized directory is obvious at a glance. A visual disk map is usually what finally explains a full C drive, because the culprit is often one forgotten project folder or game install rather than anything Windows created.
Run the analyzer as administrator. Without elevation it silently skips protected system folders and the totals will not add up to what Settings reports.
1. Run Cleanup Recommendations (Windows 11's Fastest Win)
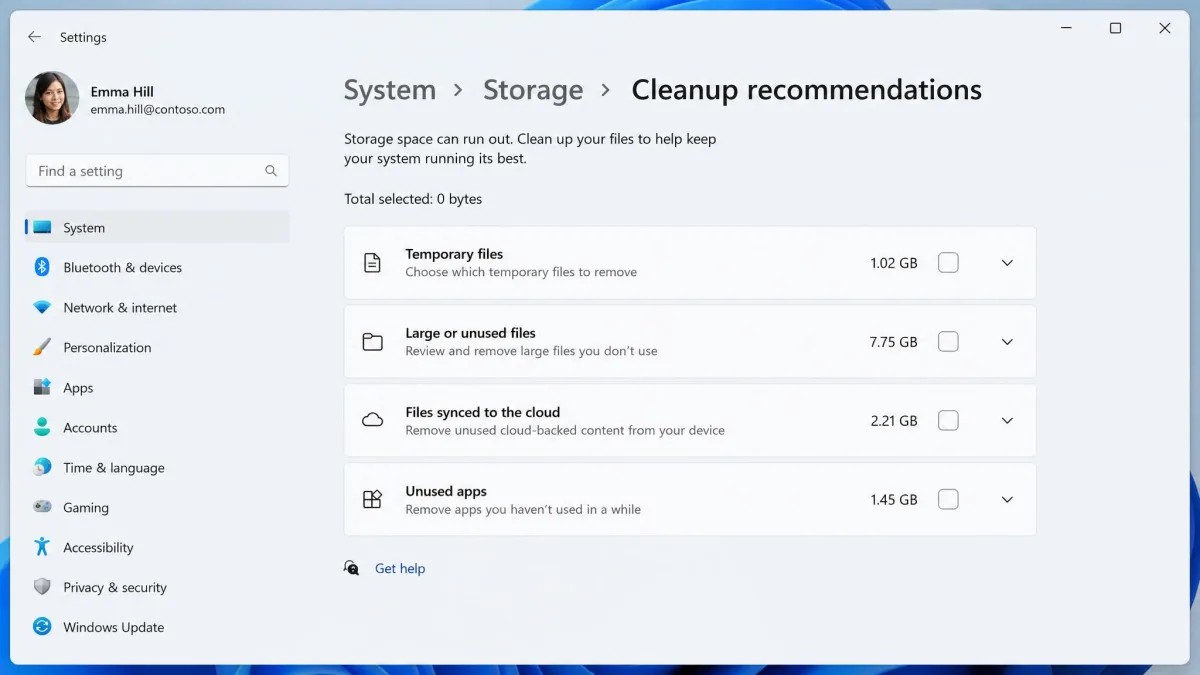
Windows 11 groups its best ways to clean up disk space into one screen. Disk Cleanup recommendations bundle temporary files, large or unused files, cloud-synced files, and unused apps, with running totals so nothing goes without your approval. It is the most effective way to free up disk space for the least risk.
- Press Windows + I to open Settings.
- Select System, then Storage, then Cleanup recommendations.
- Expand each of the four sections and review what is ticked.
- Select the cleanup button at the bottom of each section.
Read the Large or unused files list carefully first. Windows judges files by when they were last opened, and an archive you touch once a year still looks unused.
2. Delete Temporary Files
Temporary files are the largest easy win on most machines. The biggest chunk is usually Windows Update leftovers and previous installation files rather than browser junk, which is why this category holds many gigabytes on a PC that has taken a few feature updates.
- Press Windows + I to open Settings.
- Select System, then Storage, then Temporary files.
- Review each tick box, paying attention to Downloads and Recycle Bin.
- Select Remove files.
For a quicker manual pass, press Windows + R, type %temp%, and press Enter. Select everything in the folder and delete it. Windows will refuse to remove the handful of files currently in use, and skipping those is fine.
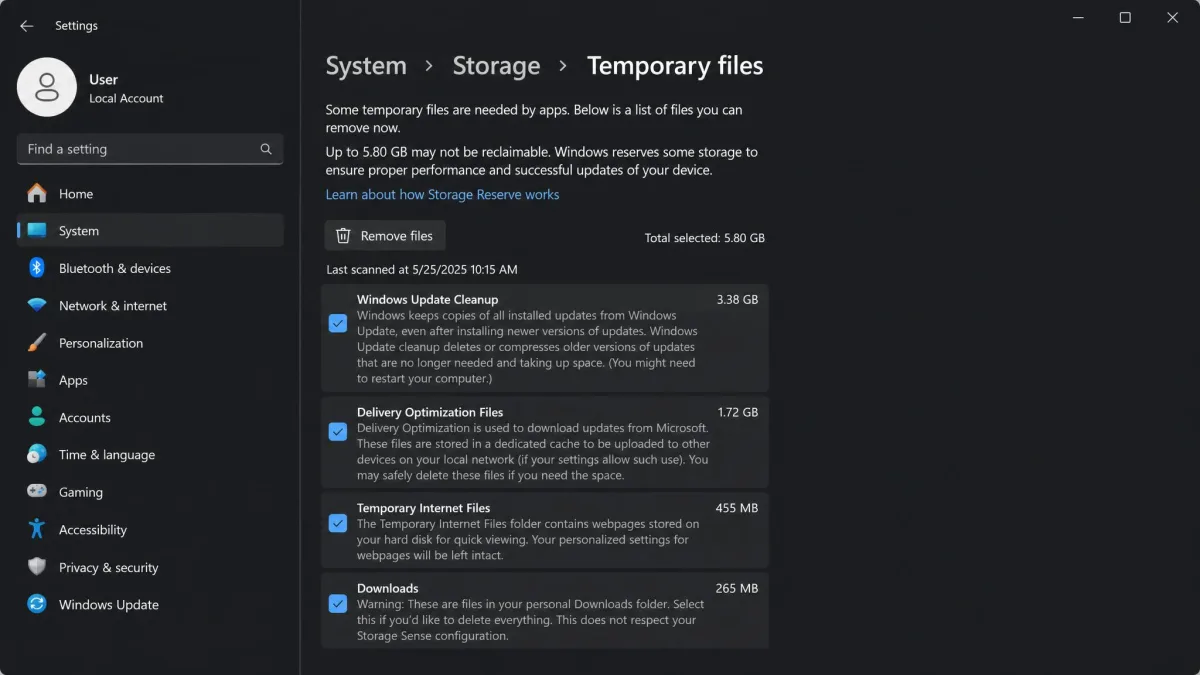
Browser caches sit outside this list and quietly grow into gigabytes of their own. Clearing the browser cache from inside its own settings is faster and more predictable than routing the job through any cleanup utility.
3. Empty the Recycle Bin and Clear Your Downloads Folder
Deleted files still occupy the drive until the Recycle Bin is emptied, and the Downloads folder is where installers go to be forgotten. Together they hold several gigabytes nobody has thought about in months.
- Right-click the Recycle Bin on the desktop and select Empty Recycle Bin.
- Open File Explorer and select Downloads in the navigation pane.
- Select the Size column header to sort largest first, then delete the installers and archives you no longer need.
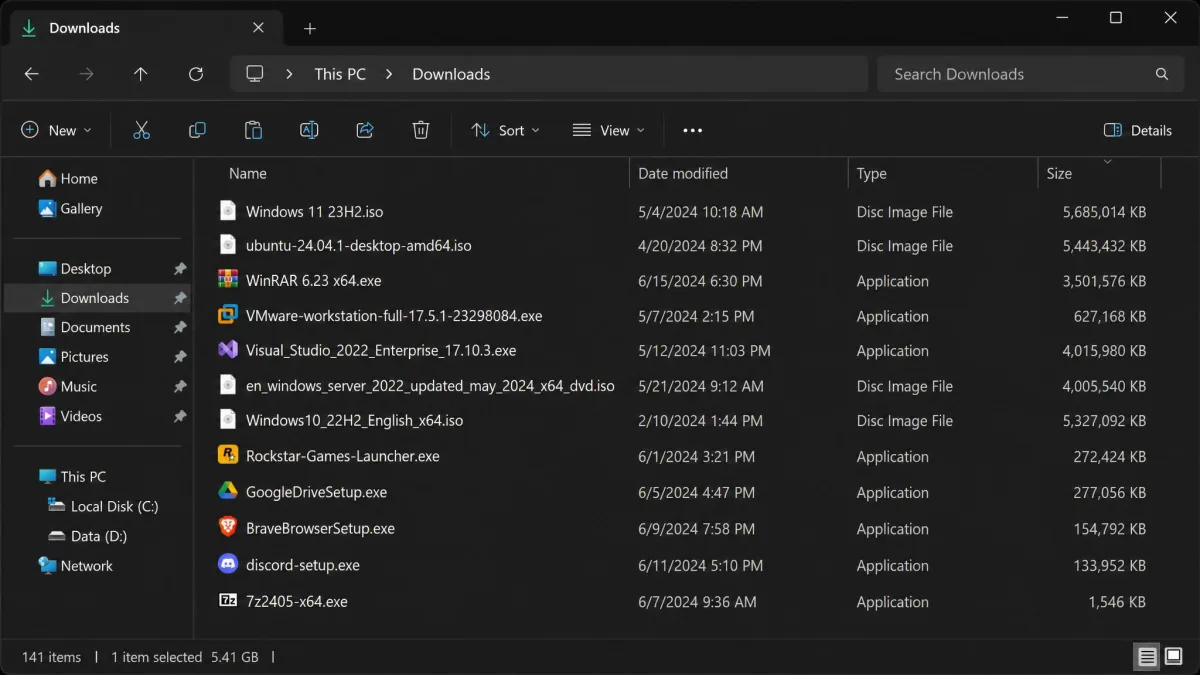
Microsoft states no default retention period for the Recycle Bin, so files sit there until something clears them. Sorting Downloads by size usually turns up old ISO files and game installers.
4. Uninstall Apps and Games You No Longer Use
Programs are the other half of most full drives, and modern games run to tens of gigabytes each. Sorting installed apps by size surfaces the games and creative suites that dwarf everything else on the drive.
- Press Windows + I to open Settings.
- Select Apps, then Installed apps.
- Set the Sort by control to Size.
- Select the three-dot menu beside an entry and choose Uninstall.
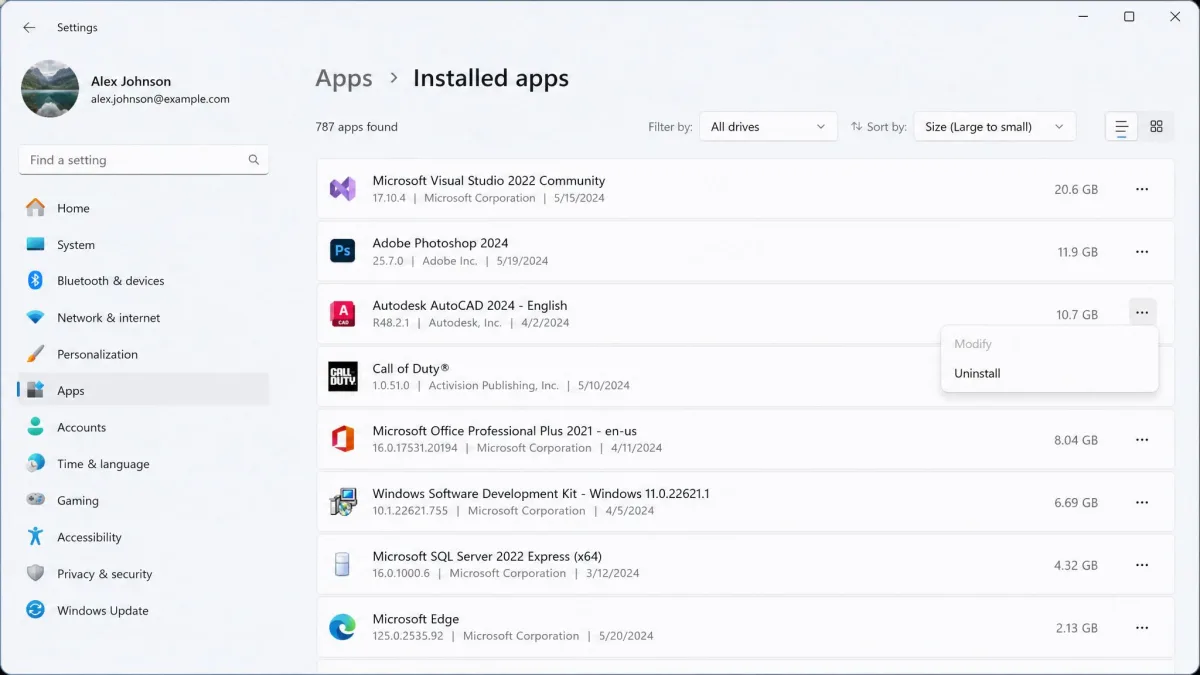
Games installed through Steam, Xbox, or Epic are best removed from inside those launchers, which also clears their shader caches and downloaded workshop content.
5. Turn On Storage Sense to Automate Cleanup
Storage Sense stops this problem coming back. It runs on a schedule or during low free disk space, and it empties the Recycle Bin, clears old Downloads, deletes temporary files, and converts unopened OneDrive files to online-only. Set it once and the routine deletions handle themselves.
- Press Windows + I to open Settings.
- Select System, then Storage, then switch Storage Sense on.
- Select Storage Sense to open its options.
- Choose how often it runs and how long files stay in the Recycle Bin and Downloads.
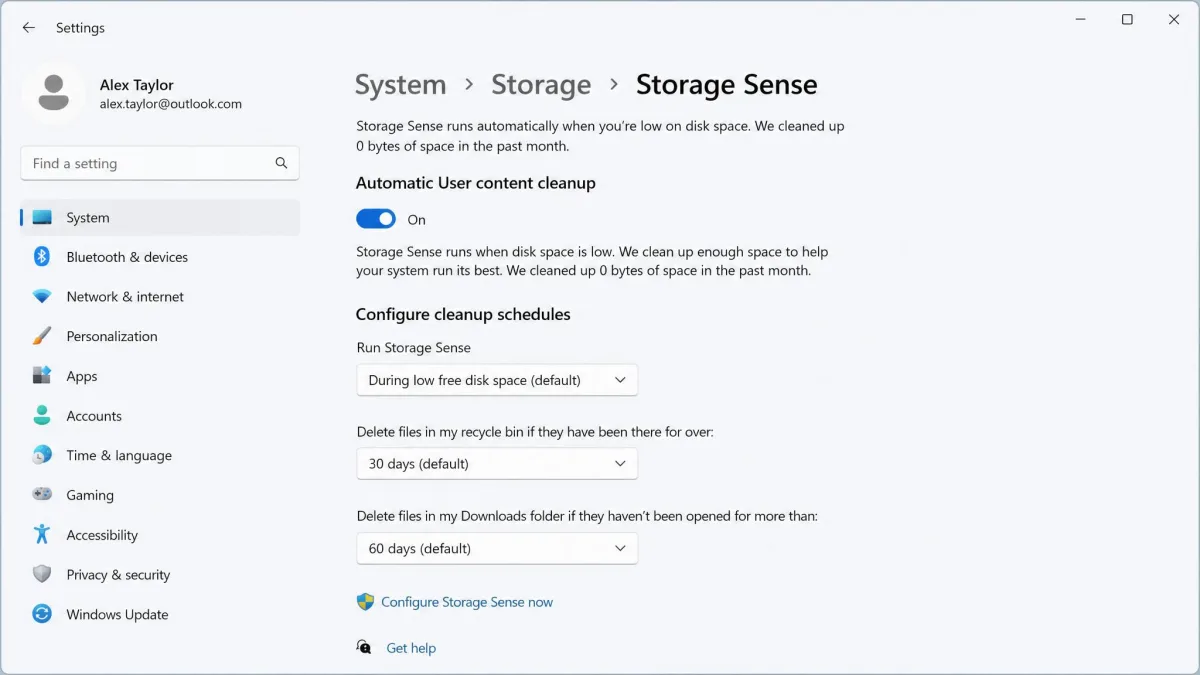
The shortest Recycle Bin retention option is 1 day, which clears the most files but leaves the smallest window to change your mind. We also set it to run during low free disk space rather than on a fixed schedule, so it stays out of the way until the drive genuinely needs help, which is exactly when you want it.
Letting Storage Sense clear the Downloads folder deletes installers and files that were never moved elsewhere, and those go without a Recycle Bin stop on the way. If Downloads doubles as your working folder, leave that option set to Never and move keepers into Documents first.
6. Use Disk Cleanup to Remove System Files
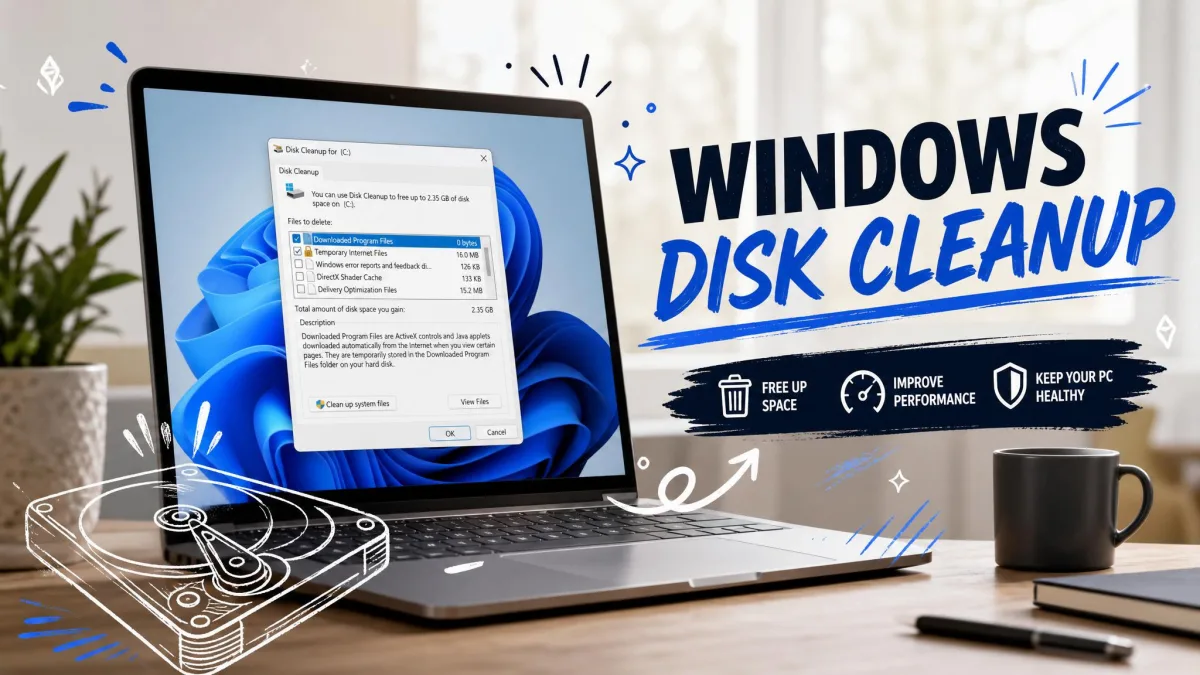
The older Disk Cleanup tool still reaches things the Settings pages do not, including update leftovers and the previous Windows installation. It only shows those entries after Clean up system files is selected, which is why a first pass often looks disappointingly small.
- Press Windows and type Disk Cleanup, then open it.
- Choose the C drive and select OK.
- Select Clean up system files and choose C again.
- Tick Windows Update Cleanup, Previous Windows installation(s), and Delivery Optimization Files, then select OK.
- To make the job repeatable, press Windows + R and run
cleanmgr /sageset:1to save your selection of cleanup categories, then runcleanmgr /sagerun:1any time to repeat that exact cleanup without clicking through the dialog again.
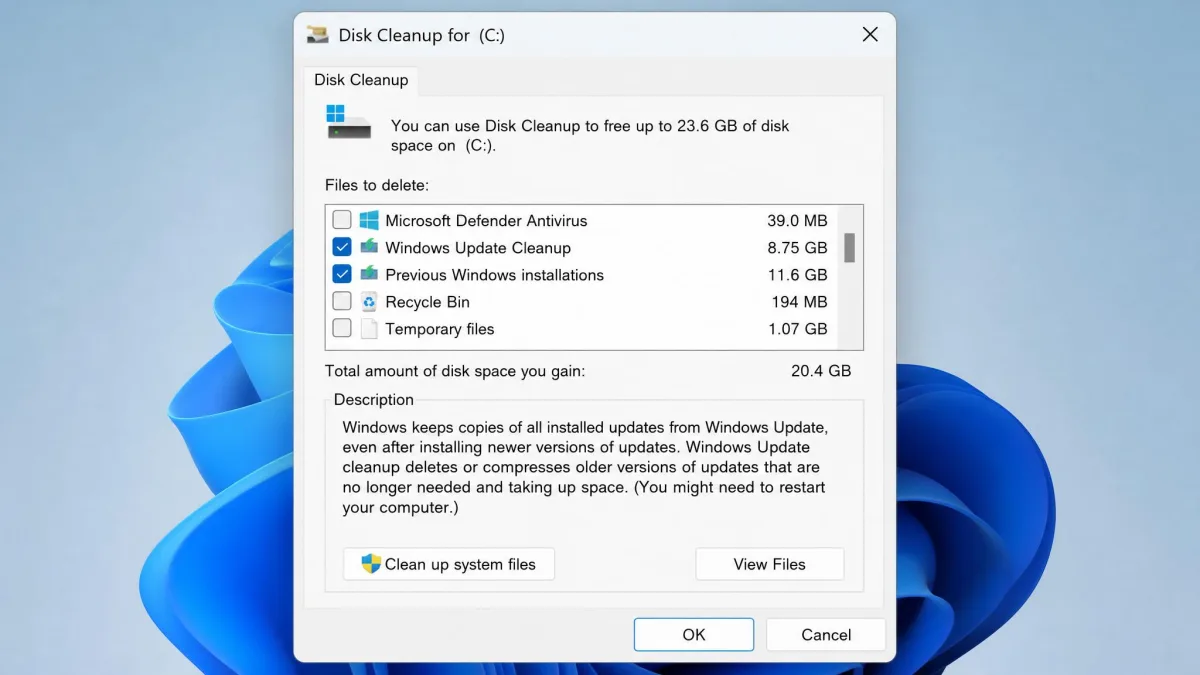
Clean up Windows Update leftovers and Windows.old
Windows keeps the previous Windows installation in a Windows.old folder for 10 days after an upgrade, then removes it automatically. Clearing it early through Disk Cleanup is the largest one-off recovery on a recently upgraded PC, because that folder holds a complete copy of the old system.
Removing Windows.old closes the rollback window for good. If the current build has given you any trouble at all, wait out the 10 days before clearing it. The same care applies to C:\Windows\SoftwareDistribution\Download: deleting its contents needs administrator permission, and only the files inside that Download folder are safe to remove. Both items are covered in Microsoft's official guidance on freeing up drive space.
Clean old component files with DISM /StartComponentCleanup
The component store keeps superseded versions of updated system files. A scheduled task clears them, but it waits at least 30 days after a component update, and it carries a 1 hour timeout that can stop it partway and leave files behind. Running the cleanup by hand clears them immediately.
- Press Windows, type Command Prompt, and select Run as administrator.
- Type
Dism.exe /online /Cleanup-Image /StartComponentCleanupand press Enter. - Let it finish, then restart the PC.
Adding /ResetBase to that command removes every superseded component version, and existing update packages can no longer be uninstalled afterwards. That only becomes a problem when a bad update needs rolling back, but it is a one-way door. Never delete files from the WinSxS folder by hand either, since doing so can leave the PC unable to boot or update. Microsoft explains the supported ways to clean up the WinSxS folder in its own documentation.
Our walkthrough on how to run Disk Cleanup in Windows covers the dialog in more detail.
7. Make OneDrive Files Online-Only with Files On-Demand
If you sync OneDrive, every downloaded file has a local copy taking up room. OneDrive Files On-Demand turns those copies back into online-only placeholders. The files stay visible and searchable in File Explorer, they simply download again on first open.
- Select the OneDrive cloud icon in the notification area.
- Open Settings, then Sync and backup, then Advanced settings.
- Select Free up disk space.
Switching files to online-only reclaims the space instantly. Opening them later stalls without a connection, which is painful on a laptop used offline, so mark the folders you work from on a plane as Always keep on this device.
8. Move Large Files to an External or Secondary Drive
Some files do not need deleting, they need relocating. Video projects, photo libraries, virtual machines, and game installs are the usual candidates, and an external SSD or second internal drive absorbs them without any risk to Windows itself.
- Connect the external or secondary drive.
- Open File Explorer and select the folder you want to move.
- Select the Cut button, open the destination drive, and select Paste.
- Confirm the files opened correctly from the new location before deleting anything.
Microsoft asks for at least 10 GB free on an external drive used to help complete a Windows update, a useful floor if you are borrowing a USB drive.
Change where new files, apps, and games are saved
Moving files once helps. Changing where new content lands stops the C drive refilling.
- Press Windows + I to open Settings, then select System, then Storage.
- On Windows 11, select Advanced storage settings, then Where new content is saved. On Windows 10, select More storage settings, then Change where new content is saved.
- Set new apps, documents, music, photos, and videos to the second drive.
The Windows 10 route sits under More storage settings while Windows 11 moved it under Advanced storage settings. The options behind both are identical, only the menu wording changed.
9. Disable Hibernation to Delete hiberfil.sys
Hibernation reserves a hidden file sized against your installed memory. A full hibernation file is about 40 percent of installed RAM, so a 16 GB machine gives up roughly 6.4 GB to a feature many people never use. Windows can also keep a reduced hibernation file instead, which leaves about 20 percent of installed RAM, so that same 16 GB machine keeps a roughly 3.2 GB file instead of a 6.4 GB one. Microsoft measured turning it off as saving over 1.5GB on a 4 GB x64 Windows Home reference image, and reducing it saved over 930 MB.
- Press Windows, type Command Prompt, and select Run as administrator.
- To remove the file completely, type
powercfg /h offand press Enter. - To shrink it instead, type
powercfg /h /type reducedand press Enter. - Type
powercfg /availablesleepstatesto confirm the result.
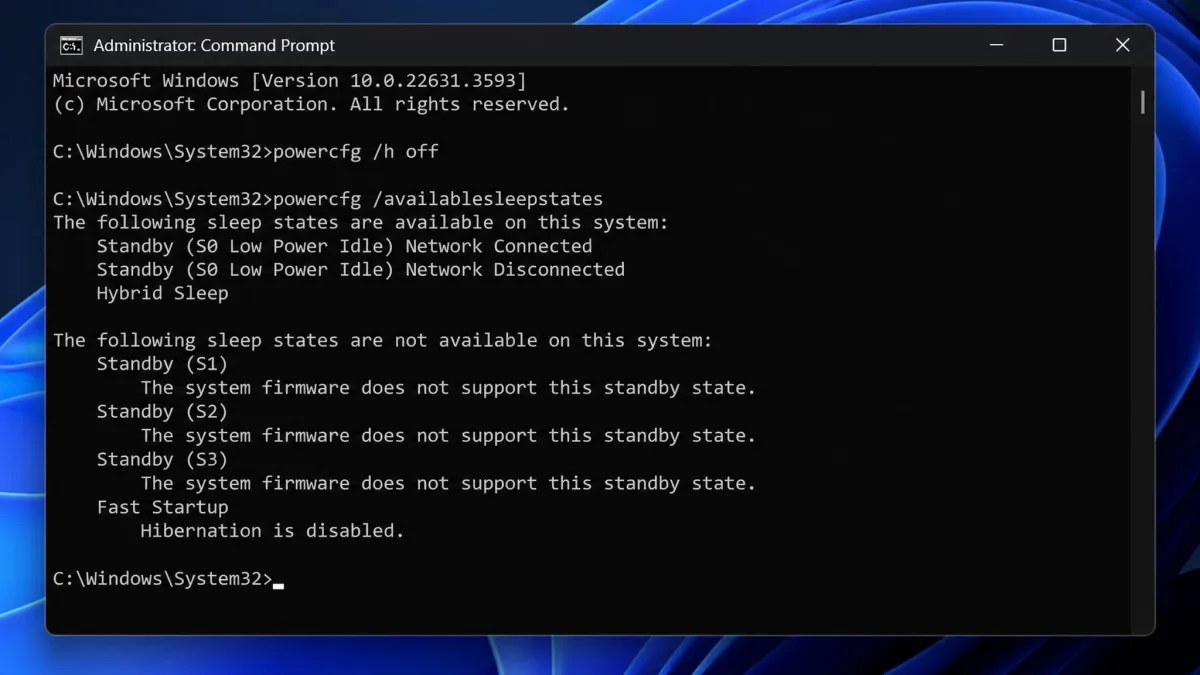
The reduced type is the middle path if you still want fast resume, since it keeps hibernation working while handing back roughly half the space the full file was holding.
Turning hibernation off also disables Fast Startup, so boot times get slower on machines that relied on it. Laptops lose the ability to hibernate on a dying battery, which means unsaved work is at risk during a flat-battery shutdown. Run powercfg /h on to reverse it.
10. Shrink System Restore's Reserved Space
System Protection sets aside part of the drive for restore points, and on a small SSD that reservation matters. Restore points earn their keep, so cap the allocation rather than switching protection off.
- Press Windows, type Create a restore point, and open it.
- Select the C drive, then select Configure.
- Drag the Max Usage slider down to a few percent and select Apply.
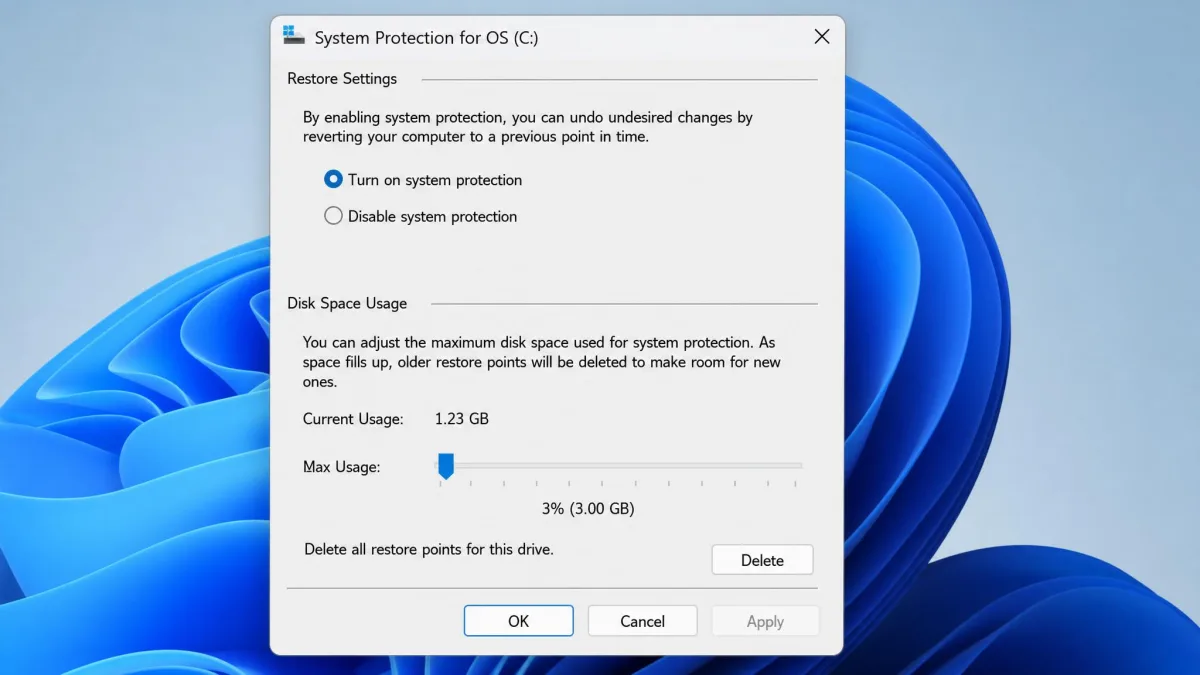
A single restore point commonly occupies roughly 500 MB to 1 GB, though that scales with system activity and installs since the last one. The cap differs by Windows build and drive size, and some upgrades reset it, so check System Protection rather than assuming a figure. We have seen a drive capped at a few percent start filling again after a major upgrade. For a command-line cap, vssadmin Resize ShadowStorage accepts a MaxSize of 300MB or greater.
Turning System Protection off entirely deletes every existing restore point and leaves you without a rollback if a driver or update breaks something. Cap the space instead of disabling the feature.
11. Compress Windows with Compact OS or NTFS Compression
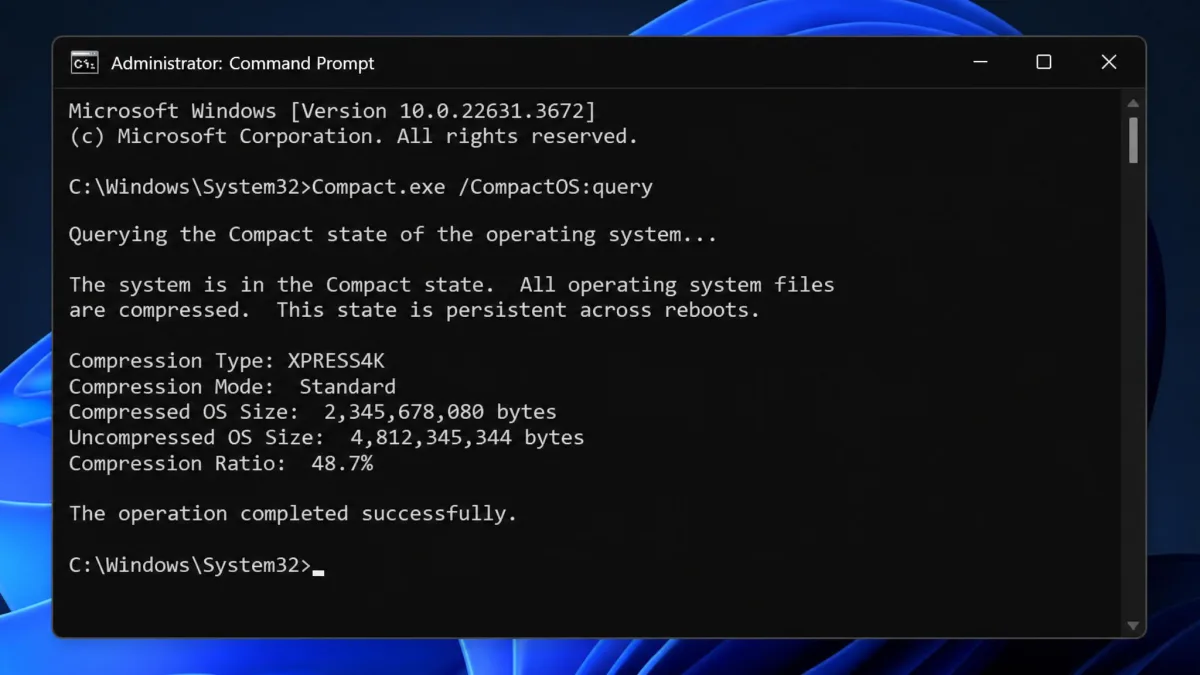
Windows can run from compressed system files. Compact OS is Microsoft's supported way to do it, and on the company's own 4 GB x64 Windows 10 Home image it cut the base footprint from 15.06 GB to 11.3 GB, a saving of more than 3.7GB.
- Press Windows, type Command Prompt, and select Run as administrator.
- Type
Compact.exe /CompactOS:queryto check the current state. - Type
Compact.exe /CompactOS:alwaysto compress, and let it finish. - Type
Compact.exe /CompactOS:neverif you want to reverse it.
Compact OS finishes quickly and is fully reversible, so it is easy to trial and undo if you dislike the result. The performance cost depends on drive speed and CPU, so the impact ranges from unnoticeable on a fast SSD to visible on older hardware.
NTFS compression on individual data folders is the gentler alternative. Right-click a folder, select Properties, choose Advanced, and tick Compress contents to save disk space. It suits archives and documents, and is a poor fit for already-compressed media or game folders.
12. Scan for Malware That Is Eating Storage
Storage that fills for no obvious reason is occasionally a symptom rather than a habit. Some malware writes large log or cache files, and cryptominers and adware droppers leave bulk behind. A scan costs nothing and rules it out.
- Press Windows + I to open Settings.
- Select Privacy and security, then Windows Security.
- Select Virus and threat protection, then Scan options.
- Choose Full scan and select Scan now.
If the drive fills again within days of a cleanup, run a Microsoft Defender Offline scan from the same screen. It runs before Windows loads and catches what hides from a normal pass.
What Not to Delete (and Why)
A few folders look like obvious junk and are not. The WinSxS folder is the clearest example, since deleting files from it, or the folder itself, can leave the PC unable to boot or update. Clear it only through DISM.
Leave the recovery partition alone too. It has no drive letter for a reason, it is usually under a gigabyte, and removing it costs the built-in reset option exactly when you would need it.
The same applies to C:\Windows\System32, page and swap files, driver stores, and anything in Program Files an uninstaller should handle. If a folder cannot be removed through Settings, Disk Cleanup, or an uninstaller, that is usually the answer rather than an obstacle.
Reserved Storage can be turned off to reclaim several gigabytes, but a later feature update then needs that space found again before it will install. The reserved amount scales with installed optional features and language packs, so it varies from machine to machine, and turning it off trades a predictable reservation for an unpredictable install failure.
How Much Space Each Method Actually Frees
Every drive is different, so treat the figures below as the shape of the win rather than a promise. Where Microsoft has published a measurement we have used it; where the amount depends on your machine, the mechanism is stated instead.
| Method | Typical reclaim | Reversible? | Risk |
|---|---|---|---|
| Delete temporary files | Varies; largest share is update leftovers | Yes, settings are unchanged | Low |
| Empty Recycle Bin and Downloads | Size of what is sitting there | No | Low |
| Uninstall unused apps and games | Tens of GB for modern games | Yes, by reinstalling | Low |
| Disk Cleanup with system files (Windows.old) | Multi-GB; a full copy of the old install | No, the 10-day rollback closes | Medium |
| DISM /StartComponentCleanup | Superseded component versions | Yes, without /ResetBase | Medium |
| DISM /StartComponentCleanup /ResetBase | All superseded versions | No, updates cannot be uninstalled after | High |
| OneDrive Files On-Demand | Size of the synced local copies | Yes, files re-download | Low, needs connectivity |
| Disable hibernation | About 40 percent of installed RAM | Yes, powercfg /h on | Low, Fast Startup is lost |
| Reduce the hibernation file | Leaves about 20 percent of installed RAM | Yes | Low |
| Shrink System Restore allocation | Down to a 300MB floor via vssadmin | Yes | Medium, fewer restore points |
| Compact OS | 3.7GB on Microsoft's 4 GB x64 reference image | Yes, compact /compactOS:never | Low, slight performance cost |
Working through the built-in tools in order, we typically recover somewhere in the 10 to 30 GB range on a machine that has been running for a year or more. Most of that comes from the first six methods.
How Much Free Disk Space Do You Actually Need?
Windows needs headroom to work, not just to store things. Feature updates typically require 6 GB to 11 GB or more of free space, quality updates want 2 GB to 3 GB or more, and Microsoft's reduced-offline-time upgrade scenario asks for about 20 GB free on the system volume.
Beyond updates, the common comfort target is keeping around 30 percent of the drive free, with performance dropping past roughly 70 percent usage. Treat that as a range, not a rule: the right headroom depends on drive size and type, and 30 percent of a 2 TB SSD holds back far more than anyone needs. On a 256 GB laptop, 20 to 30 GB free is a reasonable floor.
Frequently Asked Questions
How much free space does Windows actually need?
What is the fastest way to free up space?
Is it safe to delete temporary files?
Why does disabling hibernation free space, and what do I lose?
Can I delete Windows.old?
Does emptying the Recycle Bin really free space?
Is Compact OS safe?
What if my C drive is still full after all of this?
Final Thoughts
Most full drives come back with the first six methods here, and Storage Sense keeps them that way once it is switched on. Work down the list in order and stop when you have the room you need.
If the drive is still tight, the honest answer is capacity rather than cleanup. A second internal drive or a roomy external SSD costs less than the hours spent shaving gigabytes off a 256 GB laptop every few months. On a Mac instead? Our guide to how to free up disk space on Mac covers the equivalent tools.