Plenty of people want a VPN they fully control. Some want secure remote access to a home network from a laptop or phone. Others want privacy on public Wi-Fi without trusting a third-party company with their traffic. A few just enjoy the challenge of building something from scratch. Whatever the reason, running your own VPN server puts you in charge of the keys, the logs, and the whole connection.
We have set up VPN servers on cloud droplets, on a Raspberry Pi at home, and on router firmware, so this guide is written from hands-on experience. We will walk through the real trade-offs first, then show you the full step-by-step process to get a private server up and running. This is honest, practical advice, not a sales pitch: for some readers a DIY VPN is the right call, and for others a commercial service is the smarter, cheaper solution.
A quick expectation-setter before we start. Building your own VPN is heavy on command-line work. The process runs through many steps and it helps to be comfortable with a terminal. None of it is beyond a patient beginner, but plan for an afternoon rather than five minutes.
Should You Create Your Own VPN or Use a VPN Service?
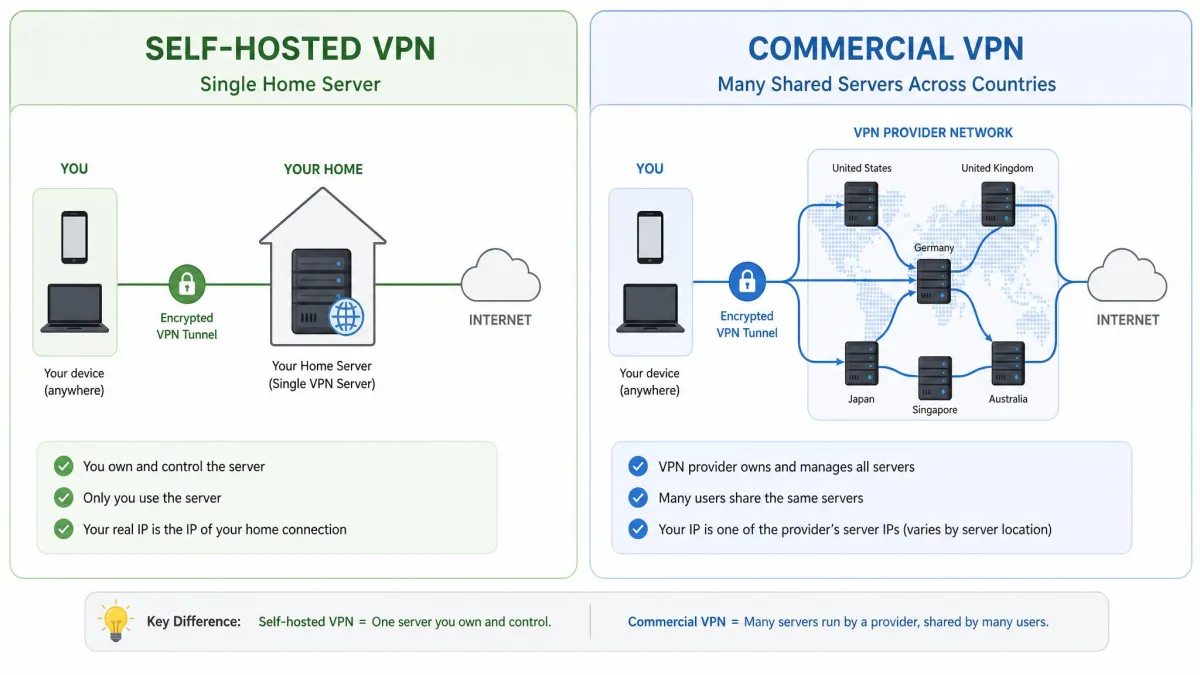
Before you install anything, it is worth being clear about what a self-hosted VPN actually does. A VPN you build yourself creates an encrypted tunnel between your devices and your own server. That is excellent for reaching files, printers, or a media library on your home network while you travel. It is also great for encrypting your traffic on untrusted Wi-Fi, as long as you understand its limits.
Here is the limit most people miss. A self-hosted VPN is not an anonymity tool. Your server keeps one fixed IP address, so it never masks your identity the way a commercial pool of shared IPs does. Anyone looking closely can tie that address back to you. A home VPN also encrypts only the hop between your device and your home network. Once traffic leaves your home connection, your ISP still sees it.
Pros and cons of a DIY VPN
The appeal of building your own is real control. You own the hardware or the server, you set the encryption, and no company logs your browsing. The costs are predictable, and on a cloud VPS they are low. For a network-minded person, it is also a genuinely useful skill to have.
Pros
- Full control over the server, the keys, and the logs
- Secure remote access to your home network and devices
- Low, predictable running cost, especially on a cloud VPS
- No third-party company logging your traffic
- A great way to learn real networking
Cons
- Command-line setup with many steps; not beginner-friendly
- Does not hide your identity or spoof your location well
- You own every security update, patch, and troubleshooting session
- A home server is limited by your upload speed
- No large server network for streaming or geo-unblocking
Maintenance is the cost people forget. Once your server is live, you own it. Every security update, every patch, and every late-night troubleshooting session is yours. A commercial provider handles all of that for you as part of the subscription.
When a commercial VPN makes more sense
If your main goal is unblocking content, hiding your location, or getting fast servers in dozens of countries, a paid service wins easily. Commercial providers run huge networks of shared IPs, apps for every device, and support teams. A service like CyberGhost connects up to 7 devices at once and backs its plans with a 45-day money-back guarantee, which is hard to match with a single self-hosted server.
A simple rule of thumb: build your own VPN when you want secure access to your own network. Buy a commercial VPN when you want privacy, streaming, and location-switching across the wider internet.
VPN Server vs VPN Client: Key Terms Explained
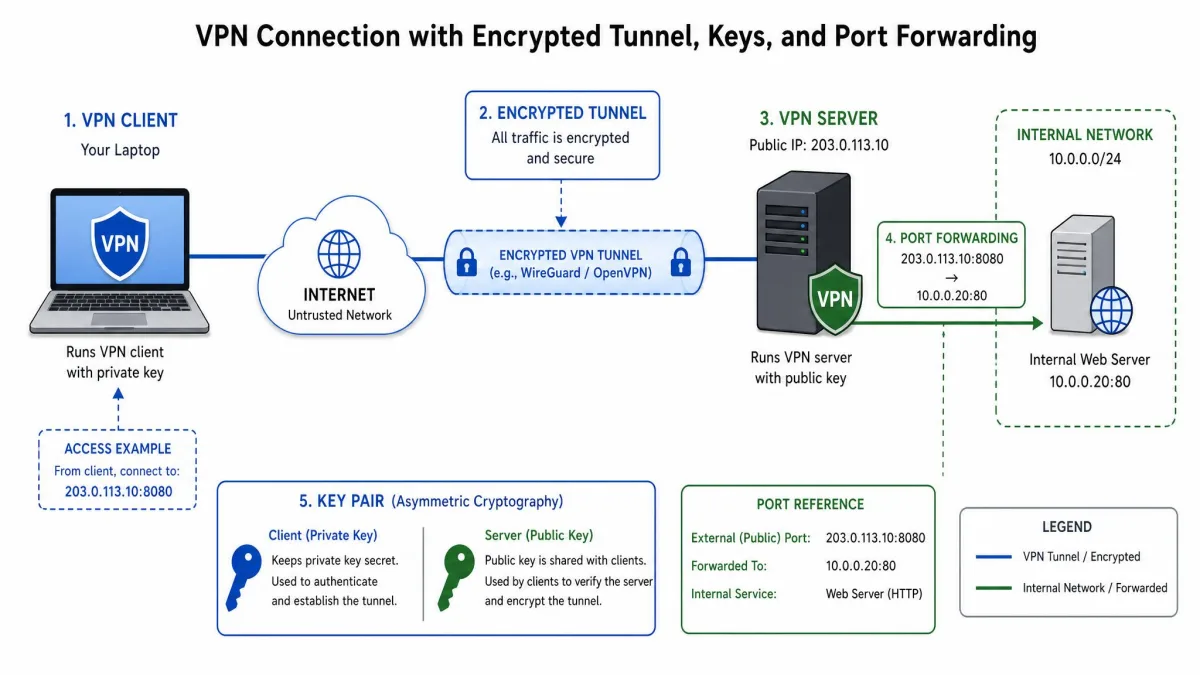
A few terms will come up repeatedly, so let us define them once. The VPN server is the machine that accepts incoming connections and routes traffic. In this guide that server is your Pi, your cloud droplet, or your router. The VPN client is the device you connect from, such as your laptop or phone, running an app that speaks the same protocol.
The protocol is the set of rules that build and secure the tunnel. WireGuard and OpenVPN are the two we will use. A key pair, made of a private key and a public key, lets the server and client verify each other and encrypt data. Port forwarding tells your home router to send incoming VPN traffic to the right internal machine. Dynamic DNS, or DDNS, gives your changing home IP address a stable name so clients can always find it.
Keep your private keys private. A private key never leaves the device it was made for, and you never paste it into a config that gets shared. If a private key leaks, generate a new key pair and revoke the old one.
What You Need Before You Start
Getting your prerequisites straight now saves a lot of frustration later. The exact list depends on which method you pick, but the core needs are similar across all three.
Hardware and device requirements
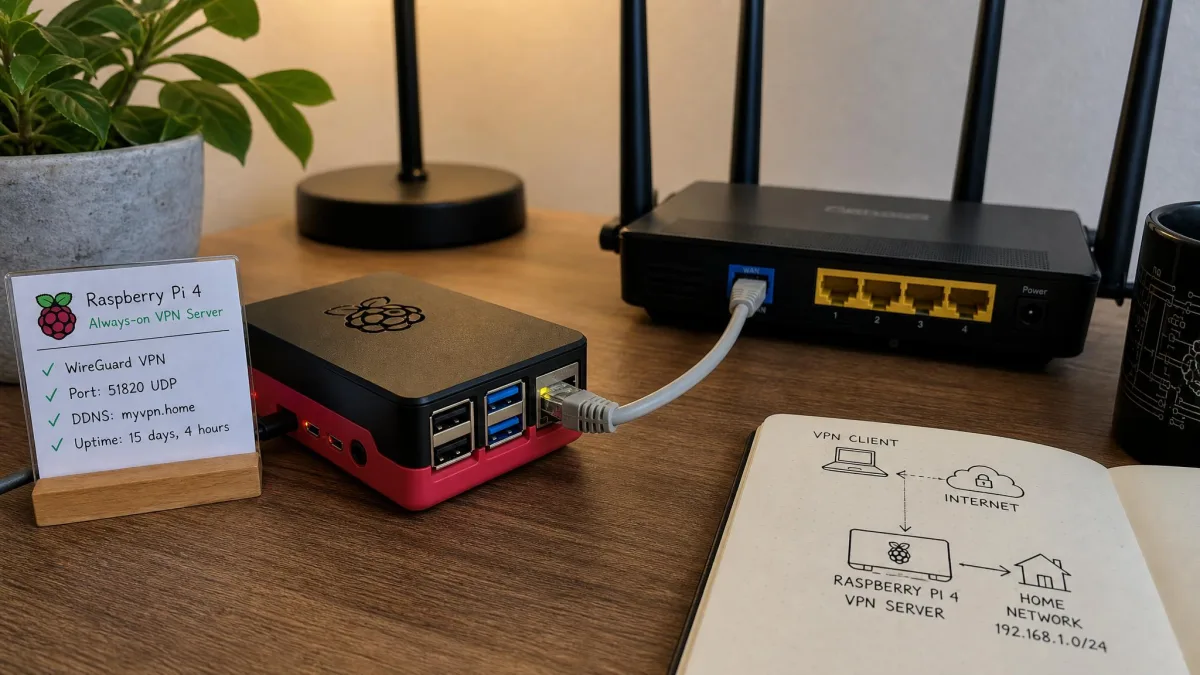
For a home server, a Raspberry Pi 4 or newer is the popular choice, and it needs to run 24/7. Older Pi models tend to cap out near 100 Mbps, so a newer board is worth it. A wired gigabit Ethernet connection is far better than Wi-Fi here. In our testing, Wi-Fi made an unreliable link for a server, while a wired connection held up steadily under load.
For a cloud VPS, you do not need any hardware at all. You rent a small virtual server and connect to it over SSH. For a router setup, you need either a router with native VPN server support or one that is compatible with third-party firmware.
ISP requirements, static IP, and dynamic DNS
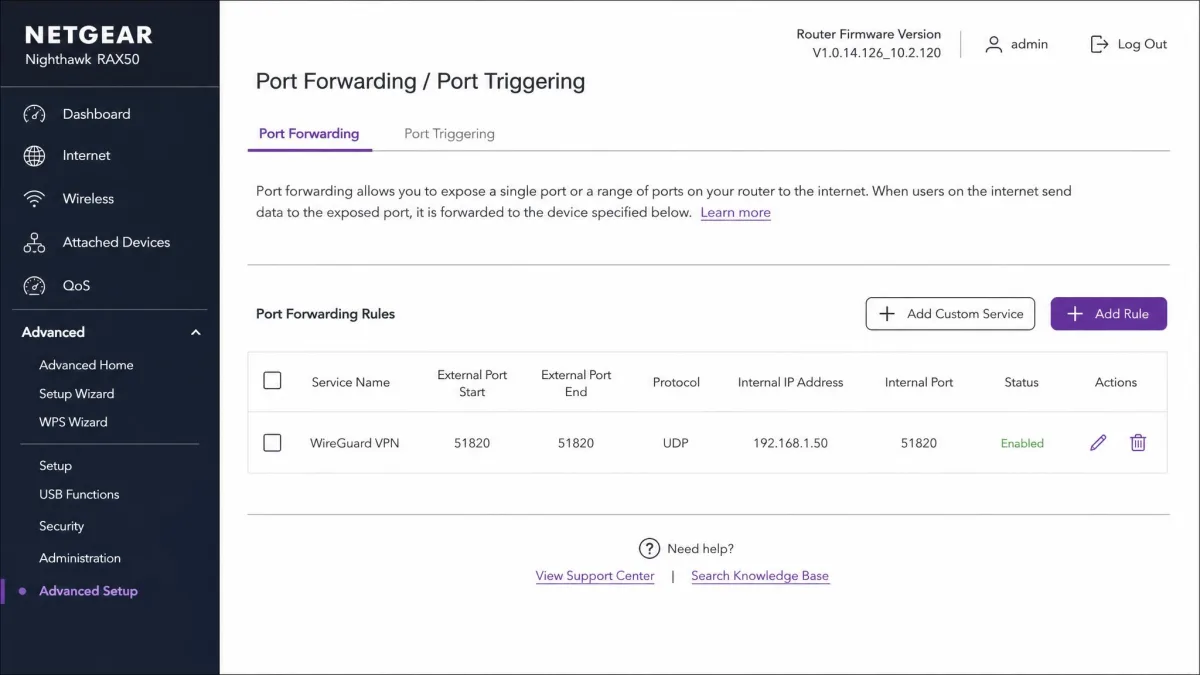
Home hosting adds a few networking hurdles. Your server needs a static local IP address so your router always forwards traffic to it. You also need to set up port forwarding, sending the VPN port to your server. For WireGuard that is UDP port 51820 by default.
Most home connections get a public IP that changes over time, so dynamic DNS gives that address a fixed hostname your clients can rely on. There is one bigger obstacle to check for first. Many residential ISPs use Carrier-Grade NAT, known as CGNAT, which quietly blocks home VPN hosting. In our experience, beginners usually do not discover a CGNAT problem until their setup simply fails to connect.
Check for CGNAT before you build a home server. Compare your router's public IP address to the address shown by an online IP checker. If they do not match, your ISP is likely using CGNAT, and a cloud VPS will save you hours of dead-end troubleshooting.
Choosing Your Method
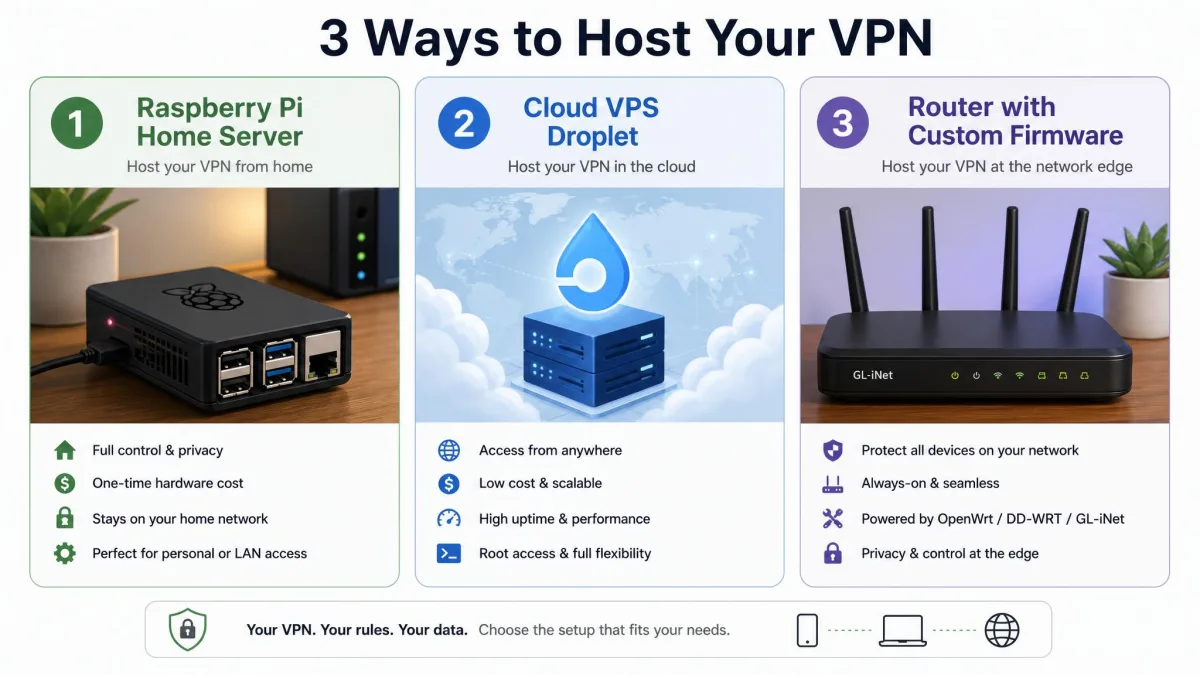
There are three practical ways to create your own VPN. The right one depends on your goal, your budget, and how much you enjoy tinkering. Here is how they compare at a glance.
| Method | Approx. cost | Difficulty | Speed ceiling | Best for |
|---|---|---|---|---|
| Home / Raspberry Pi | Hardware plus electricity | High: CLI, port forwarding, DDNS | Home upload speed, slowest | Remote access to your home network |
| Cloud VPS | About $4 to $6/month | Medium to high: CLI on Ubuntu | Datacenter link, fastest | Privacy and speed away from home |
| Router firmware | $0 if compatible, else $150+ | Medium to high: flashing is risky | Router CPU limited | Whole-network coverage |
Method 1: Create a VPN on a home computer / Raspberry Pi
This method hosts the server on hardware you already own, most often a Raspberry Pi. It is the classic choice for reaching your home network from anywhere. The open-source PiVPN project makes the install much simpler, and a free service like DuckDNS handles dynamic DNS.
The honest catch is speed. A home VPN server's real ceiling is your upload bandwidth, which makes it the slowest option, since home upload speeds trail download speeds by a wide margin. Performance drops further when several devices connect at once, especially while streaming or moving large files. It is perfect for grabbing a document from home, less so for heavy use.
Method 2: Create a VPN on a cloud VPS
Renting a virtual private server is our recommended path for most people who want privacy away from home. You get a fast datacenter connection, a clean Ubuntu install, and no CGNAT to fight. Providers like DigitalOcean start their basic droplets at $4.00 per month, and a comfortable VPN-capable VPS typically runs about $5 to $6 per month.
The setup is command-line work on a fresh Ubuntu 24.04 server, but it is well documented and predictable. This is the method our step-by-step section below follows most closely.
Method 3: Set up a VPN on your router
A router-based VPN covers your whole network at once, so every device behind it is protected without per-device apps. Some routers ship with a built-in VPN server, such as the ASUS RT-AX88U Pro. Others can be flashed with third-party firmware like DD-WRT or OpenWRT.
Two cautions apply. Flashing third-party firmware is risky and can permanently brick a router, so check compatibility first. Router CPUs are also underpowered for VPN encryption, so router-based tunnels tend to bottleneck your throughput.
Flashing custom firmware can void your router's warranty and, if it goes wrong, leave you with a dead device. Always confirm your exact model and hardware revision against the firmware's compatibility list before you begin.
OpenVPN vs WireGuard: Which Protocol Should You Use?
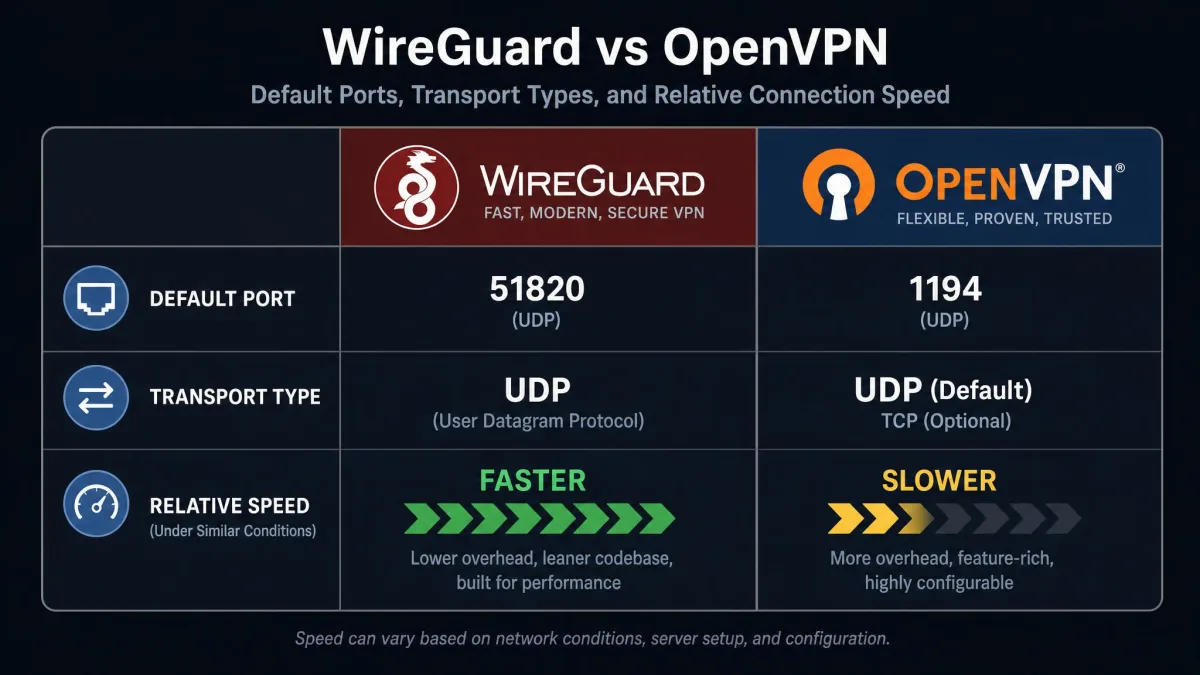
Whichever method you choose, you will pick a protocol. For self-hosting, it comes down to two: WireGuard and OpenVPN. Both are secure and open source. They differ in speed, complexity, and how they behave on restrictive networks.
WireGuard is the smoother choice for most self-hosters. It is faster, simpler to configure, and easier to audit than OpenVPN. It runs over UDP only, uses a fixed set of modern cryptography, and connects almost instantly. Its codebase is famously small, roughly 4,000 lines against OpenVPN's 600,000 or more, though those figures are widely repeated approximations rather than audited counts.
OpenVPN earns its place where WireGuard's UDP traffic is blocked. It supports both UDP and TCP, and it can fall back to TCP on port 443 to slip through restrictive networks. It is mature, battle-tested, and highly configurable. If you connect from strict corporate or public networks, that flexibility matters.
| Feature | WireGuard | OpenVPN |
|---|---|---|
| Default port | UDP 51820 | UDP 1194, TCP/443 fallback |
| Transport | UDP only | UDP or TCP |
| Codebase | About 4,000 lines | 600,000+ lines |
| Speed | Faster, near-instant handshake | Slower TLS handshake |
| Best when | The default modern choice | UDP is blocked or you need granular control |
Our recommendation for most readers is WireGuard. Reach for OpenVPN only if you know you need TCP/443 to get through a firewall. You can install WireGuard on every major platform, and the official OpenVPN downloads cover the open-source builds and docs.
How to Create Your Own VPN: Step-by-Step
This walkthrough uses a cloud VPS with WireGuard, since that is the fastest, most reliable path for most people. The same shape applies to a Raspberry Pi, with port forwarding and DDNS added. A full 13-step VPS guide from provisioning to client setup is common, and we have grouped that flow into six clear stages here. For a deep reference, DigitalOcean's WireGuard on Ubuntu tutorial is a solid companion.
Step 1: Set up your server (Ubuntu / VPS)
Create a small droplet or VPS running Ubuntu 24.04 LTS. The cheapest tier, with 512 MiB of RAM and one vCPU, is plenty for a personal VPN. Once it boots, connect over SSH using the credentials your provider gives you. Update the system first, then create a non-root user with sudo rights so you are not working as root.
Step 2: Install the VPN software (OpenVPN / WireGuard)
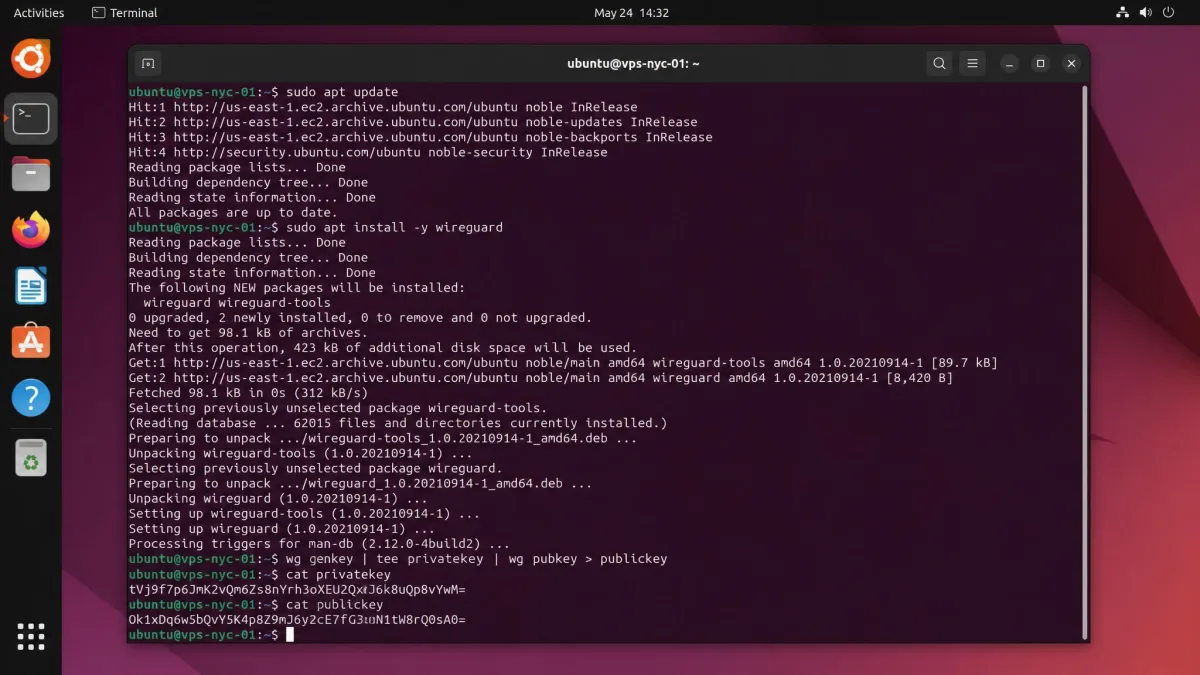
Install WireGuard from Ubuntu's package repository with a single command. WireGuard ships as a kernel module on modern Linux, so there is little to configure at this stage. If you chose OpenVPN instead, many people use a trusted install script to handle the heavier setup. Confirm the software installed cleanly before moving on.
Step 3: Generate certificates and keys
Security lives in this step. For WireGuard, generate a private and public key pair for the server, and a separate pair for each client device. WireGuard's key setup is quick and needs no certificate authority. OpenVPN uses certificates instead, so you would build a small CA and issue a certificate per client. Keep every private key on its own device and never share it.
Step 4: Configure the server and network settings
Create the server config file with its private key, its listening port, and the internal VPN IP range. For WireGuard the default listening port is UDP 51820. Enable IP forwarding so the server routes client traffic, and open the VPN port in the firewall to allow incoming connections. If you are hosting at home, this is where you add port forwarding on your router and point your dynamic DNS hostname at your connection.
Step 5: Create client configurations
Each device that connects needs its own config file. That file holds the client's private key, the server's public key, the server address, and the allowed IP ranges. Set the allowed IPs to route all traffic through the tunnel if you want full protection, or just your home subnet if you only need network access. WireGuard can turn a client config into a QR code, which makes phone setup painless.
Step 6: Connect and test your devices
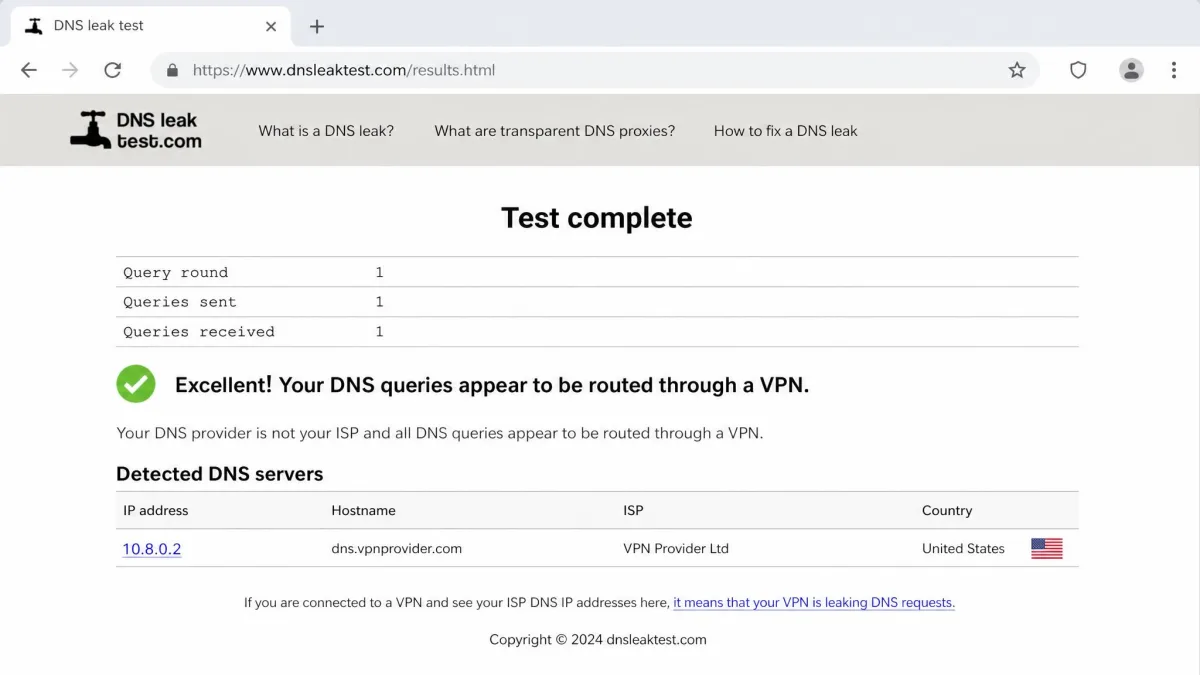
Install the client app, import the config or scan the QR code, and toggle the connection on. Confirm the tunnel is up, then verify your traffic is actually protected. Check that your public IP now shows the server's address, and run a leak test to be sure DNS requests are not slipping outside the tunnel. If it connects and the IP changes, your VPN is live.
Test from a network outside your home, such as a phone on mobile data. Connecting from inside your own network can mask port-forwarding mistakes that only show up when a real client connects from the outside.
Securing Your DIY VPN
Getting connected is the milestone. Keeping the server safe is the ongoing job. A VPN you built is only as private as the habits you keep around it, and a few settings make a big difference.
Enable a kill switch and DNS leak protection
A kill switch blocks all internet traffic if the VPN connection drops, so nothing leaks out unprotected. Most desktop and mobile clients include one, and it is worth turning on. DNS leaks are the other common gap. If your device sends DNS queries outside the tunnel, your browsing can be exposed even while the VPN looks connected.
After every setup, we run a quick check with a tool like browserleaks.com to confirm both the IP and DNS requests resolve through the server. It takes a minute and catches the most common misconfiguration.
A VPN that connects is not automatically a VPN that protects. Always run a DNS leak test after setup. A silent DNS leak can expose the very browsing you set the tunnel up to hide.
Use strong encryption and keep software updated
WireGuard uses modern, fixed cryptography by default, so you do not need to tune ciphers. On OpenVPN, stick with current, strong cipher settings rather than dated defaults. The bigger ongoing task is updates. Maintenance never really ends: you own every security update and patch once the server is live. Apply system updates regularly, and rotate keys if a device is lost.
Troubleshooting Common Issues
Most VPN problems trace back to a handful of causes, and they are quick to diagnose once you know where to look. If a client will not connect at all, start with the network layer. Confirm the VPN port is open in the firewall and, for home setups, that port forwarding points to the server's static local IP.
If you are hosting at home and nothing reaches the server from outside, CGNAT is the usual culprit. Compare your router's public IP against an external IP checker. A mismatch points to CGNAT, and a cloud VPS is the clean fix. If the tunnel connects but there is no internet, IP forwarding is probably not enabled, or the client's allowed IPs are set wrong.
Slow speeds are often expected rather than broken. A home server is limited by your upload bandwidth, and a router's CPU can bottleneck encryption. If DNS names fail to resolve while raw IPs work, set a reliable DNS server in your client config. When in doubt, test one change at a time so you know which fix worked.
Keep a note of every change you make during setup. When something breaks later, that log turns an hour of guessing into a two-minute fix.
Costs of Running Your Own VPN
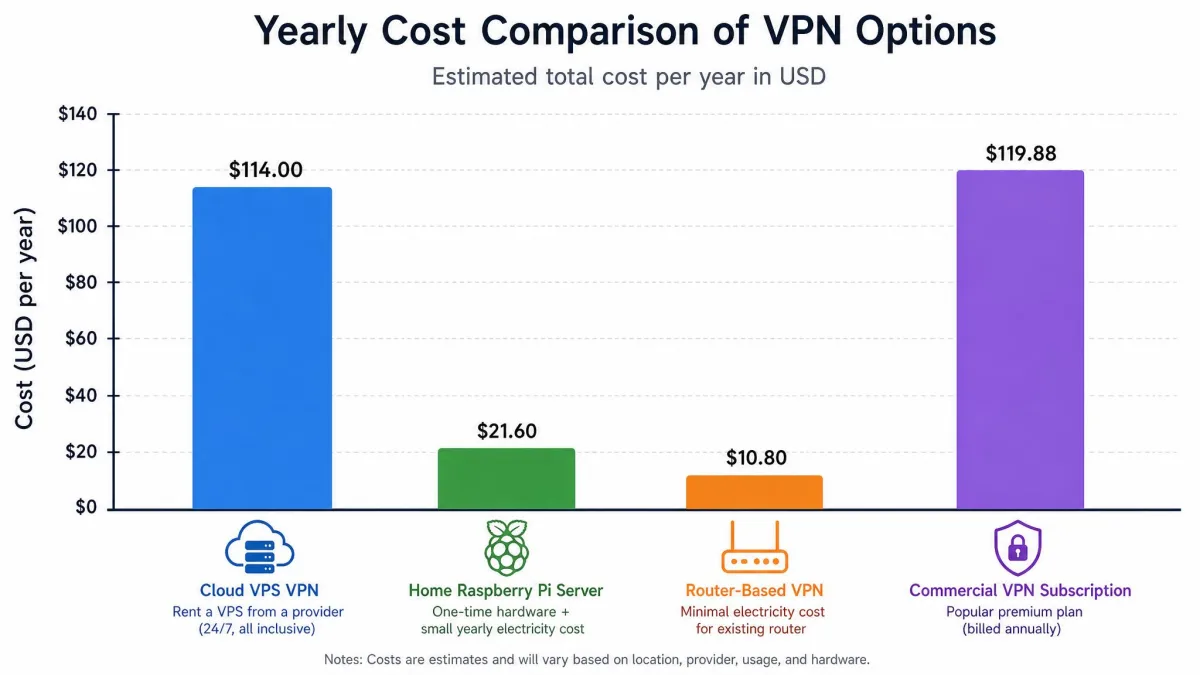
The money side is where a DIY VPN can surprise you, in both directions. A cloud VPS is the most predictable option, at roughly $4 to $6 per month with no hardware to buy. Over a year that is competitive with many commercial plans, and you get full control in return.
A home server looks free but is not quite. You pay for the hardware once, and then for electricity to run an always-on machine. Running a device 24/7 adds to your electricity bill, a cost that is easy to forget when comparing against a subscription. A router setup can be genuinely free if your current router is compatible, but a VPN-capable router starts around $150 if you need to buy one.
There is also a hidden cost that never shows on a bill: your time. Setup takes an afternoon, and maintenance is an ongoing commitment. If your time is scarce, factor that in honestly against the price of a ready-made service.
Is Building Your Own VPN Worth It?
For the right person, absolutely. If you want secure remote access to your home network, enjoy learning networking, and value full control over your own server, a DIY VPN is rewarding and cheap to run. A cloud VPS in particular gives you real speed and privacy for a few dollars a month.
For everyone else, be honest about the trade-offs. A self-hosted VPN will not hide your identity, it will not spoof your location within your own region, and it is poor for bypassing geo-blocks near home. It also asks for ongoing maintenance that a commercial service handles for you. If unblocking content and switching countries is your goal, a paid provider is cheaper on effort and better at the job. Match the tool to the reason you wanted a VPN, and the decision gets easy.