A VPN can show "Connected" in big green letters and still leak your real IP, DNS requests, or WebRTC data. The status light tells you the app is running. It does not tell you that every packet is actually inside the encrypted tunnel. In our testing, this gap is the single most common reason people think they are protected when they are not.
The good news is that you do not have to trust the status light. A handful of quick tests confirm what your VPN is really doing, and most of them take under a minute in a browser tab. This guide walks through seven checks we run on every VPN before we trust it, from a basic IP comparison to DNS, WebRTC, and IPv6 leak tests. We also cover why a VPN sometimes stops working and how to fix it.
These checks use free public tools you can open right now, and they work the same whether you are on Windows, macOS, or Android. You do not need any technical background. If you can copy a number and refresh a web page, you can confirm whether your VPN is protecting you.
How to tell if your VPN is working (quick checklist)
Before we go test by test, here is the fast version. If your VPN passes all of these, your connection is in good shape.
- Your public IP address changes after you connect, and it matches the VPN server location.
- A "what is my location" check shows the VPN's country, not your own.
- A DNS leak test lists your VPN provider's DNS servers, not your ISP's.
- A WebRTC test does not expose your real IP address in the browser.
- An IPv6 leak test shows no IPv6 address, or one that belongs to the VPN.
- Your kill switch blocks all traffic when you force the connection to drop.
- Your speed is reduced but still usable, not collapsed to nothing.
Run these checks the first time you connect, and again after your device wakes from sleep or switches networks. A VPN can pass on the first connect and start leaking later, so a quick re-check after those events is worth the ten seconds.
If any single check fails, your VPN is not fully protecting you yet. The sections below explain how to run each test and what a passing result looks like.
Test 1: Check and compare your IP address
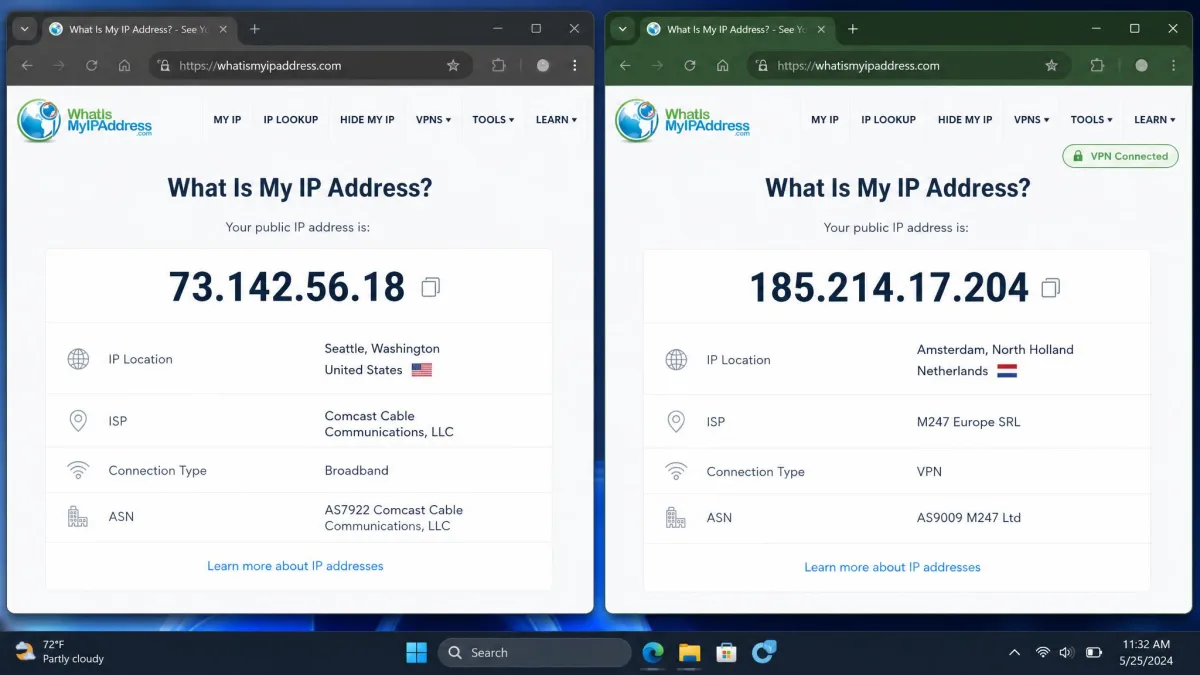
The most basic test is also the most important. A VPN works by replacing your real public IP address with one belonging to its server. If your IP does not change when you connect, the VPN is not routing your traffic at all.
Your public IP is the address the whole internet sees. It is tied to your ISP and, roughly, to your physical location. When the VPN is working, websites see the server's IP instead of yours, which is what keeps your identity and location private.
How to check your IP before and after connecting
The test is a simple before-and-after comparison. Do it in this order.
- With the VPN turned off, open an IP lookup site such as WhatIsMyIPAddress. Note the IP address it shows.
- Connect your VPN and choose a server, ideally in a different country.
- Refresh the same page, or open it in a new tab.
- Compare the two addresses.
If the IP address is different after connecting, and it points to the server location you chose, the VPN is masking you correctly. If the address is unchanged, the VPN is connected in name only, and you should move on to the troubleshooting steps near the end of this guide.
Test 2: Confirm websites see the VPN location
Changing your IP is not quite the same as changing your apparent location, and the difference matters for streaming and geo-restricted services. This test confirms that websites actually place you where the VPN server is.
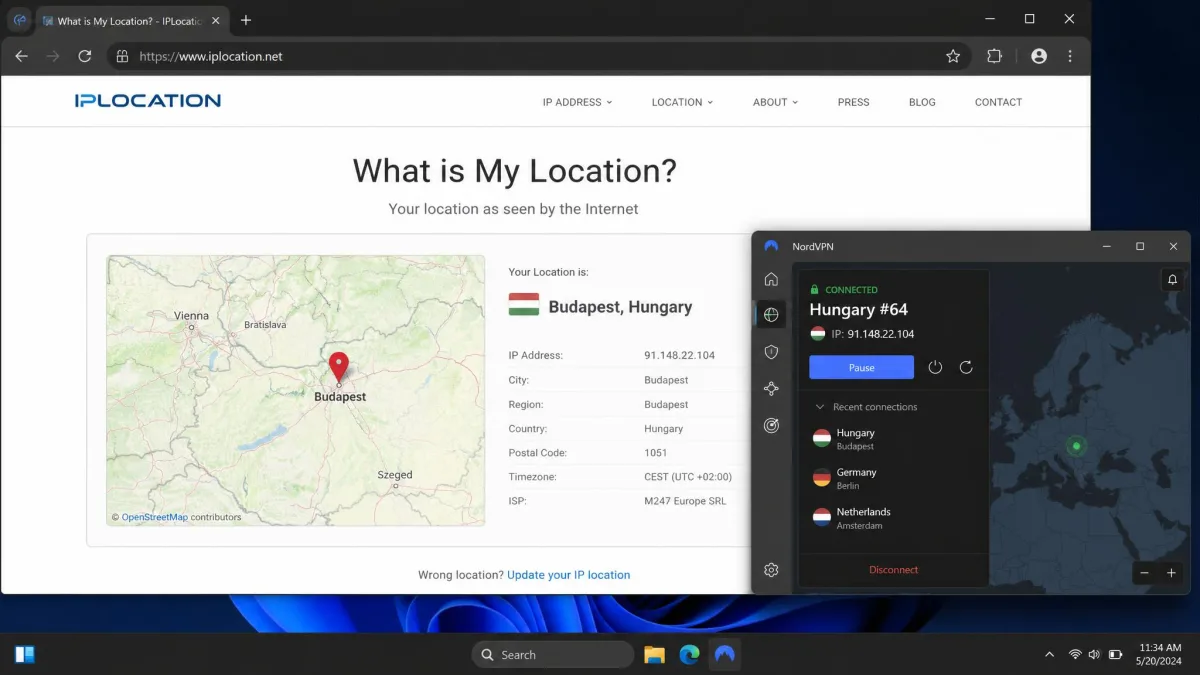
While connected, search "what is my location" or open a location-check page in your browser. It should report the city and country of your VPN server, not your real one. This is the check that tells you whether a service will treat you as being in that region.
There is one catch worth knowing. A VPN can hide your IP address and still be given away by other signals. On a phone, mobile GPS data can reveal your true location even when the IP looks correct, because apps read location from the device sensor rather than the network. So an IP check alone does not confirm full location privacy on mobile.
On a phone, turn off precise location or deny location permission for the browser and any app you want the VPN to cover. Otherwise the app can read your real GPS position regardless of what the VPN does to your IP.
Test 3: Run a DNS leak test
DNS leaks are sneaky because everything else can look perfect. Your IP changes, the location is right, and yet your browsing history is still visible to your ISP. This is the test that catches that gap.
What is a DNS leak?
Every time you visit a website, your device asks a DNS server to translate the domain name into an IP address. When the VPN is working, those lookups travel through the encrypted tunnel to the VPN's own DNS servers. A DNS leak happens when your operating system uses its default ISP DNS servers instead, so the queries travel outside the tunnel. Your ISP can then see which sites you visit, even though the rest of your traffic is encrypted.
Some ISPs make this worse by running transparent DNS proxies. These intercept every lookup on port 53 and force it through ISP servers, no matter which DNS settings you configured. That is exactly the kind of silent leak a test is designed to expose.
How to perform a DNS leak test
Run this test while the VPN is connected.
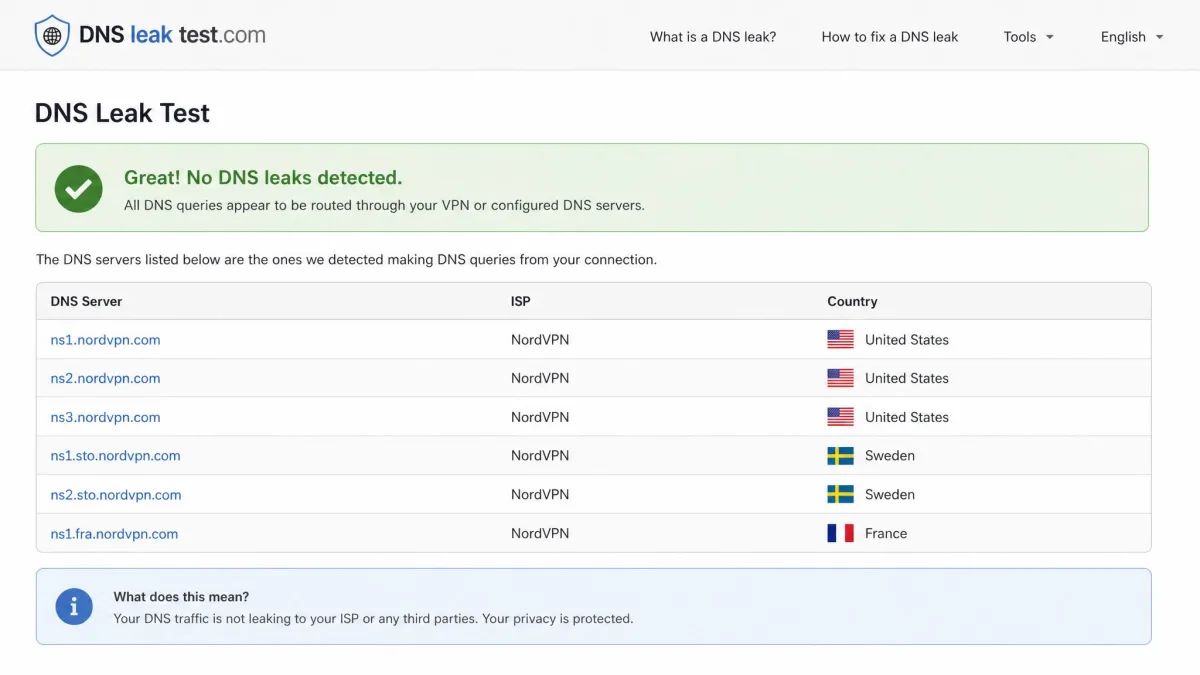
- Open DNS leak test in your browser.
- Choose the standard test. It runs one round of 6 queries, which is enough to spot a leak for most people.
- Read the list of DNS servers it returns.
If the servers listed belong to your VPN provider, or to a privacy resolver like Cloudflare's 1.1.1.1, your DNS is protected. If you see your ISP's name in that list, DNS is leaking outside the tunnel. There is an extended test that runs 6 rounds of 36 queries total and takes 10-30 seconds longer, but in our testing the standard test is enough to catch a leak unless you have strong anonymity needs.
Test 4: Check for WebRTC leaks
WebRTC leaks are the ones that catch experienced users off guard. Your IP and DNS tests can both come back clean, and your browser can still be handing out your real IP address. That is because the leak happens inside the browser, not inside the VPN tunnel.
WebRTC is the technology browsers use for video calls and peer-to-peer connections. To set up those connections, the browser's RTCPeerConnection and RTCDataChannel APIs can reveal both your local network IP and your public IP. A website can read those values with a small piece of JavaScript, which means your real address can slip out even while the VPN is doing its job on everything else.
How to test for WebRTC leaks
- While connected to the VPN, open the BrowserLeaks WebRTC test.
- Look at the public IP address it detects.
- Compare it to your VPN server's IP.
If the WebRTC test shows only the VPN server's IP, or no public IP at all, you are protected. If it shows your real IP address, the browser is leaking. Because the leak lives in the browser, the reliable fix is to disable WebRTC or use a protective extension. In Firefox, you can set media.peerconnection.enabled to false in about:config. Chrome has no native toggle, so Google's WebRTC Network Limiter extension is the way to control it there.
Test WebRTC in every browser you actually use. A leak fixed in Firefox does nothing for Chrome, and the reverse is also true, because the setting lives in the browser rather than in the VPN.
Test 5: Check for IPv6 leaks
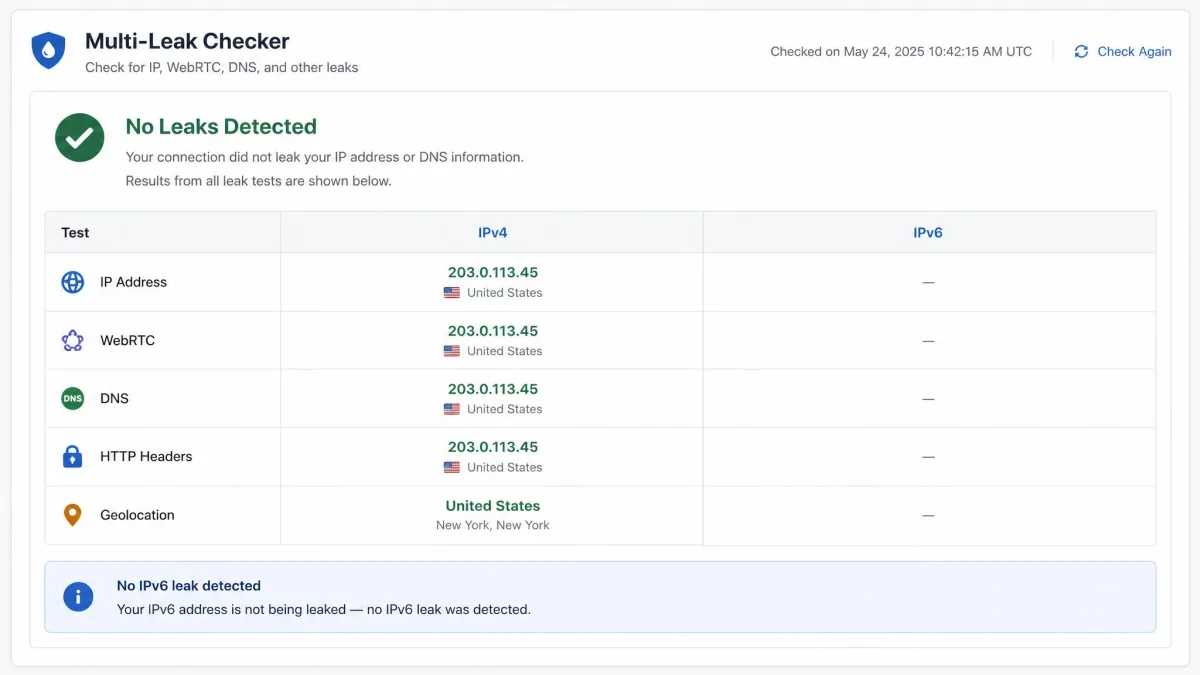
Many VPNs were built around IPv4 and handle the newer IPv6 protocol less carefully. If your network supports IPv6 but your VPN only tunnels IPv4, your real IPv6 address can leak straight past the VPN while the IPv4 tests all pass.
To check, open a multi-leak checker such as IPLeak.net while connected. It shows your IPv4 and IPv6 addresses together on one page. A clean result shows either no IPv6 address at all, or an IPv6 address that belongs to the VPN. If it shows an IPv6 address tied to your ISP, that is a leak.
The simplest fix is to make sure your VPN has IPv6 leak protection enabled in its settings. If it has no such option, you can disable IPv6 at the operating system level so there is nothing to leak. Cloudflare's IPv6 resolver at 2606:4700:4700::1111 is a useful reference point if you want to confirm which addresses are privacy resolvers rather than ISP ones.
Test 6: Verify your kill switch works
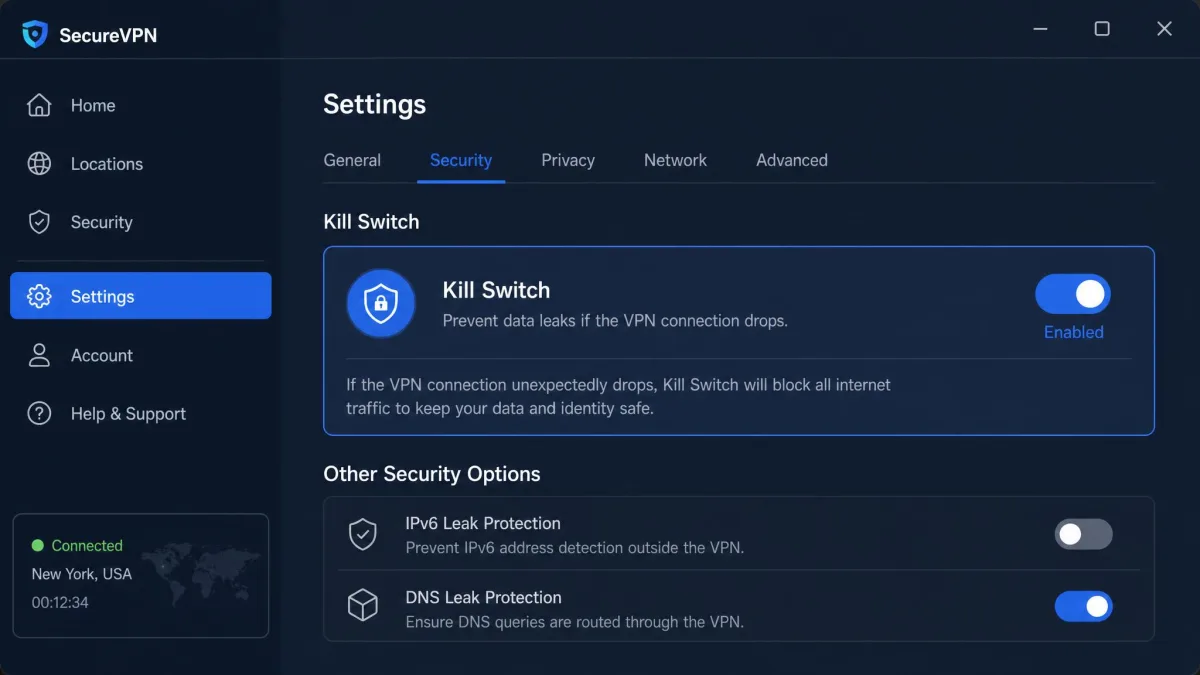
A kill switch is your safety net for the moment the VPN connection drops. Without it, your device silently falls back to the normal, unencrypted connection until the VPN reconnects, and every packet in that window exposes your real IP. A kill switch blocks all internet traffic until the tunnel is restored, so a brief drop never becomes a brief exposure.
Testing it takes a deliberate failure. Here is how we do it.
- Turn on the kill switch in your VPN's settings.
- Connect the VPN and start something that uses the network, such as a streaming video or a continuous ping.
- Force the connection to drop. Switching to a different server, or disabling your network adapter for a moment, both work.
- Watch what happens to your traffic.
If the kill switch is working, your internet cuts out completely the instant the VPN drops, and comes back only when it reconnects. If pages keep loading during the gap, the kill switch is not protecting you, and you should check that it is enabled for your whole system rather than a single app. For more on how this feature behaves, see our explainer on what a VPN kill switch does.
Test 7: Run a VPN speed test
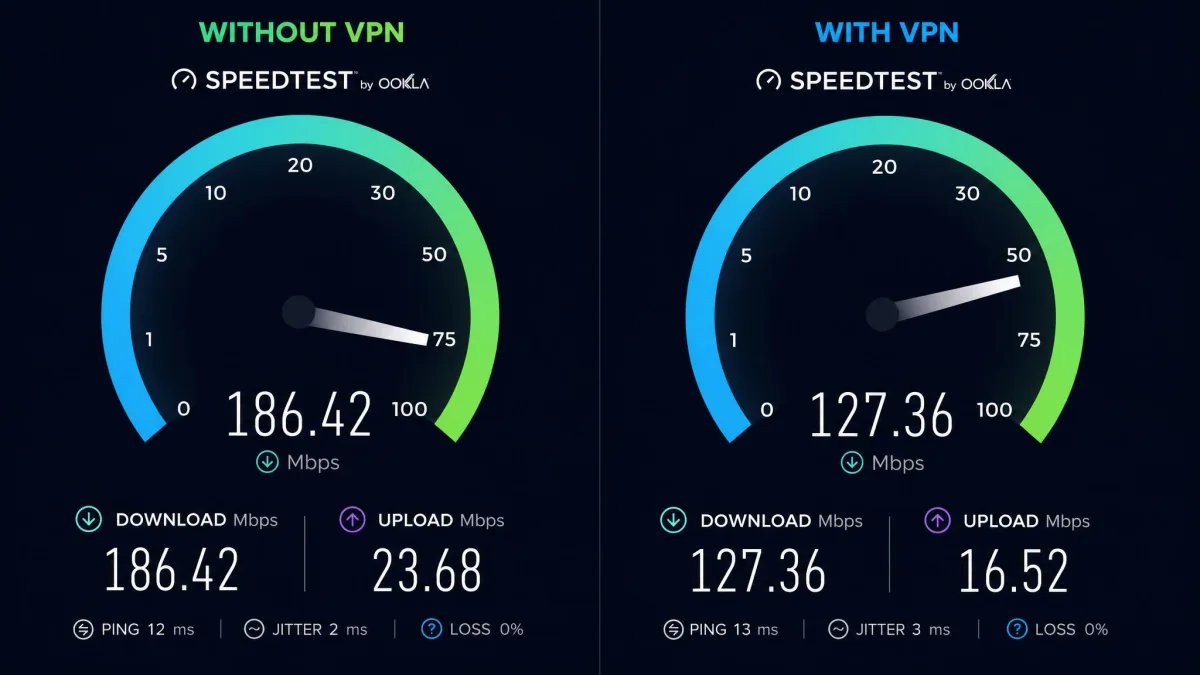
Speed is not a privacy test, but it tells you whether the VPN is usable and whether it is behaving normally. Every VPN adds some overhead, because your traffic now travels an extra leg to the server and back through encryption. The question is whether the slowdown is reasonable or severe.
To measure it, run an ordinary speed test with the VPN off to get a baseline, then run the same test connected to your VPN server. Compare the two. A typical slowdown falls somewhere around 10-50%, though this varies widely with server distance, protocol, and your starting connection, so treat it as a ballpark rather than a fixed rule.
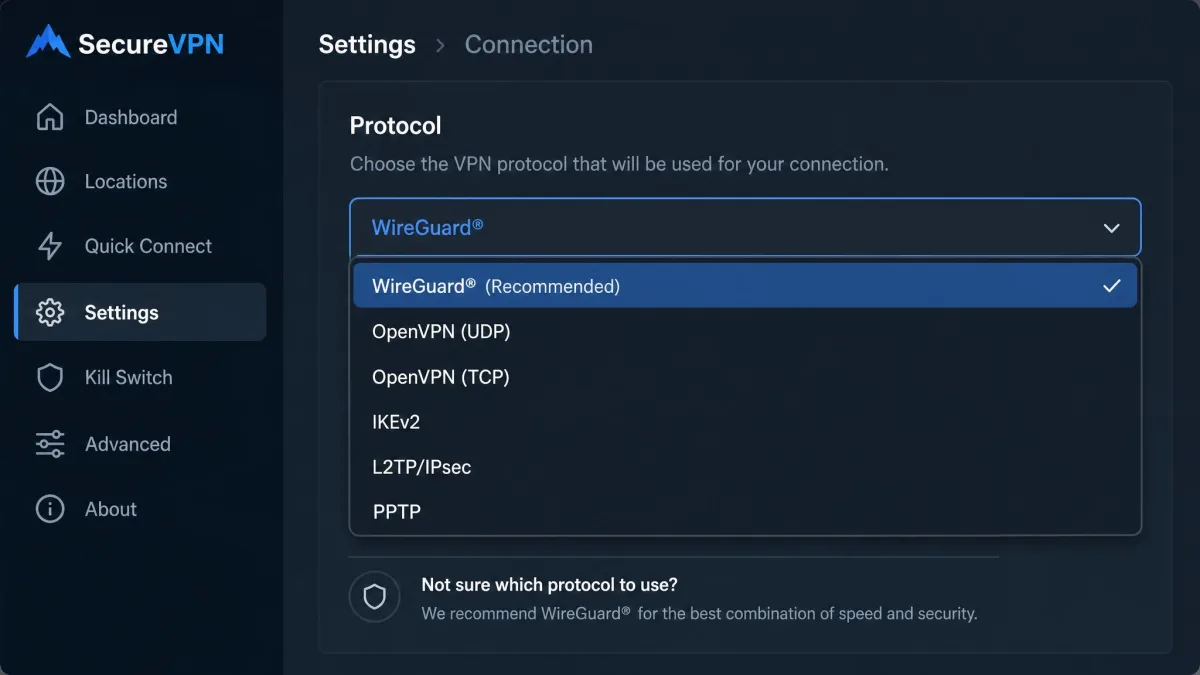
If your speed collapses far below that, the usual causes are distance and protocol. Connecting to a server closer to you almost always helps. Switching protocols is the other lever, since different VPN protocols behave differently across networks, and one that struggles on your connection can often be replaced by another that runs smoothly.
Why is my VPN not working?
If a test failed, the cause is usually one of a short list of culprits. In our experience the connection status being "Connected" while data leaks is the most common surprise, and it points to a configuration issue rather than a broken app.
Here are the failures we see most often:
- Another VPN or security tool is interfering. A second VPN client running at the same time, or antivirus software filtering traffic, frequently blocks a clean connection.
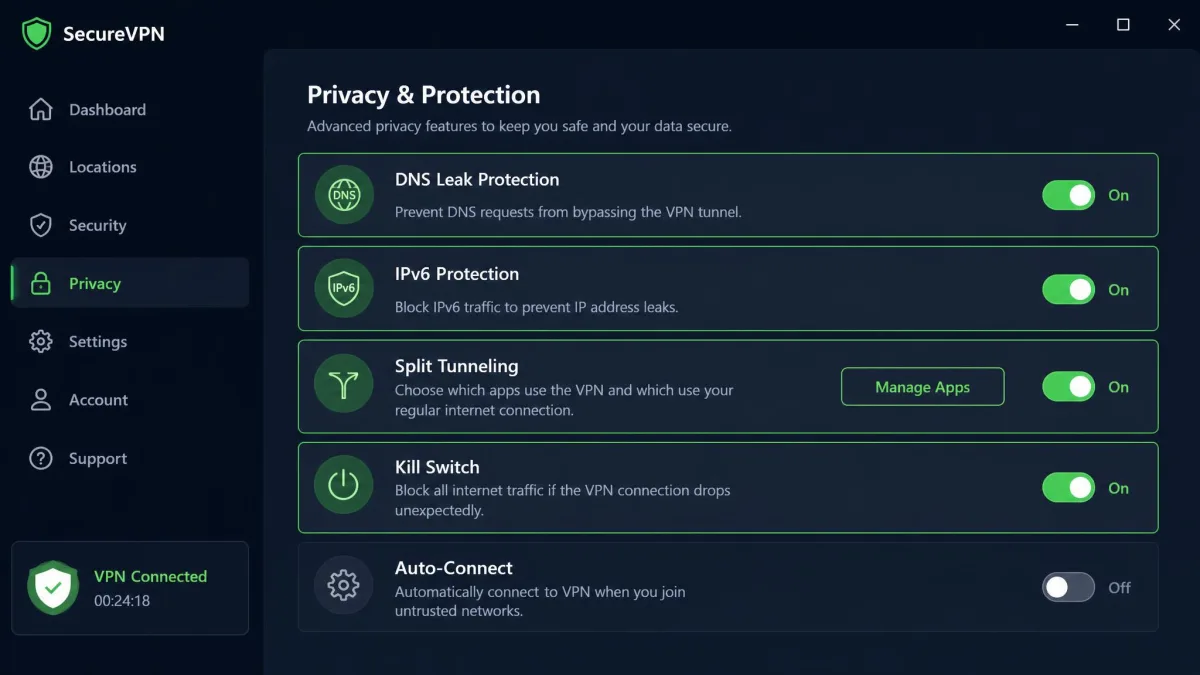
- Split tunneling is on. If split tunneling is enabled, some apps are deliberately routed outside the VPN, which looks exactly like a leak when you test those apps.
- A protection feature is switched off. DNS leak protection, IPv6 protection, or the kill switch being disabled will each cause the matching test to fail even when the tunnel itself is fine.
- The wrong protocol for your network. Some networks throttle or block certain protocols, so the app connects but cannot pass traffic properly.
- The connection dropped and reconnected. A VPN can pass every test on first connect, then start leaking after you switch networks or wake the device from sleep.
When a VPN worked yesterday and fails today, close it completely, quit any other VPN or security tool, and reconnect from scratch before changing any settings. A clean restart clears most conflicts faster than digging through the options.
How to fix a VPN that isn't working
Work through these fixes in order. Each one addresses a common cause, and most problems clear up in the first few steps.
- Reconnect and switch servers. Disconnect fully, then connect to a different server, ideally one closer to you. This resolves most speed problems and many connection failures.
- Close conflicting software. Quit any second VPN client and temporarily pause antivirus or firewall filtering to see if the connection clears. If it does, add an exception rather than leaving protection off.
- Change the protocol. In your VPN settings, switch to a different protocol. If one cannot connect or pass traffic on your network, another often works.
- Turn on the protection features. Enable DNS leak protection, IPv6 protection, and the kill switch. These directly fix the DNS, IPv6, and drop-exposure tests.
- Turn off split tunneling. If you want the VPN to cover everything, disable split tunneling so no app is routed around the tunnel.
- Update or reinstall the app. An outdated client can misbehave after an operating system update. Installing the latest version, or a clean reinstall, resolves stubborn cases.
- Re-run the tests. After any fix, run the relevant leak test again to confirm the problem is actually gone rather than hidden.
If you are still stuck, our guides on how to set up and use a VPN and how to turn a VPN off walk through the settings from the beginning. If you are shopping for a more reliable provider, how to get a VPN covers what to look for.