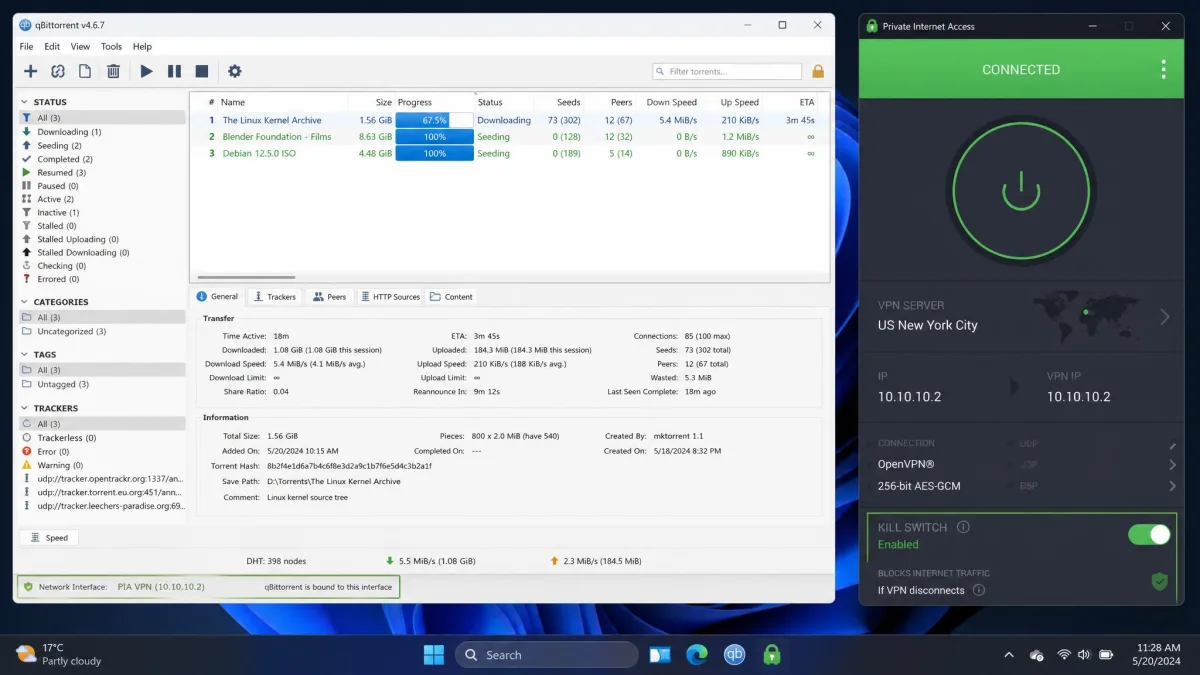
Binding a VPN to qBittorrent means locking the client to a single network interface, the virtual adapter your VPN creates when it connects. Once that binding is in place, qBittorrent can only move data while the VPN tunnel is up. If the tunnel drops, torrent traffic stops instead of quietly rerouting through your normal internet connection and exposing your real IP address.
That single setting is the difference between hoping your VPN never fails and knowing your client cannot leak. We set up this binding on our own test machines across Windows, macOS, and Linux, ran a download through each one, then pulled the VPN down mid-transfer to watch what happened. This guide walks through the exact steps, the per-OS differences, and the troubleshooting we ran into along the way.
What Does Binding a VPN to qBittorrent Mean?
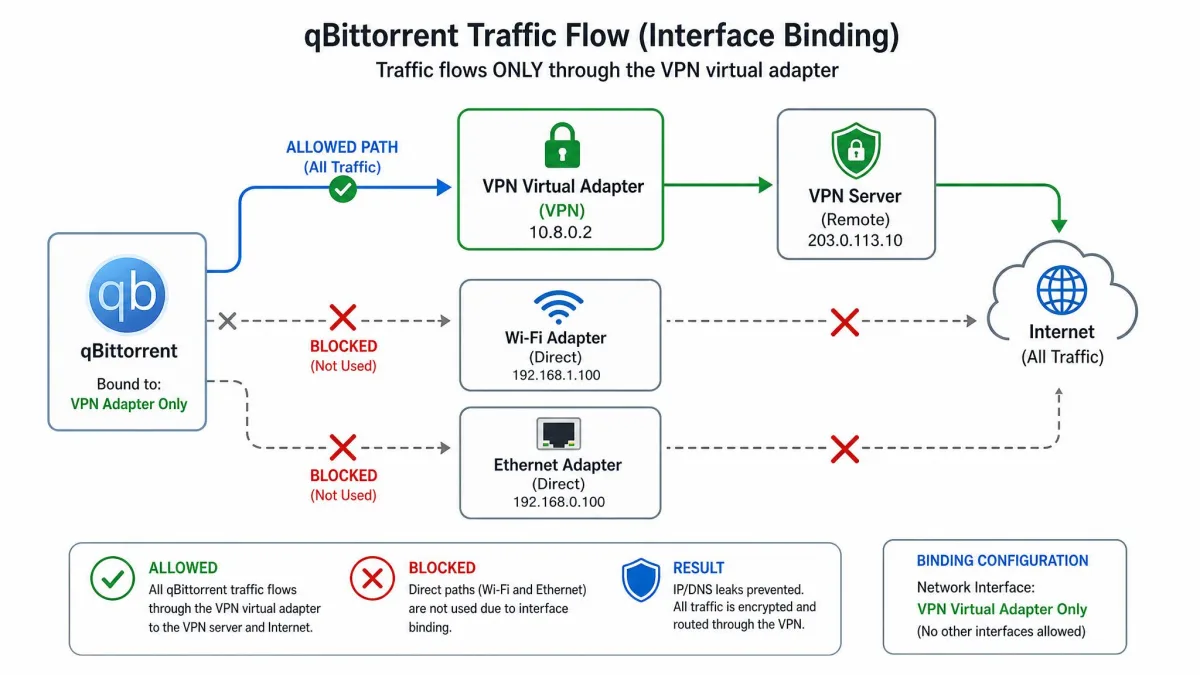
Every VPN app creates a virtual network adapter when it connects. Your operating system treats that adapter as just another way onto the internet, sitting alongside your Wi-Fi and Ethernet connections. Binding tells qBittorrent to use only that one adapter and to ignore the rest.
The effect is strict. Data transfers happen only while the bound VPN interface is active. When the tunnel drops, the client has no other interface it is allowed to use, so torrent traffic stops rather than falling back to your real connection. Your public IP address stays hidden even during a failure.
This is different from simply running a VPN in the background while you torrent. A background VPN protects you only as long as it stays connected. Binding removes the fallback path entirely, which is why it is the approach the official qBittorrent VPN binding guide recommends for anyone serious about avoiding leaks.
Why Bind qBittorrent to Your VPN Interface?
A torrent client is unusually exposed. It advertises your IP address to every peer in a swarm, which can be hundreds of strangers at once. A VPN hides that address, but only while it is connected. VPN connections drop for ordinary reasons: a server reboots, your Wi-Fi flickers, the app updates in the background. In each of those moments, an unbound client will keep seeding and downloading over your real connection.
Binding closes that gap. Because the client cannot send data when the tunnel is down, the leak probability drops to virtually zero. There is no reaction time to worry about and no window where traffic slips out before a safeguard kicks in.
In our testing, this is what made binding feel more trustworthy than any background safeguard. When we pulled the VPN mid-download, the transfer did not stutter and recover on the real connection. It simply stopped, which is exactly the behavior you want.
Binding vs a VPN Kill Switch
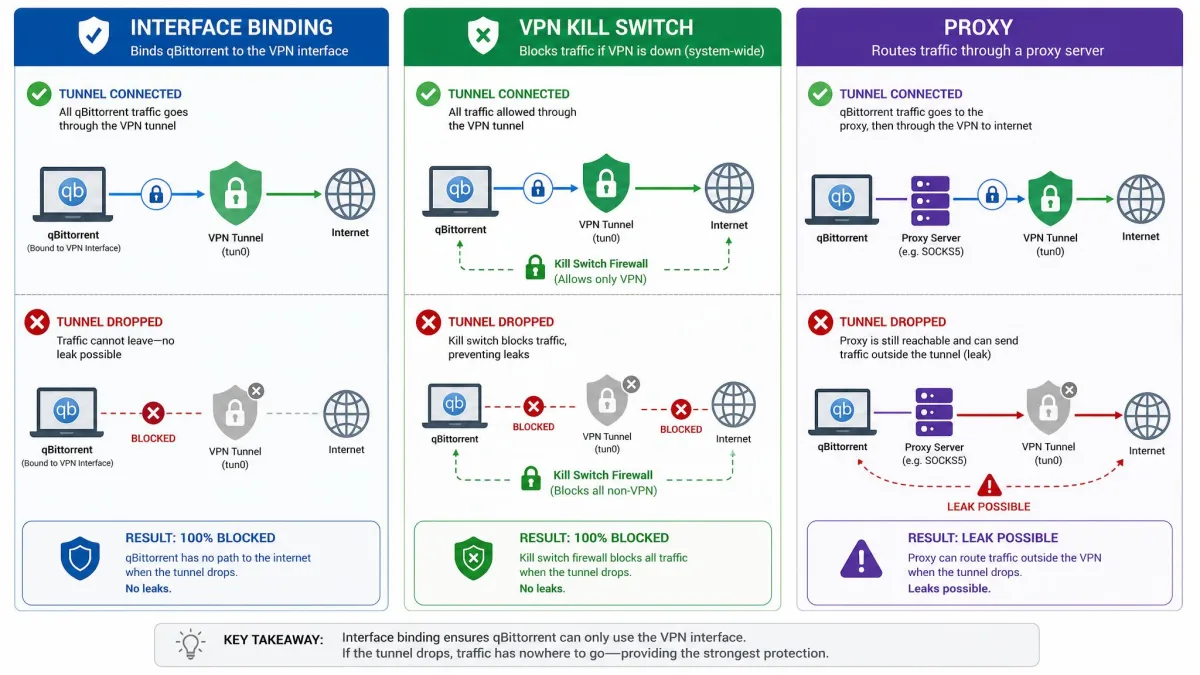
A kill switch does a related job through a different mechanism. It watches the tunnel and cuts your traffic when it detects a drop. That works, but it is reactive: the switch has to notice the drop before it acts, and the prevailing view among practitioners is that this leaves a brief window where traffic can leak before the switch triggers.
Binding is not reactive. The client is structurally unable to use any interface other than the VPN adapter, so there is nothing to detect and nothing to trigger. A proxy is a third option, but it routes only the configured app's traffic and usually adds no encryption, so a misconfiguration can leak. The table below lays out how the three compare.
| Approach | How it works | Leak protection | Reliability | Ease of setup |
|---|---|---|---|---|
| Interface binding | Locks qBittorrent to the VPN adapter; data moves only while that adapter is up | Very high; the client cannot send data when the tunnel is down | High, but can stall after a reconnect and need a restart | Moderate; you must identify the correct adapter |
| VPN kill switch | Monitors the tunnel and cuts traffic when a drop is detected | High but reactive; a brief leak window is possible | Depends on VPN client quality | Easy; toggle in the VPN app |
| SOCKS5/HTTP proxy | Routes only the app's traffic through a proxy server, usually without encryption | Variable; depends on per-app config, can leak if misconfigured | Depends on the proxy provider and setup | Moderate to advanced; manual credentials and ports |
Binding does not react to a dropped VPN. It makes the leak structurally impossible, because the client has no other interface it is allowed to use.
The strongest setup uses both: bind qBittorrent to the interface and leave your VPN's kill switch on as a second layer. The two protect against slightly different failures, and running them together costs you nothing.
Before You Start: What You Need
The whole process takes a few minutes, but a couple of prerequisites will save you a stalled download later. Gather these first.
- A working VPN with a desktop app installed and a connection you can test.
- A recent copy of the client. If you do not have it yet, download qBittorrent from the official site rather than a mirror.
- Admin access on the machine, since identifying network adapters sometimes needs a terminal or an elevated shell.
- A few minutes to run a verification test once the binding is set.
Bind to the interface name, not a fixed IP address where you can avoid it. Many VPNs hand out a different tunnel IP each session, and a binding pinned to yesterday's IP will silently stop working after you reconnect.
Step 1: Connect Your VPN and Find the Correct Network Interface
Before you touch qBittorrent, connect your VPN. This matters more than it sounds. The VPN interface only exists while the tunnel is up, so if the client is already open, it will not see the adapter and the dropdown will be empty. Connect first, then find the adapter's name so you know which one to pick later.
One thing to expect: the VPN adapter often shows up without an obviously identifiable name. Identifying the right interface can take a moment the first time. Once you find it, renaming it in your OS network settings to something clear makes every future binding easier.
On Windows
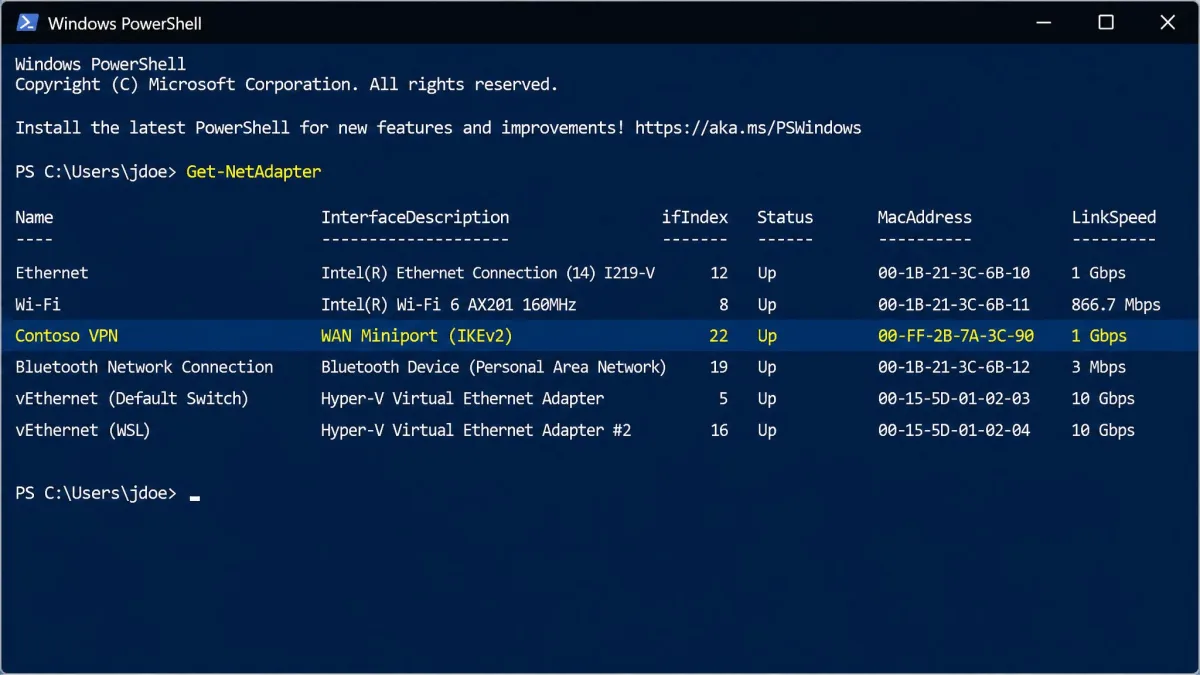
Open PowerShell and run Get-NetAdapter -IncludeHidden. This lists every adapter with its status. Your VPN interface shows a Status of "Up" while connected and is often named after your provider. Note the exact name. You can right-click the adapter in Network Connections and rename it if you want something you will recognize next time.
On macOS
Open Terminal and run ifconfig. With the VPN connected, look for a tunnel interface named utun0, utun1, or utun2. These appear only while the VPN is active, so if you do not see one, confirm the connection first. Note which utun entry carries your VPN's assigned address.
On Linux
Open a terminal and run ip addr show. An OpenVPN tunnel usually appears as tun0, while a WireGuard connection appears as wg0. Match the interface to the address your VPN assigned, and note the name for the next step.
Connect the VPN before you open qBittorrent, every time. If the tunnel is down when the client launches, the interface will not appear in the dropdown, and a client that was bound to a now-missing adapter can behave unpredictably. A dropped VPN is exactly the moment your real IP is at risk.
Step 2: Bind the Interface in qBittorrent (Advanced > Network Interface)
With the VPN connected and the adapter name in hand, the actual binding is a two-click job inside the client.
Accessing Advanced Settings
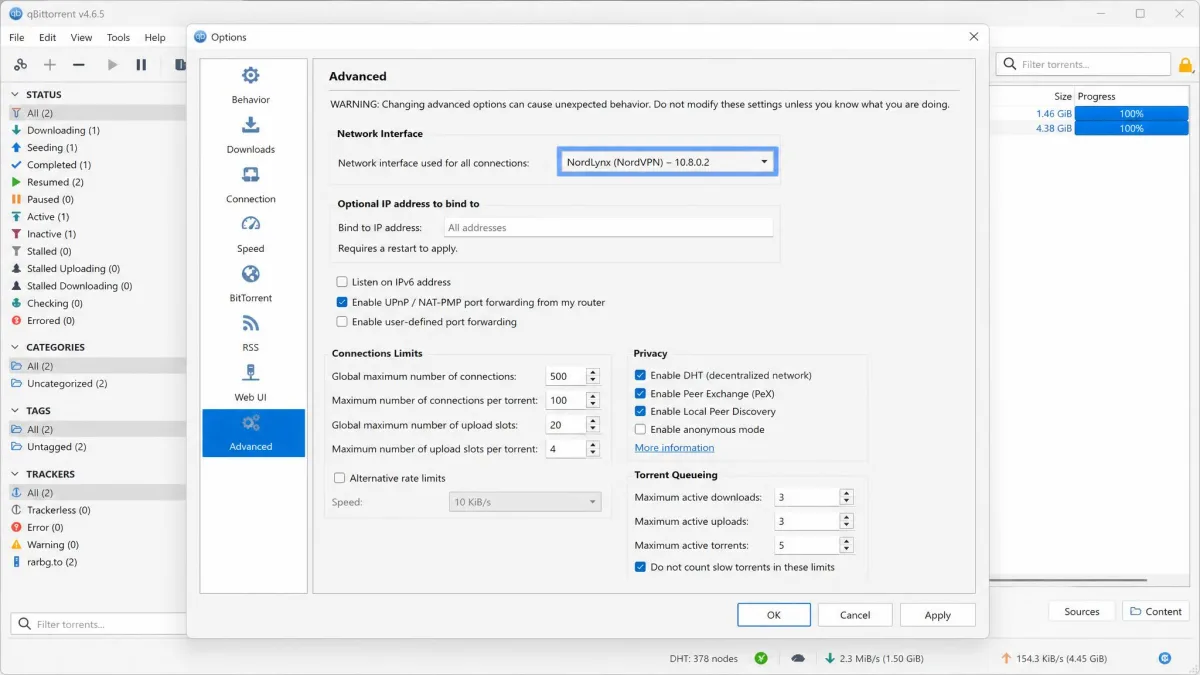
Open qBittorrent, then go to Tools, then Options, then Advanced. The Advanced pane holds settings most people never touch, so do not be alarmed by the density of options. The one you want sits near the top of the networking group.
Selecting the VPN Adapter and Restarting
Find the Network Interface dropdown. By default it is set to "Any interface," which lets qBittorrent use whatever connection is available, exactly the fallback you are trying to remove. Open the dropdown and select the VPN adapter you identified in Step 1.
Directly beneath it sits an "Optional IP address to bind to" field. You can leave this alone for a standard interface binding. It exists for pinning a specific tunnel IP, but as noted earlier, a fixed IP can change between sessions, so the interface name is the more reliable target.
Click OK to save, then restart qBittorrent. A restart makes sure the client cleanly picks up the new binding rather than holding onto an old connection. When it reopens, your client is bound.
Step 3: Test That the Binding Works (Disconnect / Reconnect Test)
Never trust a binding you have not tested. The check is simple and takes two minutes, and it is the only way to know the setting actually took.
Start a download from a well-seeded torrent and let it reach a steady speed. With the transfer running, disconnect your VPN. If the binding is working, the transfer speed drops to 0 KB/s almost immediately. That drop is the proof: with the tunnel down and no fallback allowed, the client has nowhere to send data. We ran this exact test on each of our machines, and a clean binding always killed the transfer the moment the VPN went down.
Now reconnect the VPN and confirm activity resumes. While you are verifying, it is worth checking your public address with a leak tester like ipleak.net to confirm the address peers would see is your VPN's and not your own. You can cross-check the same result with whatismyip.com or open a listening port test at CanYouSeeMe.org port checker to confirm connectivity only works through the tunnel.
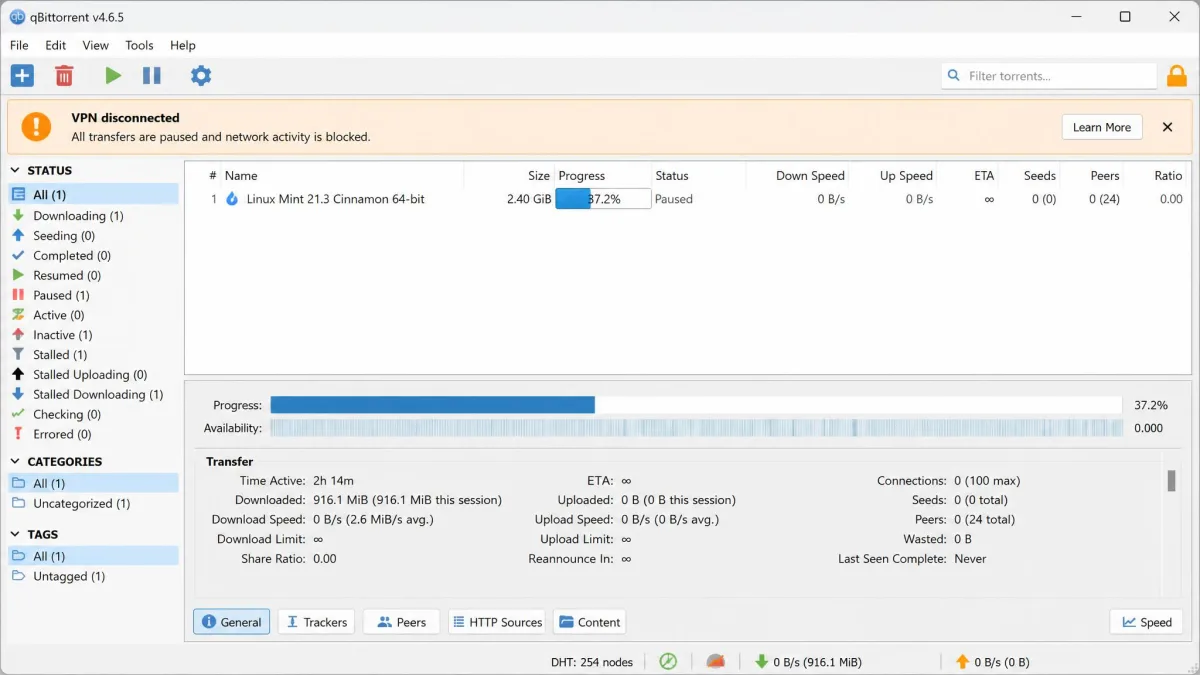
One quirk to note before you rely on this daily: after that disconnect-and-reconnect cycle, qBittorrent frequently does not resume transferring on its own. That is normal binding behavior, not a fault, and the next section covers the fix.
Troubleshooting Common Binding Issues
Binding is reliable once set, but a few predictable snags come up the first time. Here is what each symptom means and how to clear it.
VPN Interface Not Listed in qBittorrent
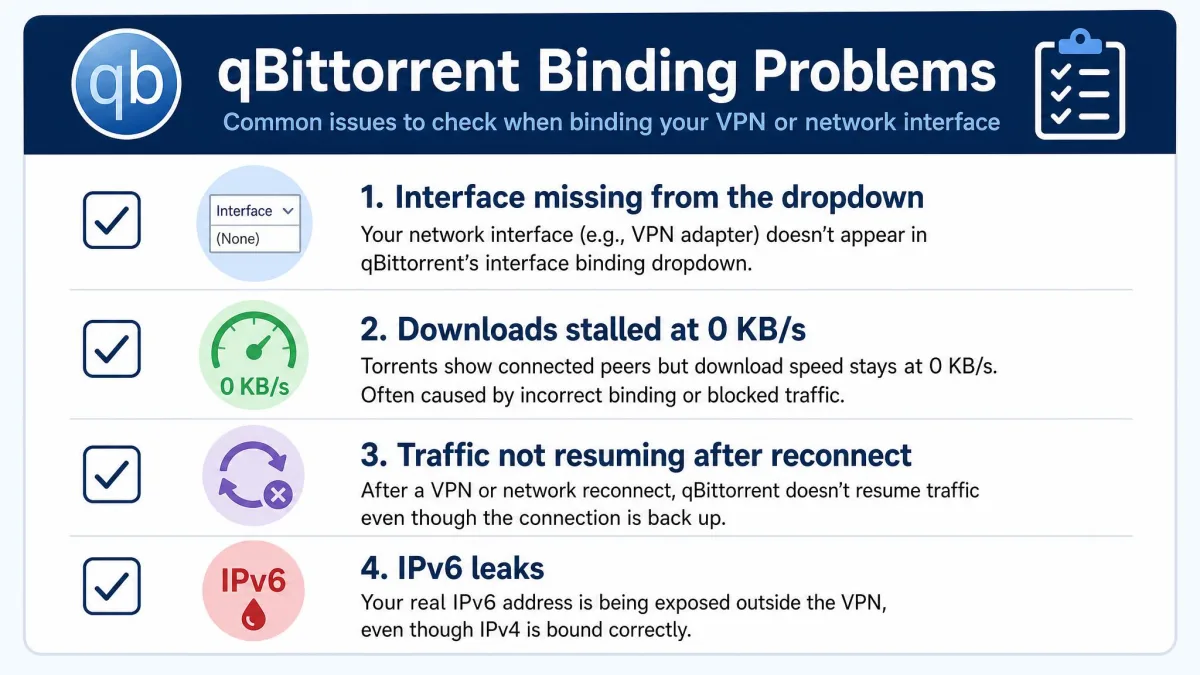
If the Network Interface dropdown does not show your VPN, the tunnel was almost certainly down when the client launched. The interface only exists while the VPN is connected. Connect the VPN, fully restart qBittorrent, and reopen the Advanced pane. The adapter should now appear. This is the single most common cause, and it catches almost everyone once.
Downloads Stalled at 0 KB/s After Binding
A transfer sitting at 0 KB/s right after you bind usually means the wrong adapter was selected, not that the binding is broken. It is easy to pick a regular Ethernet or Wi-Fi entry instead of the VPN tunnel, especially when the adapter has an unhelpful default name. Go back into Advanced, reopen the Network Interface dropdown, and confirm you chose the interface that showed as Up in Step 1. Selecting the correct tunnel clears the stall.
Traffic Does Not Resume After the VPN Reconnects
This is the reconnect quirk from the test above. After a VPN drop and reconnect, qBittorrent often stops transferring and does not restart on its own. The fix is quick: pause and resume the affected torrents, or restart the client. Either nudges qBittorrent to re-establish connections over the freshly restored tunnel. It is a minor annoyance rather than a flaw, and it is the price of the strict no-fallback behavior that keeps you safe.
qBittorrent Still Leaks Your IP (Dynamic Interface Names & IPv6)
Two subtler issues can undermine a binding that looks correct.
The first is IPv6. Interface binding does not reliably cover IPv6 traffic. The client has been observed opening IPv4 web-seed connections while set to IPv6 only, and if your VPN runs on your router, your machine keeps its real IPv6 address regardless of the binding. The safe move is to disable IPv6 on the machine or in the client so there is no second path to leak through.
The second is dynamic interface names on Windows. An adapter can come back under a different name after a reconnect, a reboot, or a VPN client update, which silently breaks a saved binding. If your binding stops working for no obvious reason, reopen the Advanced pane and confirm the dropdown still points at a live VPN adapter. It is worth a quick re-check after any VPN app update.
Rename your VPN adapter in your OS network settings to something you will recognize, like "VPN-Tunnel." A clear, stable name makes the correct interface obvious in the dropdown and easier to spot if a dynamic-name change ever breaks the binding.
Best Practices for Safer Torrenting
Binding is the core of a leak-proof setup, but a few habits make it airtight and keep it that way.
Run binding and your VPN's kill switch together. They guard against slightly different failures, and layering them gives you an extra layer of security at no cost. Disable IPv6 so binding is not undone by a path it does not cover. Re-verify with a quick disconnect test after any VPN or client update, since updates are the most common cause of a quietly broken binding.
Keep the client current by downloading updates from the official source only, and get into the habit of connecting the VPN before opening qBittorrent so the interface is always present. None of this is heavy work. A one-minute check every few weeks is enough to keep every torrent moving only through the tunnel.
Frequently Asked Questions
Does qBittorrent need a VPN bound to it?
Will binding stop all traffic if the VPN drops?
Is binding better than a kill switch?
Why doesn't qBittorrent show my VPN interface?
Does binding slow down my downloads?
Conclusion
Binding qBittorrent to your VPN interface is a small setting with an outsized payoff. It turns leak protection from something you hope holds into something the client structurally cannot violate, because it has no interface to leak through when the tunnel is down.
The routine is worth committing to memory: connect the VPN, confirm the adapter name, select it under Tools, then Options, then Advanced, restart the client, and run one disconnect test to prove the speed drops to 0 KB/s. Add IPv6 disabling and a kill switch for full coverage, re-check after updates, and every torrent you run will move only through the tunnel.