Mac Startup Disk Full? Here's How to Fix It and Free Up Space

If you just saw "Your startup disk is almost full" pop up on your Mac, the drive macOS runs from is nearly out of free space. We hit the same warning on a test MacBook, and it is almost always fixable in a few minutes without losing anything important. Below are 11 easy ways we used to clean up the startup disk and free up space fast, from emptying the Trash to clearing System Data. Work through them in order, and stop whenever the warning clears.
What "Your Startup Disk Is Almost Full" Means
The warning means the disk macOS boots from is running low on room. It is a storage problem, not a hardware fault, and clearing some clutter fixes it.
What is the startup disk on a Mac?
The startup disk is the drive your Mac boots from, where macOS and your files live. On most Macs it is the built-in drive named Macintosh HD. When it runs low on space, macOS has nowhere to put the temporary files it needs, so it warns you. To confirm which drive it is, open System Settings, click General, then Startup Disk.
Why your startup disk gets full
The disk fills up gradually from everyday use. Large files like videos and photo libraries take the biggest bite, but app caches, old iPhone backups, leftover installers, and local Time Machine snapshots add up too. There is also a hidden category called System Data that collects caches, logs, and temporary files. On our own Mac, most of the clutter was forgotten downloads and an old iOS backup.
How a full startup disk affects performance
macOS uses free disk space for swap files, system caches, temporary files, and updates. When it runs out, apps launch slowly, the spinning wait cursor appears more often, and updates can fail. A widely cited guideline is to keep about 10 to 15 percent of the drive free, though Apple does not publish an official number and the range varies with how you use your Mac.
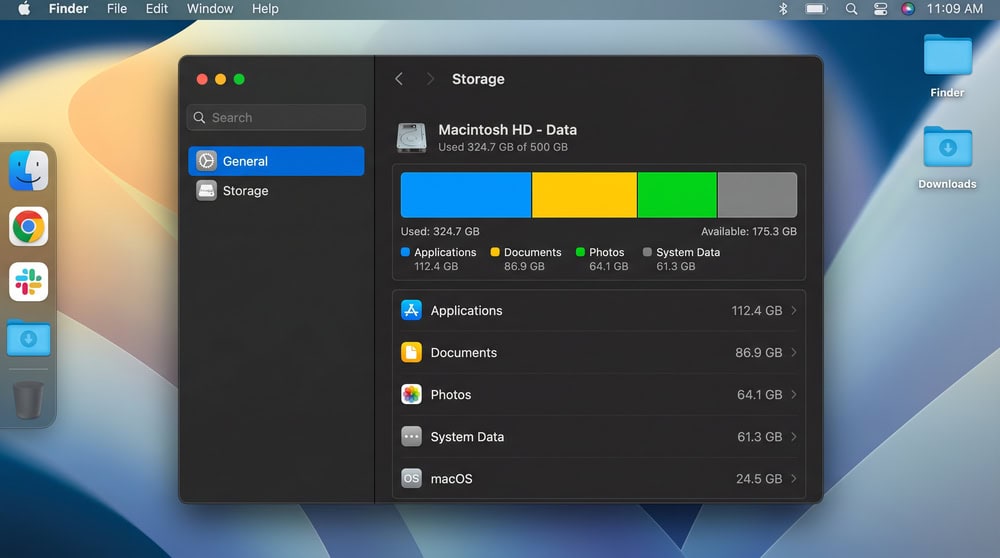
How to check available storage on your Mac
To see where your space is going, open System Settings from the Apple menu, click General, then click Storage. A colored bar breaks usage down by category, such as Applications, Documents, Photos, and System Data; hover over each segment to see its size in gigabytes. On macOS before Ventura 13, choose About This Mac from the Apple menu and click Storage instead. Apple's own Apple Support page covers this same screen.
How to Free Up Space on a Full Startup Disk (11 Ways)
Now for the cleanup. The early steps are the fastest and safest, so work roughly in order. Across all 11, we freed around 40 GB on our test Mac.
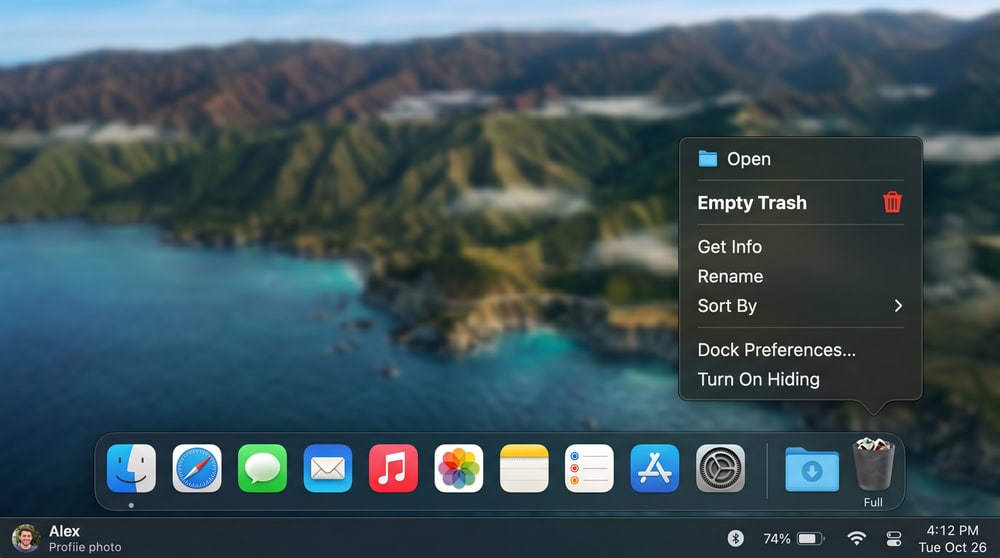
1. Empty the Trash
Deleting a file does not free up space until you empty the Trash, since macOS keeps removed items there until you confirm. Control-click the Trash icon in the Dock and choose Empty Trash. On our Mac, this quickest win recovered a few gigabytes.
Emptying the Trash permanently deletes its contents, so take a quick look inside before you confirm.
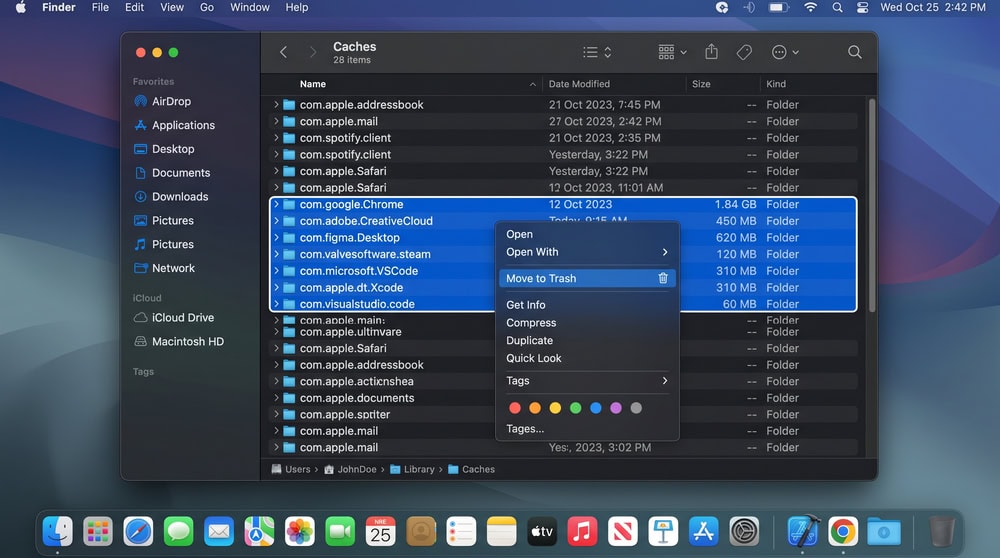
2. Clear cache and system junk files
Apps and browsers create cache files to load faster, but those caches grow over time into junk you can safely clear. Open Finder, choose Go, then Go to Folder (or press Shift-Command-G), and enter ~/Library/Caches. Delete the contents of the folders inside rather than the Caches folder itself, and leave the system-level caches alone, since macOS manages those automatically.
3. Clear System Data ("Other") storage
System Data, which older versions of macOS labeled "Other," is a catch-all for app caches, system logs, local snapshots, and temporary files, and it can grow surprisingly large. There is no single button to clear it, so you reduce it indirectly by clearing caches, removing old backups, and deleting local snapshots as the surrounding steps describe. For a deeper walkthrough, see our guide on clearing System Data storage on a Mac.
4. Delete old iPhone / iOS backups
Old iPhone and iPad backups are some of the biggest space hogs people forget about, and one can run many gigabytes. On macOS Catalina or later, connect the device, open Finder, and select it in the sidebar. Under the General tab, click Manage Backups, then select any backup you no longer need and click Delete Backup. They live at ~/Library/Application Support/MobileSync/Backup, but removing them through Finder is safer.
5. Remove Time Machine local snapshots
Even if your Time Machine backups go to an external drive, macOS keeps local snapshots on your startup disk too. Time Machine saves a snapshot about every hour and keeps it for 24 hours, which can temporarily eat into your free space. macOS counts that space as available and thins the snapshots automatically as they age, so it usually manages itself. If you need space right now, deleting some large files prompts macOS to clear older snapshots.
You don't usually need to hunt down local snapshots by hand; macOS reclaims that space automatically when the disk gets tight. Focus on the steps you control directly.
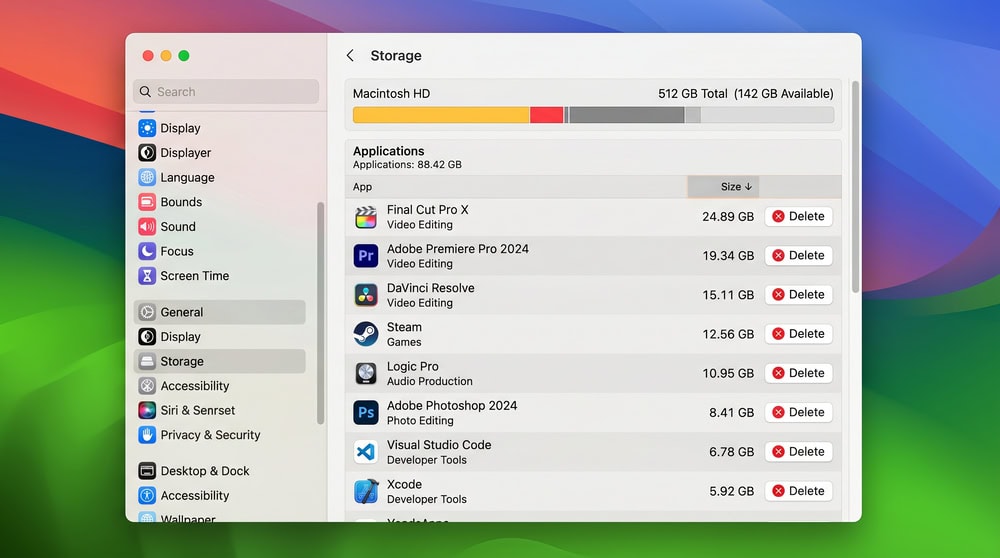
6. Uninstall apps you no longer use
Apps you installed once and forgot about quietly hold onto space. Open the Storage screen in System Settings, click the Applications category, and sort by size. Select an app and delete it, then move on to the next. A couple of large apps you never open can free up gigabytes.
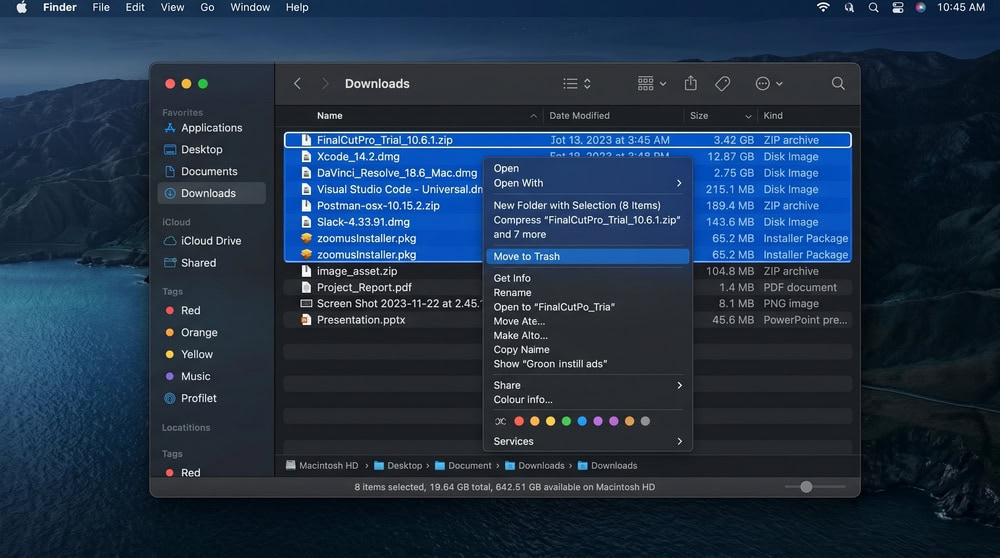
7. Clear out the Downloads folder
The Downloads folder is where installers, PDFs, zip files, and other one-time downloads pile up and never leave. Open Finder, click Downloads in the sidebar, and switch to list view to sort by size or date. Delete the disk images and installers you have already used, then empty the Trash to reclaim the space.
8. Find and delete large and duplicate files
A few very large files often account for most of a full disk. Open the Storage screen in System Settings and review large files, which lists your biggest items so you can delete them in a few clicks. You can also open Finder, press Command-F, and filter by file size to surface anything over 1 GB. Clear out duplicates while you are there, since repeated copies waste space: the Photos app has a Duplicates album that gathers repeated images so you can merge them, and sorting Finder by name and size catches duplicates elsewhere.
9. Move large media and photos to iCloud or an external drive
For large photo and video libraries you want to keep, the cleanest fix is to move them off the startup disk rather than delete them. Copy folders to an external drive and remove the local copies once the transfer is confirmed, or move full-resolution libraries into iCloud so lighter versions stay on your Mac. Our guide on how to free up disk space on your Mac covers the external-drive route.
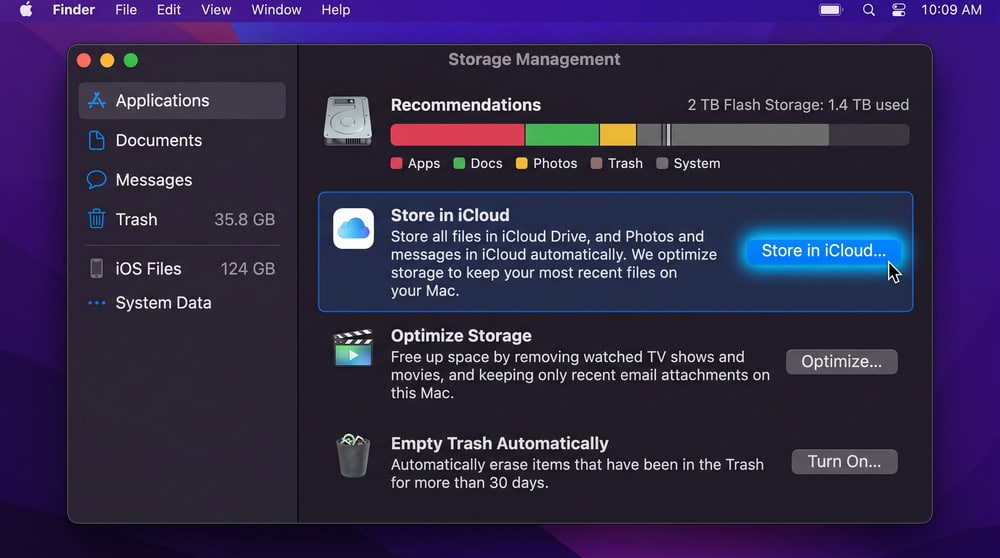
10. Use macOS Optimize Storage and built-in recommendations
The Storage screen has its own recommendations that automate much of this cleanup. Store in iCloud keeps files and full-resolution photos in the cloud while leaving lighter versions on your Mac. Optimize Storage automatically removes Apple TV movies and shows you have already watched. Empty Trash Automatically clears items that have sat in the Trash 30 days. Turn on the ones that fit how you work and macOS reclaims space in the background.
11. Compress large files
For files you want to keep but rarely open, compressing them saves space without deleting them. In Finder, select a file or folder, Control-click it, and choose Compress to create a .zip archive, then delete the original once it works.
How to Prevent the Startup Disk From Filling Up Again
A little routine maintenance keeps the warning from coming back, starting with leaving some headroom on the drive rather than filling it to the brim.
Aim to keep roughly 10 to 15 percent of your startup disk free for healthy performance. There is no official Apple figure, but staying in that range gives macOS room for swap files, caches, and updates.
Beyond that, leave the built-in recommendations on the Storage screen switched on so macOS keeps storing files in iCloud, removing watched Apple TV shows, and emptying the Trash on a schedule. Empty your Downloads folder every few weeks, delete old iPhone backups once you no longer need them, and glance at the Storage bar once a month to catch a creeping System Data figure early. For a full routine, our walkthrough on how to clean up your Mac collects these habits in one place.
Frequently Asked Questions
What is a startup disk on a Mac?
It is the drive your Mac boots from, where macOS and your files are stored, usually the built-in drive named Macintosh HD.
Why does my Mac say the startup disk is full?
The drive macOS runs from is low on free space, usually from a buildup of large media, caches, old backups, and System Data over time.
How much free space should a Mac startup disk have?
A common guideline is about 10 to 15 percent of the drive. Apple does not publish an official number, so treat it as a general target rather than a hard rule.
What is "System Data" or "Other" storage, and can I safely delete it?
It is a catch-all for caches, logs, local snapshots, and temporary files. There is no single delete button, but you can shrink it safely by clearing user caches and removing old backups rather than deleting system files.
My Mac says the disk is full but it isn't, why?
Local snapshots or large caches are often holding space macOS will reclaim on its own. Restarting and rechecking the Storage screen often shows a more accurate figure.
Will uninstalling apps free up significant space?
It can, especially for large apps like games, video editors, or virtual machines. Sort the Applications category by size and remove the heaviest apps you no longer use.
Final Thoughts
A full startup disk looks alarming, but it is one of the easier Mac problems to fix. Start with the quick, safe steps like emptying the Trash and clearing your Downloads folder, then work through the rest until the warning disappears. These 11 steps freed up around 40 GB on our test Mac, and a little monthly maintenance kept it from filling up again. Keep roughly 10 to 15 percent of the drive free, and your Mac should stay fast and warning-free.

 How To Free Up Disk Space On Your Mac
 How To Clear The Scratch Disk On A Mac
 How To Clear System Data Storage On A Mac
 What Other Storage On A Mac Is
 How To Clean Up Your Mac
 The Best Mac Cleaner Software