How To Clear The Scratch Disk
If you have received a message that your scratch disk is full, here's what you need to know to fix it.
When Photoshop is running, it uses a local drive as a scratch disk. This virtual hard drive takes advantage of the storage on your computer (HDD or SSD) to keep files that cannot fit in or are not required to be in RAM.
Photoshop's scratch disk is set to be your boot drive by default. Your boot drive may acquire temporary files from a variety of programs on your PC over time, as most of them will utilise it in some way.
This can result in errors saying that your scratch disk is full.
8 Ways To Clear Your Scratch Disk
Clear Photoshop Cache
If you wish to empty Photoshop's scratch disk, you should start by clearing the cache. Even though the cache is deleted automatically when you exit Photoshop, some items may be missed.
Here's how to clear the cache in Photoshop completely:
- Select the Edit menu.
- Click on Purge.
- Click 'Select All' to clear all caches, or select individual caches to clear (Clipboard, Video Cache, or Histories).
You can also erase system caches on Mac to make it cleaner and faster. While you're at it, you may want to use a cleaning app for Mac or a PC cleaner to quickly remove your browser cache, cookies, and other miscellaneous junk files.
Delete Photoshop Temp Files
Photoshop saves temp files as a backup in case your computer or the software crashes, but it doesn't erase them once you've finished working on a project. As a result, these useless files might linger and leave behind a lot of temp files.
Here's how to clean up Photoshop's temp files:
- Close all open projects to avoid potential data loss.
- Exit all Adobe apps.
- Use Finder to search for /tmp and open the folder.
- Delete any folder that contain the word 'Photoshop'.
- Empty your Trash to recover the hard disk space used for temp files.
Another option to free up space on a Mac is to look through your Other storage, which contains files that aren't used as frequently. Some of the data in this folder should not be removed, so read our guide on how to clear up other space on Mac first.
Clean Up Your Computer's Storage Drives
Cleaning up your computer's hard disks should always be the initial step. Users of Mac and Windows can utilize their native disk cleanup applications, such as Windows' Disk Cleanup utility. You can also utilize trusted third-party programs like CCleaner Free or Pro.
This step is listed first because it may correct problems with your computer's operating system and any background processes.
Disk cleaner software will delete browser data like your browsing history, cookies, temporary cache, recently visited URLs, and indexes. It will also automatically clear system junk like temporary files, memory dumps, logs, chkdsk file fragments, and error reporting logs.
After each session on your computer, take a few moments to run your disk cleanup tool. This will help eliminate the error that your scratch disks are full, as well as enhance the speed of your machine in general.
Additionally, please remember to minimize the number of applications running on your computer when using Adobe Photoshop.
Free Up Additional Storage Space
When you receive the 'Scratch disk full' error, it usually implies that the hard disk holding your scratch disk has run out of space.
It's possible that you'll need to free up more room. You'll need to do the following to accomplish this:
You can accomplish this by deleting temporary files from the scratch disk or moving unneeded items to another storage drive.
If you're unsure which hard disk is set as the scratch disk, follow these steps to find out:
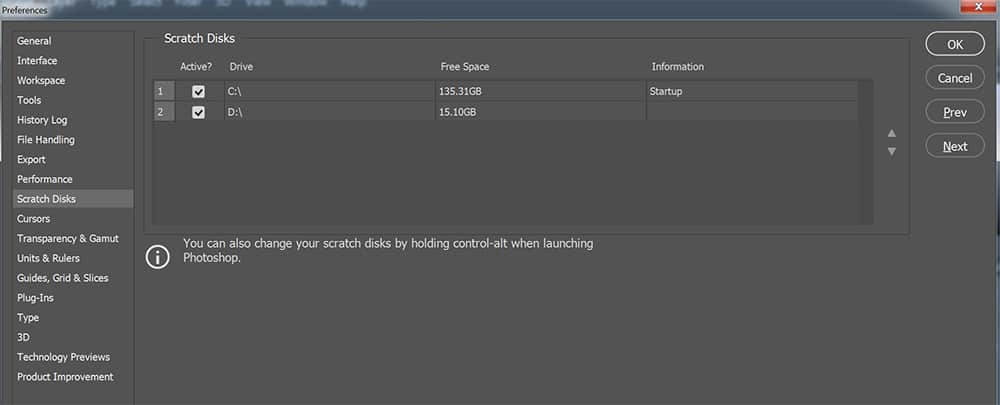
Go to Edit > Preferences > Scratch disks in Adobe Photoshop.
The scratch disk is usually found on the C: drive. Once you've found it, double-check that the storage device has more than 45 GB available. If you don't have enough disk space, you will need to delete unnecessary files until you have enough room for Photoshop to function.
Move Photoshop's Scratch Disk
Setting the scratch disk to another location is the easiest and fastest way to free up space if you need additional scratch disk space. Thought this setting is set by default, you can alter this by opening Photoshop and selecting Edit > Preferences > Scratch Disks and then setting it to use a new drive or several drives. Scratch disk space can be assigned on up to four drives.
If your primary boot disk is a SSD, you can utilize it as the scratch disk without incurring any performance cost, as long as it has sufficient free space to operate properly. However, if your primary drive is a hard drive, setting the scratch disk to a different location will result in a performance boost. As long as you're utilizing a Thunderbolt or USB 3.0 connection, even an external device can be used without hurting performance.
Go to Edit > Preferences > Scratch Disk to choose the drive Photoshop uses as the scratch disk. Then select the devices you would like to use by marking the checkboxes. Scratch space can be assigned to up to four drives. External drives with a high-speed connection are good, but if the disk wasn't attached when Photoshop launched, you'll have to restart it before it recognizes it as an option. Before the modifications to the scratch disk take effect, you'll need to restart Photoshop.
Change Photoshop Settings To Use More RAM
You can boost your temporary storage by allowing Photoshop to use more RAM. Here's how you can raise the amount of memory (RAM) it is able to allocate:
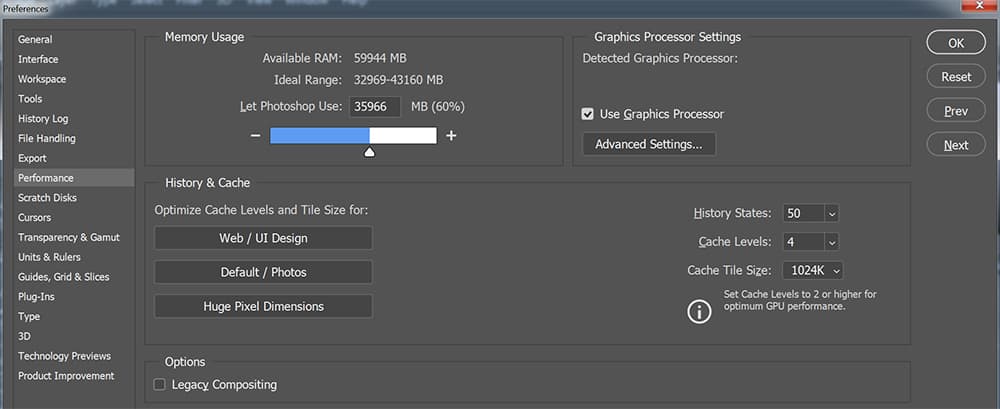
- Open Photoshop.
- Click Edit > Preferences > Performance > Memory Usage.
- Under 'Let Photoshop Use', raise the amount of ram it is allowed to use.
Photoshop defaults to a maximum of 70% RAM usage but this may not be ideal for your configuration. If your computer has plenty of memory, raising this allocation will allow Adobe Photoshop to avoid using virtual memory nearly as much.
Disable the Auto Recovery Feature in Photoshop
When using Photoshop, your project is automatically saved as you go. You will save room on the scratch drive if you disable the Auto Recovery option. However, this should only be done as a last resort as it will disable automatic saving of your work, resulting in potential data loss if there is a crash.
To disable automatic recovery, select Edit > Preferences > File Handling and de-select the box marked 'Automatically Save Recovery Information Every'.
How To Fix Photoshop Not Opening Due to "Scratch Disks Full" Error
In extreme cases, Photoshop may refuse to launch at all, instead displaying an error.
When this happens, press Ctrl + Option on Mac or Ctrl + Alt on Windows to open Photoshop. This will enable you to gain access via an override and resolve the issue.
What causes errors that a scratch disk is full?
Temporary files are the most common cause of 'Photoshop scratch disk full' issues and do not get deleted when you an app is force-quit or if Photoshop crashes. The program keeps them because it thinks you'll want to utilize them later. These files may not appear as occupied memory, which adds to the puzzle of why you're seeing the error notice.
Other explanations for the problem include a lack of space on the storage device where the scratch disk is housed, which is most common when your hard drive becomes full. Similarly, the partition may be overly large and the app may only have a restricted amount of RAM.
How Much Scratch Disk Space Do You Need?
Many photographers already have a storage problem, but it's critical to reserve adequate available space on your device for the required temp files. Photoshop automatically reserves 6 GB if your scratch disk is set to your main hard drive. It sets aside 1 GB of space on non-system disks. However, the amount you actually require differs from what is reserved, and it fluctuates significantly depending on what you're doing in the program.
Adobe estimates that you'll require 1.5 GB plus double the size of all files you may have open at the same time for smaller operations and revisions. They suggest multiplying current document sizes by the number of history states for large processes and complex updates (you can change the number of history states by heading to Edit > Preferences > Performance).
In practice, file sizes quickly accumulate, particularly when working with huge files that contain numerous layers or images. As a result, ensure you have enough available space on your hard disks.


 Best Free Computer Cleaners
 Top Alternatives To CCleaner
 Review of Avast Cleanup
 Best Driver Updaters
 Best Duplicate File Finder Software
 Advanced SystemCare Review